Sunday, 27 February 2022

Butterick 6866 - part 2, the neckline

I've only managed to complete the bodice of Butterick 6866 this week, but as it's the neckline detail which really makes this dress, I felt it was worth taking the time to get it exactly right.

Without the neckline pieces, it's a fairly plain dress

When I was planning this dress, I wasn't sure initially what to use for the two contrast tabs. I had rifled through endless remnants in the 'craft cottons' bin of my local fabric shop without finding anything suitable and then, apparently out of nowhere, one of the sales staff produced this length of a perfect ombre print - thanks Zoe!

So much to choose from

The colour ranges from a very pale beige to a deep chocolate brown, so I was spoilt for choice when it came to selecting just two shades. In the end, I cut out two of the lower tab and three of the upper, and experimented with all the possible combinations - along with two different sets of buttons.

Also so much to choose from

Unfortunately, the only conclusion I could reach from all this was that I really need to replace my workroom curtains!* So, as ever, I took the whole thing over to Mum's. Her immediate assessment was that the maximum contrast was needed, i.e. the lightest top and the darker bottom tabs.

I forgot to photograph the initial stages of constructing the right bodice front, but it involved sewing the upper tab and its backing piece together along the inner curved edge and the wider straight edge, and turning the result right side out. This was repeated with the lower tab, but with the upper tab sandwiched between the two pieces.

The completed tabs

I had cut the backing pieces from unused sections of the ombre, which meant that the colours were quite different. So I had to be careful to ensure that the backing wouldn't show at all on the front.

The wrong side - with the right side of the upper tab just visible

Then the tabs section was sewn between the bodice piece and its facing. This all involved manipulating a lot of curves, and I was grateful that I'd taken the time to work out all the notches and markings properly when I'd drafted the pattern.

A lot of curve-wrangling was involved . . .

I then had a completed right front.

. . . but it was worth it

This was attached to the back along the shoulder seam, and the seam allowance snipped at the edge of the facing (it wasn't in the instructions, but I reinforced that section of the seam). This meant that part of the seam could be pressed open, while the section with the tabs was laid to the back.

Bodice pieces sewn together

The back and left front facings were sewn together, and attached to the bodice.

Facing attached

Finally, the raw edge of the back facing was turned under, and slip-stitched over the right front tabs and facing.

Everything sewn in place

The end result looks very neat.

Bodice construction complete apart from the sleeves

I added to the complexity by deciding to sew this dress on Tilda. My treadling skills are still not entirely up to all the stopping and starting required on tight curves, so it was quite a slow process. There has also been far more tacking/basting than I usually do. But I love using that machine - there's something oddly satisfying (to me, at least) about supplying your own motive power! And, yet again, it comes down to why I sew. I'm not on piece work, and I'm not having to provide clothing and do mending for a large family on top of a whole stack of other domestic tasks. So the fact that sewing on a treadle takes longer than on an electric machine isn't an issue. If anything, it stops me from completing things quickly and moving straight on to something new. I'm not saying that my 'modern' (i.e. 1986!) machine will never be used again, just that it's nice to have options for how I sew.


* - The curtains came with the house when we moved in. Over 14 years ago now. I thought then that they would do temporarily, but I wanted to replace them. I bought fabric in 2012. It doesn't do to rush these things (although, now I come to think of it, curtains would be a perfect treadle machine project)!

Sunday, 20 February 2022

Butterick 6866 - part 1, the pattern

Given that my part of the UK was hit by two storms last week and a further one today, I'm really glad that I took the time to make those draught excluders; they work a treat! I'm sticking with the winter sewing theme, but I'm now back to dressmaking. Butterick 6866 was one of last year's UseNine choices, but I got no further than a brief stab at the pattern alterations - so brief that I never even blogged about it.

The fabric is less orange than this, but doesn't photograph well

I'm using up a remnant of brushed cotton, and making the longer-sleeved version, but with the contrasting collar tabs. I'm not convinced that same-coloured tabs would really work in a patterned fabric, although they do show up well on this plain dress in a very similar style, worn by Romola Garai in the TV series The Hour.

Straight skirt, but similar bodice detail

The first job was, as ever, pattern alterations. I shortened the bodice below the bust as usual, and made a mock-up using two left fronts. It (mostly) worked in terms of the fit, but I was worried about how the shortening would affect the position of the three points on the right front. To check, I made a mock-up of the right front as a single piece, minus the seam allowances and with the seam lines machine sewed in contrast thread, and basted it onto the existing toile.

First toile

Sure enough, the bottom point ended up a long way down the bodice. I do quite like it as a look, and may make this up in the future, but it's not what I'm after for this dress. It's not entirely apparent from the envelope illustration, but the bottom point should be just below the end of the vertical bust dart. It's clearer on the line drawing on the instruction sheet.

Bodice points relative to bust darts

There was also a second issue. Years of being hunched over either a computer keyboard at work or my sewing at home have left me with atrocious posture - among other things, my shoulders curve forwards, giving me hollows around my collarbones. This can cause collars to lie oddly and, in this case, it created wrinkles around the neckline of dress where the fabric bunched around the base of my neck. It's apparent on Nancy, who is exactly my shape and posture (she is, after all, my 'twin self').

Spot the wrinkle!

I decided that the solution (other than working on my posture, which I've started to do but is a longer-term job than this dress - I hope!) was to scoop out the neckline. This had the double advantage that it also changed the angle of the two contrast sections, and allowed me to move them up the bodice.

I redrew the left front with the new neckline curve, and made a new toile. Then I repeated the exercise of making a sepaprate right front, based on the dimensions of the original tabs and the curvier neckline.

Second toile - much better

Once I was happy that this worked, I traced the three separate pieces off the completed drawing, and added the seam allowances, notches, and tailor tack markings.

Comparing the two versions

Pattern created, it was time to cut out. I had measured the remnant and knew that it was long enough. Well, almost. Certainly within what I count as 'long enough'. Unfortunately, on closer inspection I found that the print was directional and the fabric has a very slight nap, and all the cutting layouts for the fabric width were 'without nap'.

Skirt, bodice and sleeve pieces are all placed both ways

The print is tiny, and the nap is negligible, so I could probably have got away with it. However, I am fussy about things like this, and my stubborn streak refused to give in. I checked the skirt pieces against myself, and realised that I could get way with shortening them. I can always make a faced hem in a different fabric if I find that a narrow hem doesn't hang correctly. I laid the fabric out on the floor, and prepared to do battle.

Shortening the skirt pieces meant I could fit three of the six skirt parts side by side.

Challenge accepted

By cutting everything else out from a single layer, I was able to get the whole dress cut out in the same direction, even the facings, and add a pocket bag, and leave enough for a belt.

Yes!!!!

Result! Now to sew it all together.

Sunday, 13 February 2022

Practical sewing

A new dressmaking project is on hold for a bit, while I attend to practical matters. As part of a New Year's resolution to get healthier, I have started doing online yoga classes, and a side effect of this has been the discovery that my living room is really, really cold at floor level. The cause wasn't hard to find; it turns out there is a good 1/2" gap at the bottom of the door into the kitchen, and the door into the hall isn't much better.

So, I’m making draught excluders. As with dressmaking, one big advantage of made over bought is that they can be made to measure. Another plus is that not only has this been a 'zero-buy' project, it has also used up a lot of waste fabric.

All this has now gone

Around the start of the first lockdown (March 2020, for those who have lost count), for a reason which I can't now remember, I started saving all my fabric scraps in a big bag. Possibly I was planning to make a Closet Core Patterns pouf - although given that I've already got two inherited poufs, this seems a bit unnecessary. Anyway, almost two years' worth of sewing scraps, plus any toiles which I no longer needed, went in there.

Because the door into the kitchen is a double door, I made two separate excluders so that I didn't have to move the whole thing when opening one door. (The doors open into the kitchen, and the reality is that I've quickly got used to just stepping over the excluder rather than moving it every time.) The basic excluders were made from leftover curtain lining; I made mine 8cm/3⅛" thick. The shape is shown below. I prefer the square shape to a simple tube with tapered ends, because it can be wedged in place and no draughts can sneak through the gaps at each end.

Shown without seam allowances (click to enlarge)

I folded the cut-out shape along the green diagonal line, right sides together, and sewed 'a' to 'a'. Next I sewed 'b' to 'b' and 'c' to 'c', and part way (less than halfway) along 'd' to 'd'. I repeated all this at the other end, and turned the excluder right way out through the gap in the centre of 'd'.

Then it was time to start stuffing. Because the draught excluders have corners, and because I am fussy, I decided to chop my scraps up a bit rather than just push them in. Cue an evening with wine, a favourite film on the laptop (seen here balanced on one of my poufs), and my fabric scissors.

Yes, Friday nights at Tulip Mansions really are this wild!

Once stuffed, I sewed up the openings.

The (almost) completed articles

These would be perfectly functional as they are, but I had already decided to make separate covers which can be replaced/washed as necessary. In my stash I had a length of furnishing velvet which had come in the same lot of 'mixed textiles' as my pink Viyella. Judging from the colours, it was the same era as the Viyella, as well! I actually quite liked the jaunty stripes, but couldn't imagine making anything from it - plus it was only a short piece. There was just enough to cover the three excluders (the one for the hall door isn't quite finished), with the scraps going into the bag for a future project!

The fabric actually goes with the carpet and wood

Finally, I'm aware that this blog post might not be what some readers were expecting. All last week on Instagram there was a collaboration between SewOver50 and Simplicity McCalls UK, and one of the featured sewists was - me! Specifically, me in the Holly dress, which was based on Butterick 5748. This came as a complete surprise, and I was thrilled, and very flattered (and a teensy bit embarrassed, as I'm quite a private person IRL!). But for anyone coming to my blog for more vintage dressmaking then I realise that draught excluders, even ones made from vintage fabric, may be a bit of a disappointment. Normal service will be resumed next week, but I hope that this post goes to show that being able to sew has more benefits than just making pretty dresses; fun though that undoubtedly is. I now have a warmer living room, am saving on heating, and can do my yoga without the risk of frostbite; and all it cost me was a few hours of my sewing time - result!.

Sunday, 6 February 2022

Vogue 1266 - part 4, pausing

Sometimes, you just have to accept that a project has missed the boat. We are a quarter of the way through what is often considered to be the coldest month of the year in the UK, and I am nowhere close to having a completed winter coat. I just started too late, having spent so long on my 'Holly' dress - a prioritisation which I don't regret in the slightest.

At the rate I'm going, winter will be well over by the time I’ve finished the coat. So, I decided to get it to a sensible break point and then leave it. I'm not going to ditch it altogether, I still want to complete it as part of this year’s MakeNine, but not until late autumn. (If, in mid-March, you come across press reports of unseasonable blizzard conditions in North-west England/North Wales, then you will know that I am regretting this decision!)

As expected, there has been a lot of hand sewing this week.

So much hand sewing

The seam shown in red had to be trimmed, graded, turned right side out and firmly pressed, and then understitched by hand. Because the fabric is so thick, I did this in a variation on back stitch, with a gap between the stitches (I have no idea if there is a name for this 'stitch'). Then I had to stab stitch in-the-ditch along the line shown in green, also by hand, to hold the collar in place.

The next job was the in-seam pockets. The fronts are cut from the lining fabric and the backs should be cut from the coat fabric, but I worried that this would make the pockets too bulky. So I went for a compromise approach of a strip of coat fabric at the edge where it might show, and sturdy black cotton from my stash for the rest.

Pocket back

The side seams were then sewn up, and this is as far as I have got. Everything needs a good press, especially the collar, and the side seam allowances need catching down. Then I will write up the next steps in my notebook so that I don't forget them, and put it all away for a few months.

Pausing point

I'll be back next week with a new project. I've got a couple of choices to consider, but right now I'm leaning towards a straightforward palette-cleanser!

Sunday, 30 January 2022

Vogue 1266 - part 3, aaaargh!

It's going to be a short post this week, as 'progress' on my coat has been glacial.

I'm finding this project a real challenge, and not in a good way. Add in a whole load of Life Issues taking up a lot of time, and general January bleugh-ness, and I must admit I'm not exactly a happy camper right now. So if you don't fancy reading several paragraphs of whinging, I quite understand, and I'll see you next week!

On the plus side, it was lovely to see how last week's introduction to Tilda the Treadle really struck a chord - thank you so much for sharing your own treadle experiences. Practice is making, if not exactly perfect, then at least a great improvement in my treadling skills.

This project has made me aware of what small parameters I usually work within; both in terms of the materials I use, and what I make. Yes, I do a lot of sewing, but it's usually with mid-to-lightweight fabrics which press easily. Even something like New Look 6594, for all the challenges, workarounds and Very Rude Words which went into its construction, fitted into this range. Also, I make surprisingly few things with collars which have separate pattern pieces. The last coats I made, Butterick 5716 and Simplicity 4896, both had grown-on collars.

So, whinge number one. The coat fabric is fairly resistant to being pressed, and because of the shrinkage issue, I hesitate to use too much steam. As a result, I've taken to catching down all my seam allowances to keep the insides flat.

Looks neat, but takes time

I rarely tack/baste anything, being firmly in Team Lots-of-pins-and-hope-for-the-best. But because this fabric is so thick, the top layer tends to stretch out under the machine foot, especially on long seams. So all seams are now tacked, and I find I have to use stab rather than running stitch to keep the layers together properly. Which takes more time that I'm not used to expending.

Also, the whole thing is very heavy and hard to manipulate, even though it doesn't yet have sleeves! Tilda's large work surface is a boon, but it is still tricky to keep the entire garment from sliding to the floor.

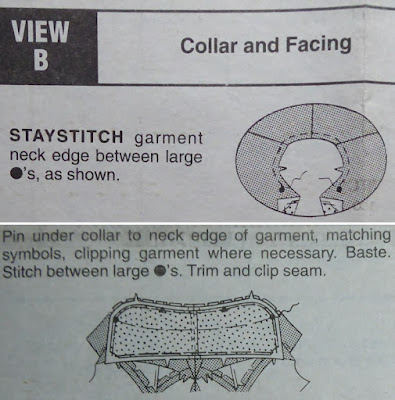
Finally (I did warn you there was a lot of whinging!) I'm just not used to tailoring methods. When collars do make an appearance in my projects, the construction tends to be: make the collar, sandwich said collar between facing and main garment, sew round from front to front, job done. With this pattern however, the back and fronts of the coat are sewn together at the shoulders, the neckline is stay-stitched, and the under collar is attached.

Instructions

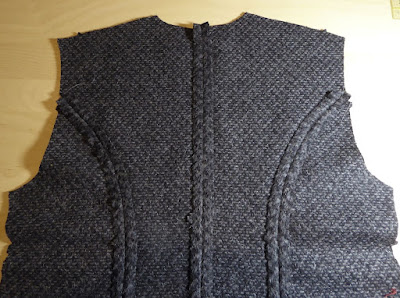
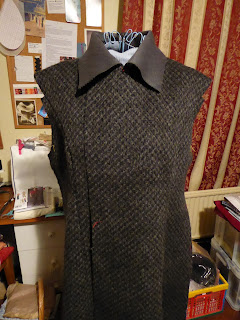
This did at least produce something which looks a bit like a coat.

Sort of

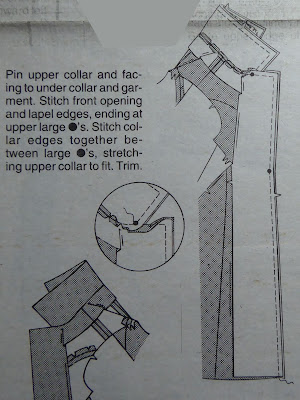
The process is repeated with the facings and the upper collar. And then, the two are sewn together in three stages - the fronts first, and then round the collar. I found it very fiddly.

More instructions

This is as far as I have got. Next comes a whole lot of pressing, trimming seam allowances, and yet more pressing, much of which is likely to have limited effect. I see a great deal of understitching in my future, and I'm not looking forward to it.

Thank you for coming to my TED Rant!

Sunday, 23 January 2022

Vogue 1266 - part 2, diversions and revelations

Following on from last week's post - the interfacing required more grappling than I was expecting.

The fabric was just labelled 'wool mix', with no indication of what was in the mix, and how much of it was wool. So, as I had decided to use fusible interfacing and I am in the 'use steam' camp, I thought that I had better check what effect said steam would have on said wool mix. I cut 15cm squares of fabric and interfacing, and fused away.

It was as well that I did so, as while the width of the square remained the same, there was a noticeable reduction in the length (along the grain of the fabric). This was a blow, as the pattern calls for the interfacing to be attached to the coat fronts rather than to the front facings, and by this time I had already cut the coat fronts out. Fortunately I hadn't yet cut out the facings, so they have had to be interfaced instead. I fused a large piece of interfacing to the remaining fabric, and cut the facings from the pre-shrunk piece.

That's a lot of potential for shrinkage

Then it was finally time to start sewing, which presented another dilemma. It's a sturdy fabric, and I really didn't want to risk putting it through my main sewing machine. My Jones dates from 1986, when machines were still mostly made of metal and fairly robust, but nonetheless, I feared for its motor.

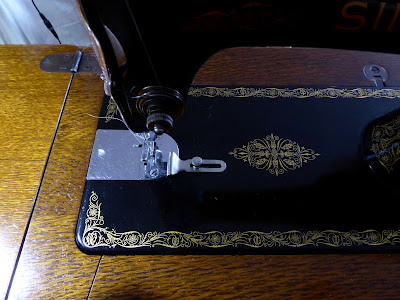
So, I turned to my treadle. I bought this at the local auction two years ago, and somehow never blogged about it. I think that I was waiting until I could sew something on it, but then of course Things Happened.

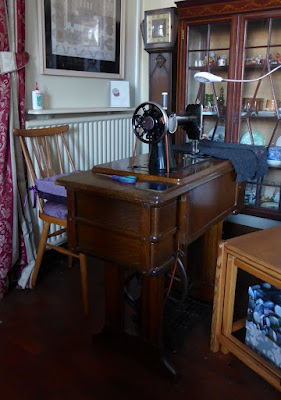
Tilda

It's a Singer 66, made in 1933. The 66 model is almost exactly the same as the more common 99, just with a longer arm. As the model numbers suggest, the 66 was made first, and then the 99 was created as a smaller 'lightweight' version (note: the term is entirely relative, and probably wouldn't get past advertising standards today!).

The machine was in very good condition, and the only thing which appeared to be wrong with it was that the treadle belt was broken. I assumed that I would be able to get a replacement belt online, and I was right - I just didn't expect to be able to buy it from the Singer website! It's a testament to the brand that clearly there are enough antique and vintage Singer machines out there and still in use for Singer to consider it worth their while to sell spare parts on their UK website.

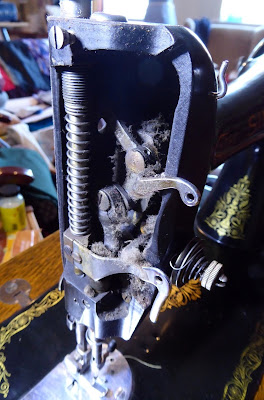
Although the machine appeared fairly clean and shiny on the outside, I got a bit of a shock when I took the endplate off. It looked as though something had nested in there - I genuinely expected a small creature to shoot out and scuttle off to a dark corner of my workroom!

Ewww!

Fluff gingerly removed with very long tweezers and new belt attached, I had a few attempts at treadling, and then stopped as other things took over. I certainly wasn't going to churn out sets of scrubs on a treadle machine! But for making a coat, it's ideal. For starters, the machine bed is flush with the rest of the table, and there's a large area to the side for resting the fabric.

Large, flat, working area

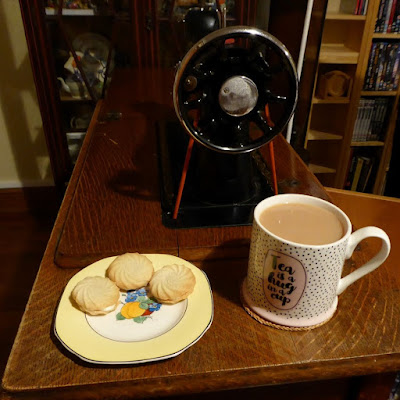
I'm always very fussy about not having drinks on my worktable in case of spillage, but Tilda's layout provides a handy but out-of-the-way place to put my mug of tea!

Perfection (biscuits for illustration only)!

On a more practical (but not more important) level, there's a lot of oomph behind that needle. It's a long time since I studied Higher physics, but I'm still vaguely aware that a large, heavy flywheel connected to a small driving wheel is going to generate a fair degree of force. Certainly, it glides through several layers of coating fabric with impressive ease.

I remember when I was a child trying, unsuccessfully, to operate my grandparents' neighbour's treadle machine. Courtesy of a few YouTube videos, I now know why I failed. I had my feet side by side, and simply wiggled my ankles. This seems the obvious method, but was never going to work. Ankle joints are fairly puny, and treadle mechanisms are heavy. What you need to do is have one foot in front of the other, and press down on each one in turn using the big muscles in your thighs. A bit like pedalling a bicycle, but up and down only. Getting the wheel, and therefore the feed dogs, to move in the right direction is still a work in progress, but I'm assured that it becomes second nature over time.

That's the treadle part, but I've also learned something really useful which applies to all of my vintage machines. None of them have the ⅛" gradations for seam allowances marked on the needle plate, so I have always had to work by eye, or put a bit of low-tack tape on the needle plate. No longer. A huge thank you to @Muchacha_Vintage for showing me how it's done, and what that mysterious bit of metal actually does.

So that's what it's for!

I love the fact that even though it's almost 50 years since Mum first sat me down in front of her Singer 99, I'm still learning something new!

Sunday, 16 January 2022

Vogue 1266 - part 1, various workarounds

I've actually begun one of my MakeNine2022 projects! On the basis of starting with what I need most right now, I'm making my winter coat.

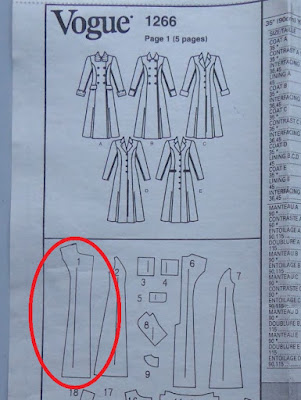
Vogue 1266, 2001*

First up, were the pattern adjustments. In the past, this would just have involved taking 5cm/2" out of the torso length above the waist, but now I also have to consider a full bust adjustment. Well, I say 'full', but the reality is that I only need to add 2.5cm/1" overall.

I've never done an FBA on a princess seamed garment, so went online, and found this tutorial. It's clear and comprehensive, but by its own admission it involves a lot of steps. So, as I was making a mere ½" change, I decided to cheat a bit. I was making a toile anyway, and worked on the basis that if it all went horribly wrong, I could try again with the correct method.

The four main coat pieces

I traced the centre and side backs (6 and 7) and the side front (2) off the originals, shortening by 2" as normal, and put back pieces aside. I had made sure to leave spare tissue to the front of piece 2, and didn't cut it out. I marked the seam line on the front edge, from the top to the waist notches. Next, I marked a point ½" out from the seam line at the apex of the bust and drew a new seam line freehand, again from the top to the waist notches. Finally, I added the seam allowance to this new line.

My bust adjustment

I measured the original and new seam lines, and calculated the difference. The new line was ⅜" longer, so I shortened the front (1) by 1⅝" instead of 2", and trued up the notches.

The toile needed to be made in something of a similar weight to the coating, so I used some old curtain fabric (wrong side out to avoid being distracted by the rather vibrant pattern). I only made one sleeve, just to check the length. It all looks a bit droopy here on Nancy but on me, with clothes underneath and shoulder pads pinned in, it fitted perfectly. I'm not sure I would recommend my method for a large bust adjustment, but if you're confident with pattern alterations and only making a small change, it worked a treat.

Completed toile

Toile done, it was time to start cutting out. My fabric is a wool mix, with a short pile. It is thick and heavy, so I decided to cut out from a single layer. Somehow, I managed to completely misread the cutting layout and only realised once I'd cut several pieces. I'm quite used to making up my own layouts, but it's normally from necessity, not stupidity! Fortunately, everything fitted into my freestyling version.

Making tailor tacks proved to be difficult, as it was impossible to make such a small stitch in a single movement and also go right through the fabric. If a pattern has tailor tack markings of different shapes (and most Vogue patterns do, including this one), I always sew them in different colours, so that I can tell them apart later on. So I put a pin of the appropriate colour through the pattern hole, lifted the tissue off, and used stab stitches to create the tailor tack around the pin.

Marking triangles (blue), large dots (red) and small dots (yellow)

I am going to cut the upper collar out of some black coating I have in my stash. As I mentioned above, the fabric has a pile. It's rather rough, and I think that having it pressing against the back of my neck, pile upwards, could quickly get uncomfortable. There are also some odd, really quite wiry, white strands in it, some of which I've removed. I'm considering making the back and sleeve facings out of the plain black as well, to avoid any other itchy bits.

Weird mystery fibres

The next step is to grapple with interfacing. Onward!

* - Well, I thought that this pattern dated from 2001, as that's the copyright date on the envelope. However, when I was checking the cutting layout (prior to totally ignoring it), I noticed that the copyright date on the instruction sheet was 1993. While writing this post I dug a bit deeper, and discovered this envelope illustration on the Vintage Pattern Wiki. Same figures, same accessories, not even a mirror image, just standing in the opposite order. I appear to be making a 'vintage' coat by accident!

1993 version - clearly a timeless design!