Showing posts with label UseNine2021. Show all posts

Sunday, 6 March 2022

Butterick 6866 - part 3, completed

I can't believe that I've not yet mentioned this little detail that I discovered when I first took the pattern pieces out. Clearly the previous owner was a smoker, albeit a careless one! The burn hole goes through two layers, so hopefully she only dropped ash on the folded tissue, not on the fabric.

Oops!

Meanwhile, back to the dress. I cheated a bit with the sleeves. The instructions are for the "new" method of gathering, rather than shrinking, the head of the completed sleeve to fit the armscye.

New! Quick! Easy!

I went with the even newer and easier method of attaching the sleeves to the bodice before sewing the sleeve and side seams. Although the sleeve uses gathering to fit, it is not a 'gathered' sleeve, the head should lie smoothly.

No gathers should be visible

For me, this would be a challenge with either a treadle or a flat-bed machine, and a recipe for disaster with both. There's much that I like about old patterns, methods and machines, but I'm not obsessive about period accuracy.

One thing I do like on old patterns is the elbow pleat detail on sleeves - it's not something you see on modern clothing or patterns. Possibly because slim, bracelet-length sleeves now only appear in stretch fabric, so there is no need for the extra ease.

My favourite sleeve style

The belt was made using my trusty furnishing-buckram-and-cotton method, and has a modern buckle. All of my suitable (by colour and size) vintage buckles had quite small holes, and the brushed cotton was going to make the belt too bulky to work with them. After all of last week's button auditions, I went for something different - dyed shell buttons which I spotted when buckle-shopping.

One thing which I just couldn't find was a suitably coloured thread for the buttonhole on the upper tab. So instead, I sewed the buttons onto the right front, and used press studs (snaps) for closure.

And here is the end result. It gaps a bit below the lowest button - when I reread the instructions, I discovered that I should have sewn the fronts together for about 2.5cm/1" above the waist. Given that, like 1940s dresses, it's already a bit of a challenge to get on and off, I think I’ll add a fourth press stud instead.

First completed project of the year

The skirt consists of three panels on the back and three on the front, with the seams aligned with the bodice darts. I really like the degree of flare; it's comfortable to sit down in, but not massively full.

#sewnshownseated

Naturally, I gave in to the temptation to #poselikethepatternmodel!

Just standing here chewing my glasses

So, a mere one fifth of the way through March 2022, that's the fourth, and last, of my UseNine2021 makes complete!

* coughs in an embarrassed manner *

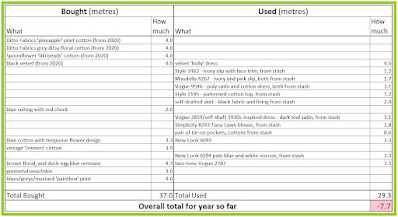
It's also the first entry in the right-hand column of the Stashometer. Joined by two new entries in the left-hand column of the Stashometer.

Second 'oops' of the evening

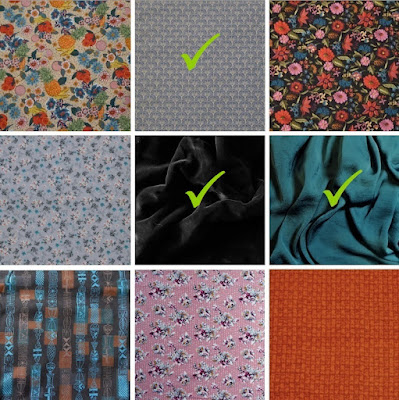
As well as true vintage and vintage-inspired fabrics, Til the Sun Goes Down also sells their own designs, based on original prints, and produced in limited quantities. So when they announced a restock of some of these fabrics, I just had to snap a few metres up while I could. Honest, guv.

This floral cotton print on a sketchy background is pure 1950s, and I have no shortage of possible patterns for it.

'Yellow', 'ivy green', and 'cactus blue' - in case you were wondering

This crepe, on the other hand, is a bit trickier. Most 1920s and early 1930s styles, which is the era of the print, do me absolutely no favours whatsoever. But I loved the design, so got some anyway. I'm sure I'll think of something.

'Saxe blue', 'sapphire', and a magnificent print

Sunday, 27 February 2022

Butterick 6866 - part 2, the neckline

I've only managed to complete the bodice of Butterick 6866 this week, but as it's the neckline detail which really makes this dress, I felt it was worth taking the time to get it exactly right.

Without the neckline pieces, it's a fairly plain dress

When I was planning this dress, I wasn't sure initially what to use for the two contrast tabs. I had rifled through endless remnants in the 'craft cottons' bin of my local fabric shop without finding anything suitable and then, apparently out of nowhere, one of the sales staff produced this length of a perfect ombre print - thanks Zoe!

So much to choose from

The colour ranges from a very pale beige to a deep chocolate brown, so I was spoilt for choice when it came to selecting just two shades. In the end, I cut out two of the lower tab and three of the upper, and experimented with all the possible combinations - along with two different sets of buttons.

Also so much to choose from

Unfortunately, the only conclusion I could reach from all this was that I really need to replace my workroom curtains!* So, as ever, I took the whole thing over to Mum's. Her immediate assessment was that the maximum contrast was needed, i.e. the lightest top and the darker bottom tabs.

I forgot to photograph the initial stages of constructing the right bodice front, but it involved sewing the upper tab and its backing piece together along the inner curved edge and the wider straight edge, and turning the result right side out. This was repeated with the lower tab, but with the upper tab sandwiched between the two pieces.

The completed tabs

I had cut the backing pieces from unused sections of the ombre, which meant that the colours were quite different. So I had to be careful to ensure that the backing wouldn't show at all on the front.

The wrong side - with the right side of the upper tab just visible

Then the tabs section was sewn between the bodice piece and its facing. This all involved manipulating a lot of curves, and I was grateful that I'd taken the time to work out all the notches and markings properly when I'd drafted the pattern.

A lot of curve-wrangling was involved . . .

I then had a completed right front.

. . . but it was worth it

This was attached to the back along the shoulder seam, and the seam allowance snipped at the edge of the facing (it wasn't in the instructions, but I reinforced that section of the seam). This meant that part of the seam could be pressed open, while the section with the tabs was laid to the back.

Bodice pieces sewn together

The back and left front facings were sewn together, and attached to the bodice.

Facing attached

Finally, the raw edge of the back facing was turned under, and slip-stitched over the right front tabs and facing.

Everything sewn in place

The end result looks very neat.

Bodice construction complete apart from the sleeves

I added to the complexity by deciding to sew this dress on Tilda. My treadling skills are still not entirely up to all the stopping and starting required on tight curves, so it was quite a slow process. There has also been far more tacking/basting than I usually do. But I love using that machine - there's something oddly satisfying (to me, at least) about supplying your own motive power! And, yet again, it comes down to why I sew. I'm not on piece work, and I'm not having to provide clothing and do mending for a large family on top of a whole stack of other domestic tasks. So the fact that sewing on a treadle takes longer than on an electric machine isn't an issue. If anything, it stops me from completing things quickly and moving straight on to something new. I'm not saying that my 'modern' (i.e. 1986!) machine will never be used again, just that it's nice to have options for how I sew.


* - The curtains came with the house when we moved in. Over 14 years ago now. I thought then that they would do temporarily, but I wanted to replace them. I bought fabric in 2012. It doesn't do to rush these things (although, now I come to think of it, curtains would be a perfect treadle machine project)!

Sunday, 20 February 2022

Butterick 6866 - part 1, the pattern

Given that my part of the UK was hit by two storms last week and a further one today, I'm really glad that I took the time to make those draught excluders; they work a treat! I'm sticking with the winter sewing theme, but I'm now back to dressmaking. Butterick 6866 was one of last year's UseNine choices, but I got no further than a brief stab at the pattern alterations - so brief that I never even blogged about it.

The fabric is less orange than this, but doesn't photograph well

I'm using up a remnant of brushed cotton, and making the longer-sleeved version, but with the contrasting collar tabs. I'm not convinced that same-coloured tabs would really work in a patterned fabric, although they do show up well on this plain dress in a very similar style, worn by Romola Garai in the TV series The Hour.

Straight skirt, but similar bodice detail

The first job was, as ever, pattern alterations. I shortened the bodice below the bust as usual, and made a mock-up using two left fronts. It (mostly) worked in terms of the fit, but I was worried about how the shortening would affect the position of the three points on the right front. To check, I made a mock-up of the right front as a single piece, minus the seam allowances and with the seam lines machine sewed in contrast thread, and basted it onto the existing toile.

First toile

Sure enough, the bottom point ended up a long way down the bodice. I do quite like it as a look, and may make this up in the future, but it's not what I'm after for this dress. It's not entirely apparent from the envelope illustration, but the bottom point should be just below the end of the vertical bust dart. It's clearer on the line drawing on the instruction sheet.

Bodice points relative to bust darts

There was also a second issue. Years of being hunched over either a computer keyboard at work or my sewing at home have left me with atrocious posture - among other things, my shoulders curve forwards, giving me hollows around my collarbones. This can cause collars to lie oddly and, in this case, it created wrinkles around the neckline of dress where the fabric bunched around the base of my neck. It's apparent on Nancy, who is exactly my shape and posture (she is, after all, my 'twin self').

Spot the wrinkle!

I decided that the solution (other than working on my posture, which I've started to do but is a longer-term job than this dress - I hope!) was to scoop out the neckline. This had the double advantage that it also changed the angle of the two contrast sections, and allowed me to move them up the bodice.

I redrew the left front with the new neckline curve, and made a new toile. Then I repeated the exercise of making a sepaprate right front, based on the dimensions of the original tabs and the curvier neckline.

Second toile - much better

Once I was happy that this worked, I traced the three separate pieces off the completed drawing, and added the seam allowances, notches, and tailor tack markings.

Comparing the two versions

Pattern created, it was time to cut out. I had measured the remnant and knew that it was long enough. Well, almost. Certainly within what I count as 'long enough'. Unfortunately, on closer inspection I found that the print was directional and the fabric has a very slight nap, and all the cutting layouts for the fabric width were 'without nap'.

Skirt, bodice and sleeve pieces are all placed both ways

The print is tiny, and the nap is negligible, so I could probably have got away with it. However, I am fussy about things like this, and my stubborn streak refused to give in. I checked the skirt pieces against myself, and realised that I could get way with shortening them. I can always make a faced hem in a different fabric if I find that a narrow hem doesn't hang correctly. I laid the fabric out on the floor, and prepared to do battle.

Shortening the skirt pieces meant I could fit three of the six skirt parts side by side.

Challenge accepted

By cutting everything else out from a single layer, I was able to get the whole dress cut out in the same direction, even the facings, and add a pocket bag, and leave enough for a belt.

Yes!!!!

Result! Now to sew it all together.

Sunday, 19 December 2021

and . . . All done!

You know what? For once I'm not going to lead into this. I'm just putting it right there, at the top of the post.

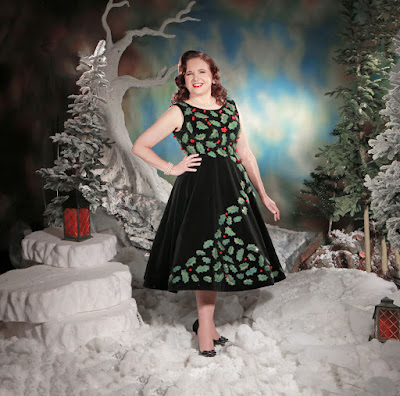
Looking ever-so-slightly different

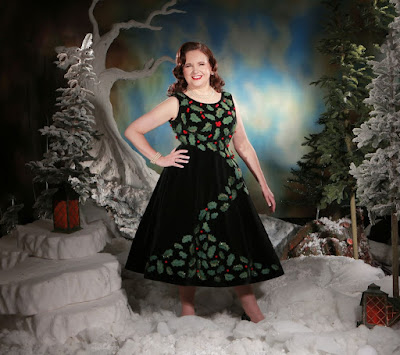
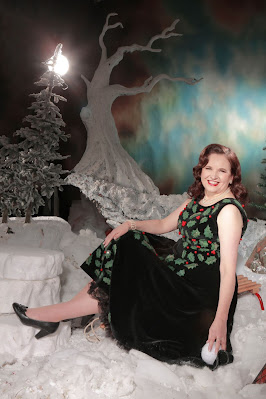
No, there hasn't been a sudden extreme snowfall in my back yard. And also no, I haven't vastly improved my hair and makeup skills in the last few weeks, either. All will be explained shortly.

I actually finished the dress in the very early hours of Monday morning (night owl tendencies right there), almost 36 hours before it was needed. Possibly some sort of record.

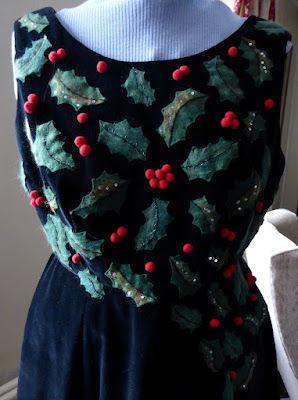
Love the glinting sequins in this shot

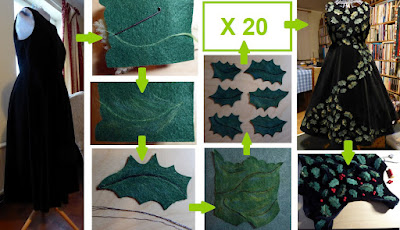
As ever, I hadn't kept a tally, but I reckon that I spent about 200 hours working on this dress in total. That's a lot of hours for one dress. But it all comes down to why I sew. As I've mentioned several times before on this blog, I don't sew because I need more clothes (although being able to create garments which fit is a huge benefit), I do it because I enjoy sewing. I enjoy creating, I enjoy the tactile qualities of working with cloth and thread and, especially over the last two very trying years, being absorbed in a sewing project does wonders for my mental health. But in order to experience these benefits without ending up with a bulging wardrobe, it's necessary for at least some of my projects to be long and labour-intensive ones.

This is where most of those 200 hours went

In some ways, having the blog makes this more difficult. Because I'm posting every week, it's hard to overcome the feeling that there needs to be a steady stream of shiny new toys to maintain interest, rather than progress reports on the same, long, project. But on the other hand, sewing does take time, and perhaps I should be reflecting that. I'd be interested to hear what readers think - let me know in the comments.

But anyway. A dress which took that long deserves a better record than my usual back-yard-or-indoors-if-wet snaps, and for this I have Ms1940McCall to thank. She regularly works with professional photographers to create stunning pictures of herself wearing her beautiful forties creations and I discovered that one of these photographers, Neil Kendall, is based in Chester.

Now much as I don't like having my photograph taken, when you're a vintage dressmaker and you discover that you live literally a ten-minute walk away from an award-winning vintage photographer well, it seems silly not to take advantage of the situation. In fact, it was Neil's announcement that he was taking booking for shoots on his 'Winter Wonderland' set, complete with hair and makeup by Bethany Jane Davies, that spurred me into finally starting on my version of the holly dress.

I woke up on the morning of the shoot thinking, "What. Have. I. Done?", but I needn't have worried. The whole thing was very relaxed. Although Neil and Bethany frequently work with professional models, they were brilliant at putting a complete novice at ease. Bethany, who has won awards for her Old Hollywood hair and makeup, gave me a look entirely in keeping with the mid-fifties provenance of the dress. While the makeup was definitely not an everyday look, I'll certainly be attempting to recreate the hair. Even a couple of days later, people were telling me they loved the style!

Neil meanwhile is a master of old school lighting to recreate that real vintage feel, and also a master at calming nerves and suggesting poses.

Going for that Picture Post look

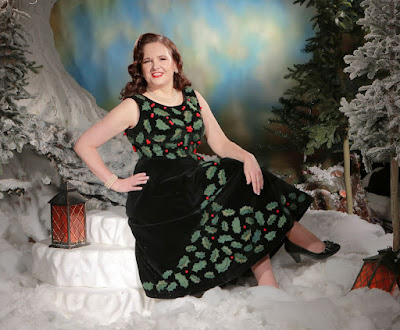
Of course, there were some seated shots as well.

#sewnshownseated

Showing the non-leafy side

It was all entirely new to me, totally out of my comfort zone, and huge fun in what has largely been a fun-free year.

Meanwhile, the practicalities. This has brought my number of #UseNine2021 makes to the miserable total of three! Family commitments have limited my sewing time this year, but that's still poor.

Ouch

I've also only managed to use one of the four fabrics I carried over from last year. The dress actually took 3.5m of the 4.5m remnant, but what's left is too marked and full of weaving faults to be much use, so I'm writing it off, stash-wise.

Sigh

But - I'm proud of what I achieved with this dress, and I'm thrilled with the pictures, too, so I'll finish with a final one.

Worth all the work

Sunday, 12 December 2021

Progress!

I'm onto the home stretch with the holly dress, and expect to finish it tomorrow. Given that it's needed for Tuesday lunchtime, by most people's standards this would represent cutting it terrifyingly fine. However, as I recently mentioned, by my standards this represents a triumph!

It's beginning to look a lot like - a holly dress

I decided to do the hem before sewing the leaves on, so that if the hem turned out to be really visible, I could hide it with leaves! Up to now, the dress has always been on either me or Nancy with petticoats underneath. But at one point it was on its own, and looked really droopy.

Cue the saddest of sad trombones

Clearly the skirt needs lots of support, so I ordered a second biiiig petticoat from Hell Bunny. The effect is alarmingly reminiscent of the dresses in the original Come Dancing, and the trail of destruction I leave when walking round my workroom in the full get-up is impressive, but it does the job. Almost.

#skirtgoals

For even more support, I decided to put crin round the hem of the dress. It's not something I've used before, and I don't know if I got it right, but this was my method. First, I marked the fold of the hem in chalk, and basted the crin in place. Because of the curve of the hem, it had to go onto the skirt, not the hem allowance, so I made as small stitches as possible on the right side.

The crin basted in place

Then, I folded the hem allowance over and pinned it to the crin, easing the excess fabric into place. (I had overlocked the raw edge of the hem when I made the dress, to stop it from shedding velvet fluff everywhere.)

Enclosed in the pinned hem

I sewed the hem allowance onto the crin along the top and bottom edges, and then sewed the hem in place, pulling out the basting as I went along. All in all, I sewed round a 3.4 metre hem four times!

The three rows of stitching are just visible

Fortunately, it all worked. The crin adds structure to the bottom of the skirt, and the hem doesn't show at all.

Then it was on to the leaves. I remembered to take Nancy's cover off, so nothing could get pinned to it, and pinned the leaves on by eye. Those on the bodice are quite widely spaced, to allow more room for berries, but on the skirt they are closer together.

The final arrangement

The 'drift' of leaves comes down from the left side of the bodice.

Showing how the leaves extend from the bodice

I used Microsoft 'Paint' to check the effect of red berries - hardly high-tech, but it worked.

The pops of red make such a difference

And then, it was lots and lots and lots more hand sewing, as I attached the leaves. I sewed down the centre vein in black, catching down the black felting wool at the ends to stop it from coming loose, and then sewed down the leaf points in green.

Finally, they were all done.

All the leaves in place

Now I am attaching the berries, which are tiny pom-poms cut from a bobble trim and sewn on individually with red thread. Once those are done, it's just a case of catching down the neck and armhole facings (and cleaning off dislodged wisps of felting wool, of which there are plenty) and I have a dress! Woot!

Berry time - the end is in sight