Sunday 27 November 2022

Caught at last

It had to happen eventually. Last week I finally tested positive for Covid, for the first time.

I've had all my jabs and boosters and they did the trick, I got off very lightly. I've had far worse colds*. I'm almost recovered now, but I've done no sewing all week - which is probably my definition of 'seriously ill'! So instead, here's a picture-heavy post about another Vogue Pattern Book. Brace yourselves, we’re heading into the 1970s!

Last week's post about my 1980s top reminded me of another batwing-sleeved pattern in my collection. I found it in a charity shop some time ago, and bought it precisely because the sleeve design was so not of its time.

Vogue 8388 - batwing sleeves, but make it seventies

I knew that it was from 1972, so looked through my collection of Pattern Books to see if I could find any photographs of it made up, and that's how I came to be browsing the Autumn 1972 issue.

Found it in here

Being early 1970s, there's lots of browns and large checks.

Lots . . .

. . . and lots

. . . and lots

The effect is indeed total - and not in a good way

Even when colours other than brown do get a look-in, large checks are still very much in evidence. For example, in this feature on fabrics.

Blue and green (and checked)

There is no escape

At least they don't appear in this drawing.

A double-page spread on Vogue 2749

This is the pattern

Or on these clothes. I have Questions about the practicality of the Galitzine design, but there's no denying it's fabulous.

Searching for the Sugar Plum Fairy in Vogue 2765

I'd make it longer but I'd wear this, Vogue 8399

Halter culotte by Galitzine, Vogue 2731

But what about Vogue 8388? It appears in a feature on "Super Sensational Shirts", along with V8401, V8424, and some truly alarming fabric choices.

I have had migraines that looked like the fabric on the right!

Vogue 8388 made up

View A - that's some collar

View C

To me, the check patterns are so bold that they completely mask the sleeve design, which seems to rather defeat the point. Especially given that it's clear from the Patterns Guide section that this is the only garment in the issue with sleeves outside the norm.

8388 is bottom right

I do have some fabric in my stash which I think might work with this pattern, and I fear that curiosity may get the better of me at some point! If I do try it, at least I've now found this handy article on tackling the sleeves.

Tips for Dolman sleeves


* - The worst thing was one day when I just could not stop coughing, and ended up with very sore ribs and an aching diaphragm. Then I remembered that I'd once tried on a corset in a costume museum when I had a really bad cough, and it had been bizarrely helpful - just enough support to stop everything from hurting. So I dug out my Laughing Moon corset and put it on over my dress, and it worked perfectly!

Just as well that I was stuck in the house, though!

Sunday 20 November 2022

An Archive of Stitches

Yesterday I went to "An Archive of Stitches - The Living Histories, Geographies, and Biographies of our Clothes" an event organised by Dr Rebecca Collins and Professor Deborah Wynne of the University of Chester as part of the Being Human festival. The purpose of the day was to explore ways of breaking through our current unsustainable relationships with garments, and celebrate the value of remaking, repurposing, and repairing clothing.

The first speaker was Holly Kirby, assistant curator at Attingham Park in Shropshire, who I had met in June when she gave a fascinating presentation on the property's costume collection. This time she spoke on "What historical fashion can teach us about sustainability". Holly first started working at Attingham as a volunteer costumed interpreter and has made various costumes for herself over time.

The first one she made was a linen dress for her role as a maid, and was all hand sewn. This gave her a keen understanding of just how long it took to make clothes in the past, and also the merits of wearing natural fibres. Although later she started using a hand crank sewing machine and moved up the social scale in her dress, she has retained the notion of making both fabrics and clothing last. For example, when the sleeve of a Regency day dress got stained, she cleverly made a set of decorative oversleeves and a matching sash to both hide the mark and remodel the dress in a newer style.

Holly then widened her talk from her own experiences and spoke about the dress of Jane Austen, Charlotte Bronte, and Lady Berwick. She also discussed the wealth of clothing care information contained in household guides of the time, to illustrate how much more clothing was valued in the past.

Holly in the costume she wore for her talk

Deborah had invited attendees to bring along items of clothing which they had owned for some time, and these formed the basis of the next part of the day, an audience discussion about clothing. I wore my Autumn Roses dress and my 
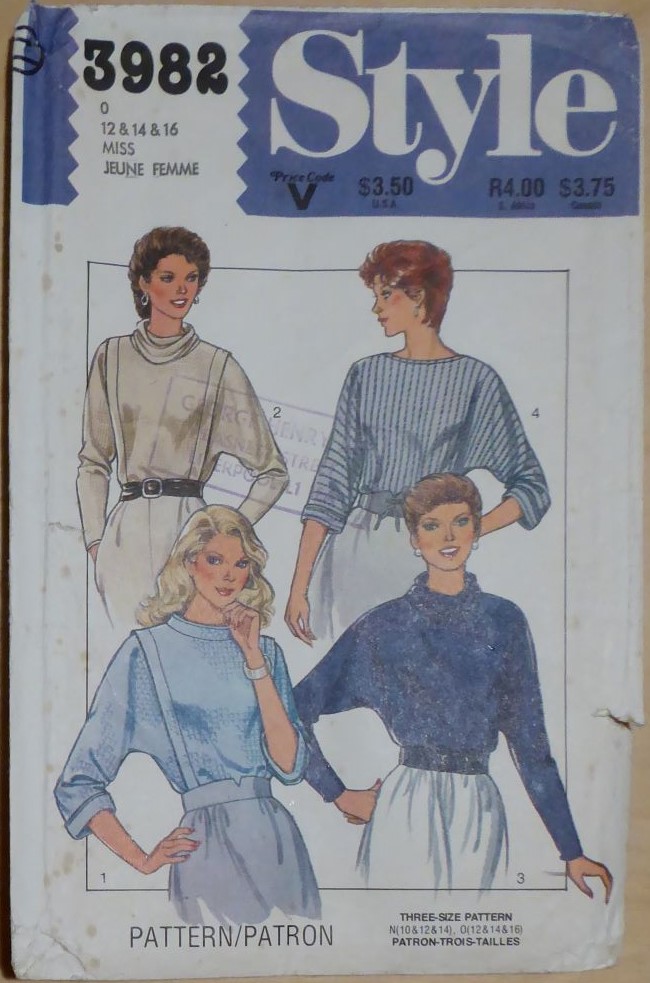
Simplicity 4896 coat as examples of my vintage dress*, and brought along the oldest me-made in my wardrobe and the pattern I used to make it.

Batwing sleeves - so 1980s!

Made in a woven check cotton, the pattern dates from 1982, and I'm fairly certain that I made around that time. Judging from the slightly iffy tension in the stitching, I suspect that it was probably made on the sewing machine we had in my hall of residence, which dates it 1982-84. (Yes, even in the early 1980s there were enough female students who sewed to warrant our having a sewing machine!)

I made view B

I suspect that the pattern survived various clear-outs because the top was still in my wardrobe, so there was a possibility that I would make it again. I should add that the fact that I can still wear it says more about the bagginess of some 1980s clothing than the svelteness of me 40 years later, and also that I have opened up the pleats a bit at the bottom to make it fit better!

The discussion was lively and interesting. Other people had also brought along items they had made and the patterns they had used, which I always love to see. Many of the attendees were, like me, able to remember a time when fixing or repurposing damaged clothing was entirely the norm until it was finally consigned to the 'rag bag', but not before buttons, buckles, and anything else of possible use had been snipped off. Because I don't have children, modern education has passed me by, so I was astonished to hear from younger audience members that they had not been taught even basic sewing in school.

This bombshell provided some context for the last part of the day. Dr Rebecca Collins is a human geographer (it's surprising how many of us get into clothing-related fields!) with an interest in everyday material culture and sustainability. She has started running pop-up repair workshops on the university campus, and hosted a workshop in the gallery where the event was held.

Earlier this week, I noticed that the strap on my umbrella was starting to fall apart. It was an easy job to fix it, but it did get me thinking. As well as having the skills, I have collected a fair array of stitching paraphernalia in the 50-ish years I've been sewing. If I need to mend something, chances are that I'll already have everything I need for the job. So it's all very well to say that we should repair our clothes, but with thread now costing almost £2 a reel, if you don't sew already then replacing a button could be a costly fix. This is where Rebecca’s workshops come in. As well as teaching repairs she provides threads, needles, darning mushrooms - everything you could need. Watching people grapple with getting just the right degree of tension required for darning, I realised just how unthinkingly I do these things, and how great it is that people like Rebecca are prepared to spend time sharing their expertise with others.

From historical dresses to darning socks, it was definitely a varied day. But it was all united in the theme of the need to recalibrate our relationship with our clothing, and how this can be achieved. I thoroughly enjoyed it.


* - I will just gloss over the fact that my 1980s top now also counts as 'vintage'. In Liverpool One, the city's alarmingly shiny new shopping centre, there is now a huge vintage store. Every time I pass it, I ponder afresh the Awful Fact that most of the merchandise seems to be from the 1990s!

Sunday 13 November 2022

Patterns of Fashion, new(ish) book!

Very little got done at Tulip Mansions yesterday. The new edition of Patterns of Fashion 2 arrived mid-morning, and much of the rest of the day was spent poring over it.

Woot!

I've posted before about Janet Arnold's Patterns of Fashion series on historical costume. You can read about volumes one to four here, and my review of volume five here. The first two volumes have been out of print for a long time, and in 2020 the publisher, Macmillan, gave the rights to The School of Historical Dress, which own Janet Arnold’s estate. Rather than just reprint the original books, the decision was taken to create new versions, to the same standards as volume five.

The new version is almost twice as long as the original, 166 pages instead of 88, and makes extensive use of colour in both the patterns and the illustrations. It is in three parts: information about dressmaking in general during the period covered; colour images; and the drawings from the original version.

Arnold's drawings of the dresses are all included, but drawn more lightly, as if in pencil rather than pen. It's not a criticism, and the details are all perfectly clear, I just wondered why. Perhaps printing techniques have improved since the book was first published in 1966.

The original (top) and the new version

In the original edition, presumably because of limitations on the number of pages, the pattern pieces overlapped a great deal. All the information was there, but had to be deciphered. The extra space in the new version means that the pattern pieces can be more widely laid out, with far fewer overlaps, and the use of different colours makes it clear which pieces are cut from which fabrics.

Pattern pieces in purple, mauve and grey

Arnold's written notes on the patterns have been replaced with printed text. I do miss the written elements, but there's no doubt that the text is easier to read. Plus, as the foreword points out, it is far easier to update for future editions if more information becomes available.

From the original, showing the overlaps and the written text

There are also some extra illustrations, such as this one showing the constructed bodice front of the Laurel Dress.

How to drape the bodice front

For me, it is the second section of the book which really brings the new edition to life. There are colour photographs of every dress featured.

Day dress in sandstone-coloured satin, 1866-67

In colour, with its vivid blue trim

It also contains images, usually fashion plates and photographs, of similar garments from the era to provide context.

Green silk dress, 1894-95

Fashion plate from the same era

Photograph of a similar dress

For anyone wanting to recreate one of the dresses, there are interior shots as well. Arnold's drawings are meticulous, but having a photograph adds extra depth to the information provided.

Bodice drawing of the green silk dress

Photograph of the same

There are also plenty of close-up shots. Again, very helpful for anyone recreating one of the dresses.

Detail images of a 1929-30 dress

The first section of the book contains the information from the original edition, but expanded and with more colour illustrations. It also shows examples of the undergarments worn with different styles of dress, vital for achieving the correct fit.

The underpinnings required for two of the dresses featured

My historical dressmaking has ground to a halt these days, partly because I barely seem to have time for my day-to-day sewing, let alone anything more complicated. But I'm hoping that this fabulous reissue of an old favourite may revive my interest. Along with others in the series, it is available through The School of Historical Dress only, it is not sold through Amazon or other retailers.

Sunday 6 November 2022

Invisible progress, and sleeve experiments

Even though I've had quite a lot of sewing time this week, anyone expecting photos showing a radically different dress is going to be very disappointed. Most of that time has been spent replacing tacked-on trim with properly sewn-on trim. It was only once I had completed the machine sewing that I remembered that the edges all had to be hand sewn down, as I did with the pockets. This was done from the wrong side, and took some time as I had to constantly check that the stitches weren't visible on the right side.

Once all the trim was on, I could finish sewing the back facing in place.

This just needs buttons and loops now

The next job was working out how to attach the 'trim' (actually 19mm / ¾" straight grain strips of the dress fabric, satin side out, with the raw edges pressed under) in a more-or-less horizontal manner round a darted sleeve head. I decided that the only way to do this would be to use a shaped piece instead.

To work out the shape, I first cut a sleeve head out of tissue paper, taped the darts closed, and pinned it to the armscye.

Tissue sleeve in place

Then, I marked roughly where the top of the trim should be.

The marks are just visible

I removed my tissue sleeve, snipped open the darts, and laid it flat.

The darts created a slightly jagged line

I traced all this onto a second piece of tissue, so that I still had the original if I needed to make any changes. By this time the markings were getting quite busy, so I drew the darts in blue to identify them. I folded the darts on version two, smoothed out the upper curve, and added a second curve 19mm below.

It looks even more odd with both lines complete

Then I taped the darts closed, and cut along the curves.

I have a pattern!

I basted the sleeves back into the dress, and pinned the tissue pattern on. I think it works reasonably well. (Apologies for the very blurry image. I couldn't take a close-up in the mirror without blocking out the light, so I had to stand some distance away and enlarge the relevant part of the photo.)

Not bad

I had made some stiffeners to go inside the sleeve heads, just pointed ovals of silk organza folded in half and overlocked.

Sleeve stiffener

I’m not sure if I will actually need them, or if the applied 'trim' shape will fill out the sleeve enough on its own. Clearly more experimentation is needed. This is what slow sewing looks like!