Sunday 29 January 2023

It's been a while . . .

Since I posted about older women and sewing. Time to recify that.

I always enjoy reading Susan Young's excellent blog, but her latest post is particularly interesting. As some readers may know, Sue is involved with SewOver50, an online group which was initially set up to challenge the invisibility of older women in the online sewing world. Four years later, the group is thriving, both online with the @SewOver 50 Instagram account and in real life with meetups, but Sue asks the question - has representation of older sewists by pattern companies actually changed in this time?

The answers are mixed. Some brands have definitely made the effort to be more age-inclusive in the images they use. Others, however, have a firmly 'youthful' aesthetic and are sticking to it - despite being happy to use the expertise of older sewists in pattern testing, their websites don't include any pictures of these aged and therefore off-brand testers wearing their creations!

Most of the comments, both on Sue's blogpost and the SewOver50 IG post are about modern Big4 and indie patterns (although The Vogue Woman patterns from the 1990s do get an honourable mention), so mean very little to me, but seen from a vintage point of view, it does seem as though things are actually getting worse.

I've posted before about half-size patterns. They were designed for the older figure: shorter, and with a lower bust point and wider waist than standard patterns. I had a few half-size patterns at the time I wrote the post, but have since acquired more. My oldest one dates from 1946, but most of them are from the 1960s and 1970s. The concept of half sizes doesn't seem to have lasted into the 1980s and, among the Big4 at least, Misses sizing now reigns supreme.

Simplicity 1749, 1946

Simplicity 4489, 1953

I assume that the sizing information section in pattern books provided an explanation of how half-sizes differed from other patterns, because there is usually no information on the pattern envelopes themselves. Butterick 9765 uses the familiar trope of grey hair with a youthful face to indicate an older wearer, but then so does Butterick 9796, which is a Misses size.

Butterick 9765 and 9796, both 1961

Simplicity's 'Slenderette' line ran for several years, and included both half-size and Miss patterns. The illustrations don't show any obvious difference in body shape.

Simplicity 3758 and 3789, both 1960

Half-size patterns may have been intended for more mature figures, but that didn't always mean more conservative styles.

Short skirts in 1968, Simplicity 7696

By 1970 Simplicity were describing half-sizes on the pattern envelope as being for shorter women. Only by comparing the standard measurements with those of a Miss pattern does the more generous waist fitting become apparent.

Simplicity 8890 and 9003, both 1970

Standard body measurements on 8890 (top) and 9003

Style seems to have taken a different approach. The earliest half-size Style pattern I have dates from 1972. (Obviously, this doesn't prove that there were no half-size patterns any earlier, but I have a number of 1950s and 1960s Style patterns, and none of them are half sizes.) Before expanding into half-sizes, Style did appear to show older women on the pattern envelopes more often than other brands. This was not achieved by drawing older faces, but instead with more mature figures.

Different ages on Style patterns

When Style did finally expand into half sizes, the older women vanished from the envelope artwork.

Style 3675, 1972

I don't have any Vogue half-size patterns, but what I have acquired since 2019 are the remaining 1975 issues of Vogue Patterns. For several issues in 1975 and early 1976 Vogue Patterns ran a feature called "The Clothes You've Always Wanted . . . In Your Size". The same design was offered as two separate patterns, one in standard sizes and one in half sizes. When I first posted about this, I didn’t have the Spring, Summer, and Early Autumn 1975 issues, but now I do. There is nothing in the Summer issue, but the other two follow the example of Early Spring issue by showing the clothes on an older model. Scandalous, I know.

Vogue Patterns, Spring 1975

The second (and final) double-page spread of the feature

Early Autumn 1975

Older women looking stylish - who knew?

And longer hair as well - shocking!

It's depressing to think that almost 50 years we are struggling to get even that level of representation of older women. But on the other hand, it's been done before (and clearly didn't drive Vogue patterns into bankruptcy!) so can be done again.

Sunday 22 January 2023

Making do

I'm in a bit of a sewing slump at present, I just don't feel like doing any stitching. This hasn't stopped me from buying the odd pattern which interests me, however.

Style 4457

I can't say that I have a pressing need to make a bedjacket, but what caught my eye was this.

Really?

If you were particularly lacking in imagination, there's this helpful illustration to help you along.

Multiple fabrics in use

The same drawing is frugally re-used in the pattern instructions.

At least this suggests day frocks could be used

It's the use of the plural, frocks, that really gets me - with the implication of having a selection of old evening dresses lying around to choose from. Especially as Style, while not one of the cheapest pattern brands, was certainly not up there with Vogue, either.

There's also the small matter of fabric. The suggested fabrics include 'quilted materials'.

Quilted fabric seems to be the preferred choice

However, unless the writer was inspired by this, that seems an unlikely choice for an evening frock.

Vogue cover, possibly 1938

The reference on the pattern envelope to the Civilian Clothing (Restrictions) Orders dates it to 1942 at the earliest, by which time coal was in short supply and a bedjacket needed to be a warm garment. The days of it being a flimsy thing in luxurious fabric for lounging around in a well-heated bedroom were long over.

The questionable value of a bedjacket made from silk satin just adds to the questions I've long had about the Make Do and Mend campaign. I have a copy of the original Board of Trade leaflet from 1943.

Laundry, repairs, re-use, and prevention

There are some useful tips but much of the information in there, such as turning sheets, was already second nature to most housewives. Long before the war, both my grandmothers always did this when sheets became thin in the centre - splitting them lengthways and sewing them back together with the sides in the middle (although I'm told that turned sheets were never used on guest beds!). Both of their husbands were in regular, secure, reasonably well-paid employment, but still the idea of getting less than the maximum use out of something was unthinkable. The fact that the leaflet feels the need to state, not once but twice, that stockings should never be ironed, suggests that women like my grandmothers were not the target audience.

A more likely audience appears in a book I've just read, House-Bound by Winifred Peck. Written in 1942 and set in Edinburgh (here called Castleburgh) in the same year, it opens with Rose, the upper-middle class wife of a city lawyer, attempting to find new domestic staff to replace the two who are about to leave for jobs in a munitions factory. With "girls streaming away from service into the Services" this proves impossible, and Rose resolves to run her home herself, despite having no housekeeping experience whatsoever.

Rose's domestic education is only part of the story, and is limited to cooking and cleaning. From a passing reference to a laundry book, I assume that she sent her washing out. However, it's not hard to imagine that a woman who wondered if soap should be used when washing potatoes would be equally clueless about whether or not to iron stockings.

Lady Peck, as she was by the time of House-Bound's publication, was from a similar background to Rose. I don't know if she shared her heroine's domestic cluelessness, but she certainly would have known many women who did. It seems to me that it was these women, suddenly having to cope without live-in staff and to make things last rather than replace them at the first sign of wear, who were the real targets of Make Do and Mend. Certainly, they were more likely to have "cast-off evening frocks" than any of the women in my family. I would love to know if anyone did actually make bedjackets from such unsuitable materials, or if suggestions like this mainly existed to normalise the idea of 'making do' among women who previously had no experience of anything like it.

Sunday 15 January 2023

A January purchase

But not by me. This red plastic box was in a suitcase of vintage patterns and assorted sewing stuff which I bought at an auction ages ago (and it made a fair contribution to the overall weight of the suitcase).

Mystery box

I looked inside, thought "Ooh, interesting", and put it on a shelf in my workroom to investigate properly later. And there it has sat, for about 4 years, until it caught my eye during a recent tidy-up, and I decided that it really was time to look at it properly.

The detail on the box lid, below the Singer logo, gives a hint of what's inside.

Can you guess?

It's an attachment for making buttonholes on a straight-stitch machine, such as my 66s and 99s (but also models such as 15, 128, 185 and 201). The box is cleverly designed to hold all the pieces securely, so there's no danger of anything getting lost.

Everything neatly in place

This (important) piece actually screws into the box

Tucked right at the bottom of the box was the receipt. I assume that of the three items bought from the Singer shop in Chester, this was the one which cost four pounds, 18 shillings and fourpence. Sadly, although the receipt clearly shows the purchase date as 20 Jan, it does not give the year.

I wonder what else they bought?

There is no year mentioned anywhere in the instructions, either. There is however a reference to the "new "Featherweight" portable", so based on this I'm guessing at a date somewhere in the 1950s. This particular buttonhole attachment doesn't seem to have been sold in the States, so there's limited information about it online.

It's a complicated beast, as is apparent from the illustration and parts list (three pages long!) in the instruction manual.

All the parts

I love the fact that if a washer snapped or a spring broke, you could simply get a replacement part from Singer, rather than have to buy a whole new attachment. Mind you, that approach to sales may go some way to explaining why Singer eventually went bust!

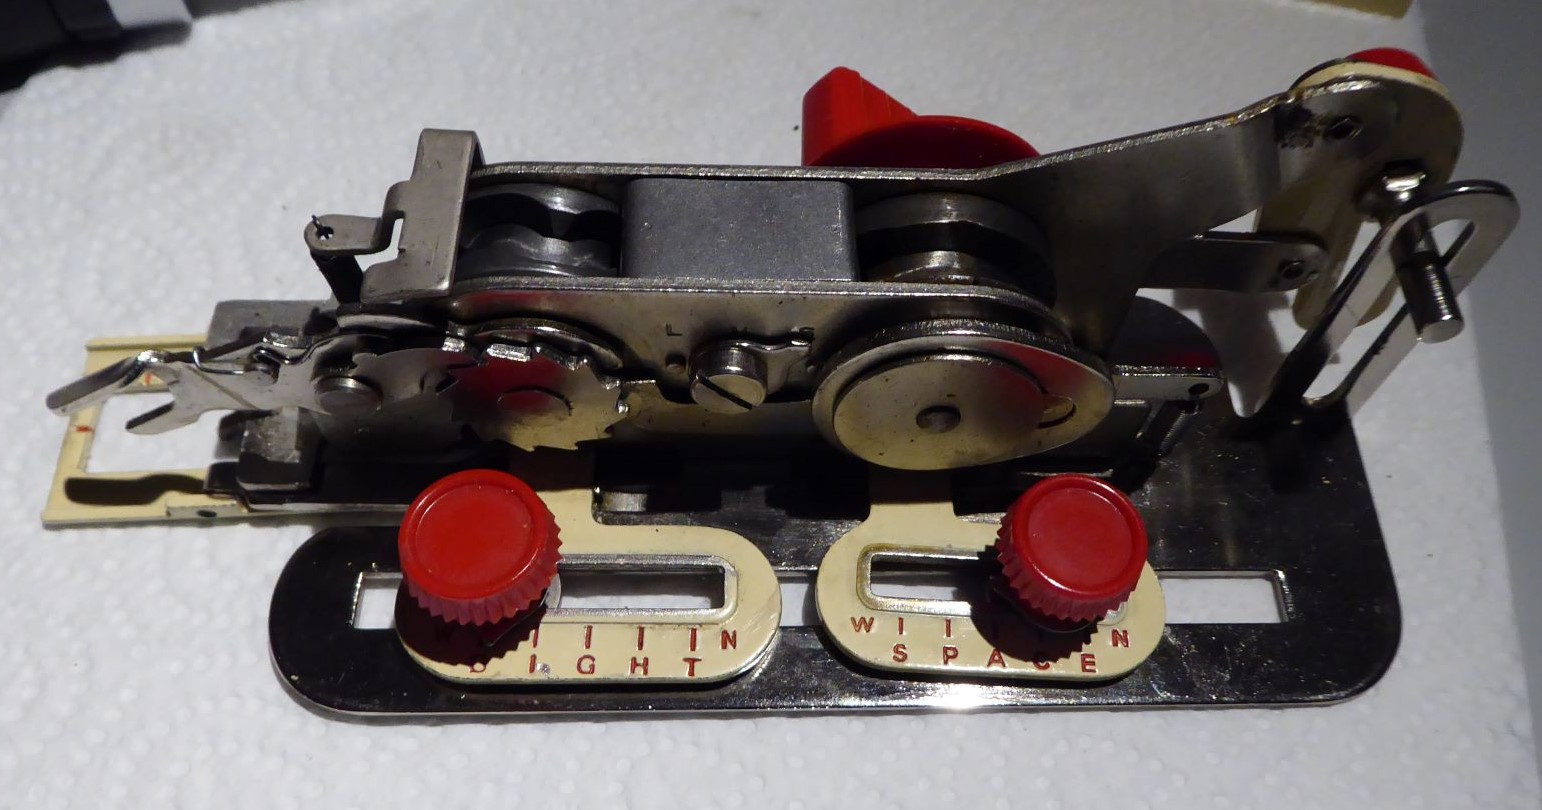
With the cover removed

The attachment works by moving the fabric from side to side between stitches, so the machine's feed dogs have to be covered with the plate, which is screwed in place using the same holes as the seam allowance marker.

Feed cover plate in place

The attachment has a fork which is positioned around the needle clamp, and the whole thing is screwed onto the presser foot bar. It's a bit of a challenge to do all this without bending the needle!

Showing how the attachment is attached

Unlike later models, which used drop-in templates to make different styles such as keyhole, this version can only make straight buttonholes. It is possible to alter the density and width of the stitches and the width of the centre gap, however. The buttonhole length can be between ⅜" and 1", and it's possible to extend it up to 1⅞" with manual intervention.

I tried doing some test buttonholes, with red thread on top and cream in the bobbin. The initial attempts were not a success.

From 'very, very bad' to 'not much better'

The underside looked even worse.

This is the underside - there may be some tension issues!

At this point I took the buttonhole attachment off, checked the tension with ordinary straight stitching, and made a few adjustments until I was entirely happy with it. Then I tried again (this time with yellow bobbin thread).

The right side

The underside - at least it's mostly yellow

It's obvious that there's still a lot of work to be done, but I think that it's mostly in improving the skills of the operator! The instruction manual for Olive, my mum's (now my) 1953 Singer 99, has the threading diagram annotated with little felt tip arrows which I added because 50 years ago I couldn't follow the instructions - now I could probably thread a 99 or a 66 in my sleep. So the fact that I can't make perfect buttonholes on my first attempt isn't too much of a worry.

I should add that I did all this on Tilda, my original 66 treadle. I thought that treadling for long enough to do a buttonhole would be exhausting, but it took far less effort than I expected, even going round it twice. The instructions stress the need to work slowly, so a treadle rather than an electric machine is probably ideal.

I've written many times on this blog about hand sewing and slow sewing, and if I only have a few buttonholes to do on a garment then I think that hand-sewn buttonholes would remain my first choice. However, I have a couple of shirtwaist patterns on my 'would like to make' list, and even I balk at the idea of that many buttonholes. So there's a good chance that machine buttonholes may be making an appearance in my wardrobe sometime.

Lots of buttonholes - Hollywood 805, from 1942

Sunday 8 January 2023

Vogue 8388 - part 2, success!

"The past is a foreign country; they do things differently there."
L.P. Hartley, The Go-Between

I found myself thinking about this quote as I worked on my last project of 2022, As was apparent in last week's round-up post, I finished my 1970s blouse before the year end. It wasn't especially difficult to make, but I did find the instructions strangely old-fashioned. I first started sewing for myself in 1978, a mere six years after this pattern was issued. Plus, as anyone who reads this blog regularly will know, I've used a lot of 1979 patterns. And yet, Vogue 8388 felt as though it had more in common with my 1940s and 1950s patterns than ones from later in the same decade.

I wonder if this is all down to interfacing. I can't remember a time when I didn't use iron-on interfacing, but this pattern assumes that the maker is using the sew-in variety, and some of the construction details may be connected to this.

For starters, the back facing is not interfaced on any view, only the front facing, cuffs, and collar for view A.

Cutting diagrams for interfacing

Instead of a separate piece, the blouse front and facing are cut as a single piece. The interfacing is then applied to the blouse part, and stay tape is added over that.

Instructions for view C

I chose to apply the interfacing to the facing section and stay-stitch the blouse edge, as I would with a modern pattern. I also interfaced the back facing and stay-stitched the blouse back.

The sleeves are attached by reinforcing the corners of the blouse front and back, snipping to the corner, and then sewing in the sleeve in a single line of stitching. The excess fabric at the corner of the sleeve is then trimmed away and the cut edges sewn together, so that the seam allowance lies flat under the sleeve.

Sleeve instructions

Because my fabric was quite fluid, I sewed small pieces of tear-away stabilizer onto the blouse when doing the reinforcing. The end result was four perfect joins with no puckers, so I was very happy.

Smooth join = happiness

The neck ruffle is long. Very long. And it took a lot of gathering. The instructions are to baste the ruffle to the blouse and then fold the facing over.

Ruffle instructions

However, because I had interfaced the facings, I sewed these together and then basted the ruffle onto the facing. Then I folded the blouse over, and stitched through all the layers. I was very glad that I had stay-stitched the section without interfacing, as that long V neck would almost certainly have stretched out of shape otherwise.

Attaching the super-gathered ruffle

For once, I found some perfect buttons. Even better, my local fabric shop was selling them off cheaply! With small gold beads set into clear resin, they add the perfect touch of seventies glam.

Buttons in all their sparkly glory

The final oddness in the instructions concerns the bottom of the blouse. Instead of a hem, it should be stitched ¼" from the edge, trimmed to ⅛", and then overcast. As the blouse is shorter below the waist than modern patterns, I just overlocked the raw edge to preserve what length there is.

When I tried the finished blouse on, I was delighted to find that my various pattern adjustments had worked, and it fits perfectly. Even better, despite the fact that it is black and frilly, two things I usually avoid, I absolutely love it! Everyone I've shown it to has loved it as well - there's just something about its sheer exuberance.

With this in mind, I decided that I needed to do it justice when I photographed it. For reference, here's the picture in the Autumn 1972 Vogue Pattern Book.

Inspiration - can I get my hair that big?

And here's my take on it.

Yes, I can!

My stash management in 2022 may have been woeful, but it was lovely to end my sewing year on a high. Onward and upward into 2023!

Sunday 1 January 2023

2022 review

Happy 2023! The start of a new year can mean only one thing in blogland, namely a review of the year just gone.

In terms of numbers, it's been a very poor year. There are just nine sewn projects to report on, and precisely none of them were in my MakeNine plans for 2022.

2022's output

I made three dresses - Butterick 6866, Style 1271, and New Look 6594. I also completed a remodel of my third version of Vogue 2787. And I managed to finish my 1970s blouse, Vogue 8388, just in time to be included in the round-up. I'll blog about it next week.

Most of my other sewing was practical. I made draft excluders (stoppers) from stash fabric and a huge bag of scraps cut up for stuffing. A stocking case for when I'm travelling has been on my to-do list for some time, and finally happened. And once I realised that my recycled plastic cable tote bag, while pretty, was of limited use as it was, I set about improving it.

On the subject of bags, I learned a lot about bagmaking (strictly speaking, made up a lot about bagmaking) in the process of creating my sunray clutch bag, and love the end result.

So little sewing, combined with multiple fabric purchases, has had a dire effect on the stashometer. This is, by a long way, the worst it's ever been. Even if I hadn't included fabrics carried over from previous years, it would be very poor. Clearly I need to stay away from fabric retailers, however tempting they may be.

The Stashometer of shame

The state of the 'used' column isn't helped by the number of PHDs (Projects Half-Done) in my workroom. I have yet to pick up work on my winter coat again, largely because I'm not happy with the collar but can't work out a way to fix it. My second version of Style 1271, made from the 1960s 'jewel' cotton I bought at the Festival of Vintage, is cut out but not started. And my 1930s Butterick dress has stalled because trying to sew black trim onto a black dress in poor winter light is a migraine waiting to happen.

Despite all this, while the number of items completed is small compared to some previous years, I'm very happy with what they represent in terms of where I'm going with my sewing. I have more than enough clothing to meet my practical needs. I sew because I love the acts of sewing and creating, and it's good for my mental health, so I have no intention of stopping. But I do want to make sure that I'm not just sewing for the sake of sewing, and most of what I’ve completed this year reflects that.

The draft excluders have proved very effective at keeping my living room cosy - particularly helpful as energy prices soar. The stocking case has become my main storage for my most worn colours of stocking. And adding a pocketed lining to my tote bag has made it vastly more useable.

Most of my dressmaking this year has involved regrading and/or fairly extensive alterations to patterns. All of which makes the process slower (good), adds to my drafting skills, and so contributes to my new goals. But the dressmaking project which I'm most proud of is remaking Vogue 2787. The dark red contrast section looks so much better than the blue which was there before, and the dress has become a firm favourite. Every time I wear it, knowing that I put in the effort to rescue it makes me happy.

I've finally come to accept my "Squirrel!" tendencies, and realise that there’s little point in setting out to make specific items in a year. So instead, I'm carrying over my goals from 2022. I really do want to complete the coat somehow, but otherwise I'm planning to concentrate on things which give me my dressmaking 'fix', but slowly.

2023 goals