
 |
| Big hair, who dis? |
What can I say? It's a bit of a different look for me!
I've finished Style 1271 - my first version, but definitely not my last. There are a few things I still want to tweak, but this was meant to be a wearable toile, and I'm pretty happy with it.
As I hinted in part one, the cuffs were a bit of a struggle. For one, the pattern piece didn't match the instructions - never a good start. The pattern only has an overlap section, which is not sewn to the sleeve, at one end. However, the instructions show overlap sections at both ends.
 |
| Cuff pattern, with overlap on the left . . . |
 |
| . . . but the instructions show overlaps at both ends |
My guess is that the pattern was changed at some point in the development process, but either the instruction sheet or the pattern piece wasn't updated.
The next issue was that whereas a modern pattern would probably have a notch to match the cuff to the sleeve and a dot to indicate where the cuff should match the sleeve seam, this pattern has the notch only. So it's entirely possible to attach the cuff the wrong way round. Which, of course, I did!
Once I had fixed that, I machined the cuff to the sleeve right sides together and slip-stitched the underside, as normal. Except that I hadn't taken into account that the cuffs are folded back, so now the stitching shows! Only a tiny amount, but enough to annoy me.
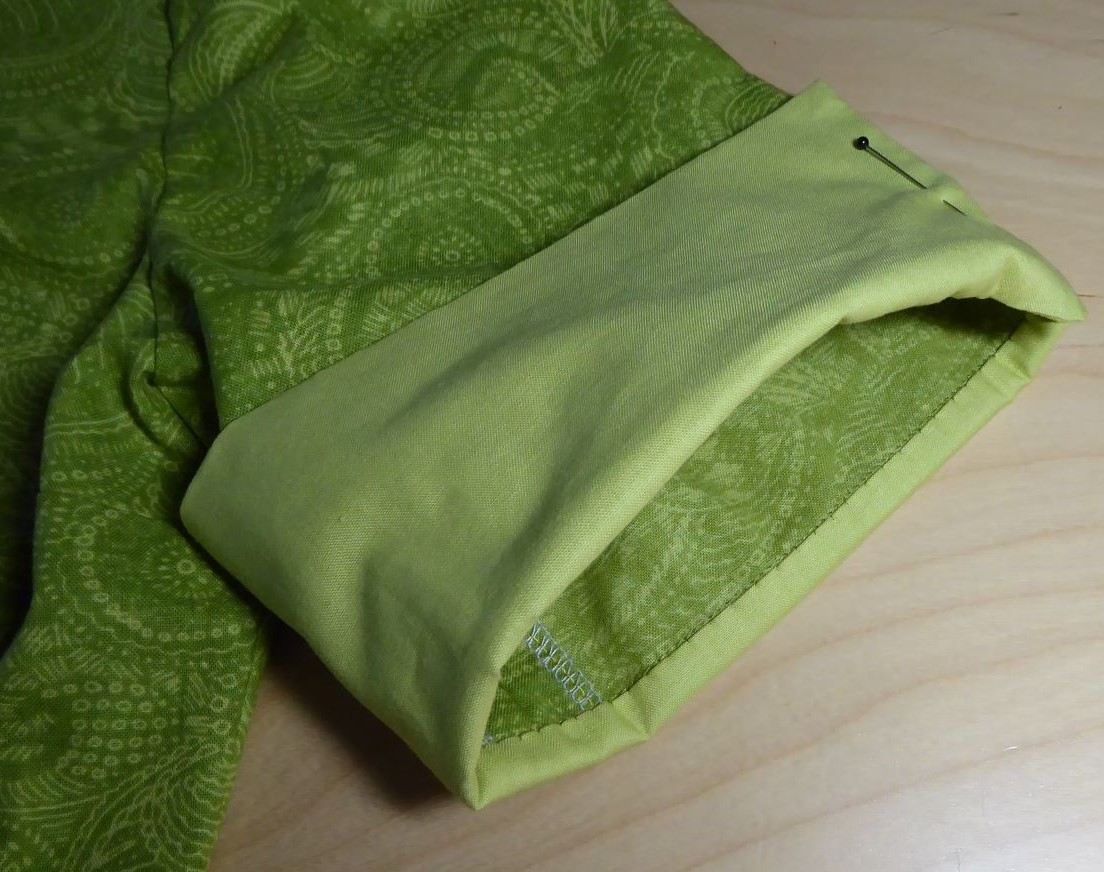 |
| Grrrr! |
All in all, the cuffs had me entirely bamboozled. Fortunately everything else was fairly plain sailing. The skirt has a back pleat with separate under panel, so just to add a bit of interest I made that from the same fabric as the cuffs. I also managed to pattern-match the centre back seam.
 |
| Contrast at the back of the pleat |
The buckle for the belt has fairly narrow slots, and I was worried that once I had attached one end of the belt to the centre section, there wouldn't be enough space for the other end to pull through. So, I only used a single layer of buckram for the section which wraps around the buckle. This made it far more pliable, and left enough room for the buckle to be usable - phew.
 |
| Narrow buckle, but it worked |
I couldn't find any buttons I liked for the cuffs (what else is new?), so instead I went through my button box for two plain, flat buttons, mismatched but the same size. I covered them in scraps of the patterned fabric wrong (domed) side out, and sewed them on round the edges of the fabric.
 |
| Cuff 'button' |
When it came to taking pictures of the finished dress, I wasn't sure what to do with my hair. Then I noticed that the lady in blue on the pattern envelope seemed to have some sort of bouffant up-do, and off I went! It came together far better than I had hoped, and was great fun. Admittedly the back didn't bear scrutiny, but for photos that didn't matter.
 |
| Posing like the pattern model |
 |
| With handbag |
 |
| And one more, because I was having so much fun! |
I even remembered to wear one of my many brooches! Plus, a fabulous pair of earrings from Loved And Loved Again, which are a perfect match.
 |
| Jewellery |
Due to the weather mostly being too hot-or-cold-or-wet to sit outside, I've never got round to putting the outdoor chairs in the yard. So for the seated shot I had to perch on the meter cupboard - oh, the glamour!
 |
| #sewnshownseated |
This is the first entirely new item that I've completed for months. For once, the Stashometer can be updated in the right direction.
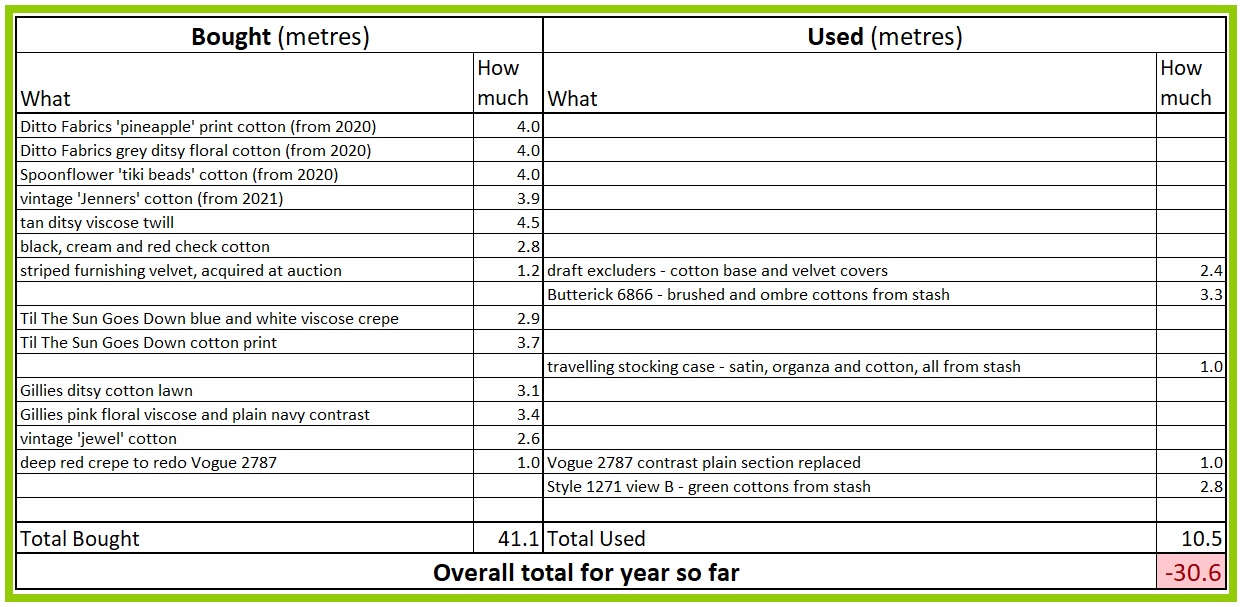 |
| Still a long way to go |
Now I just need to create a record all the pattern alterations I made, and I'm good to go with Style Print patterns.
Looks great! I really like that style (generally, but esp. on you!) The hair and shoes are perfect! Well done.
ReplyDeleteThank you! I didn't think that I liked 1960s fashions, but I realise now that it's the more 'youthquake' styles (what Linda Przybyszewski and others have described as the toddler look) that does nothing for me, and there's much in the decade to like.
Delete