Thursday 27 March 2014

Black Tulip is taking a break

Those of you who are kind enough to visit my blog regularly will know that Mr Tulip was diagnosed with Motor Neurone Disease (ALS) in autumn last year. Sadly he died this morning, very peacefully, and holding my hand.

In case anyone is wondering how I can write this now, I should explain that I've had a lot of this post prepared for some time. While the timescale was far shorter than either of us had hoped or expected, from the awful day when we got the diagnosis, the end result was never in doubt.

Pretty much the only thing that Mr Tulip asked of me was that I would keep this blog going (and by extension, would keep sewing regularly to provide material for it). Even last Saturday, when he was still very poorly from the chest infection, he was asking what I was going to write about the next day.

I promised him that I would maintain the blog, and I fully intend to do so. But first I need a break for a short time, while I come to terms with my new life.

I'll finish with a couple of photos of what was without a shadow of a doubt the happiest day of my life; our wedding in May 2004.

Elaine


Sunday 23 March 2014

The best laid plans

It's all gone a bit awry this week.

I made my rouleau straps, pinned them in place, and tried the camisole on. Sure enough, it was extremely baggy around the top, and needed to be taken in. The back fitted fine, and the side seams were in the right place, it was just the front which needed attention.

Even allowing for completing the French seams, it's very baggy indeed

Then, when I laid the top out flat on my worktable (it had gone straight from sewing machine to dressform for photographing last week, I was running so late), I discovered that the front was indeed a good 6cm / 2⅜"wider than the back, but only at the top. I undid the offending part of the seam, trimmed off the excess, sewed it up again, and completed the French seams.

And then. . .

Friday morning I was expecting to get a phone call from the hospital to say that Mr Tulip was being discharged, and please could I come and collect him. Instead I got a phone call from the hospital to say that Mr Tulip was not at all well, and please could I come and see the consultant. Overnight he had developed a severe chest infection. Most of my time since then has been spent at the hospital, including Friday night sleeping (or rather, trying to sleep) in an armchair by his bed. I'm happy, and immensely relieved, to say that he's now on the mend.

Even (or possibly, especially) at times of stress, I'm really not good at sitting doing nothing, so into the top of my hastily-packed overnight bag I threw my hand sewing. As Laurie of Teacups Among the Fabric rightly guessed last week, the mystery diamond on the pattern mock-up is a design feature, which I am making as a separate piece so that the camisole isn't marked by being in an embroidery hoop..

Decorating lingerie was clearly a big thing in the 1930s; the Good Needlework Gift Book has a whole section on the subject. I decided to have a go at cutwork with a net background, described as; "the very daintiest decoration for lingerie."

I started by machine stitching a piece of satin onto a larger piece of calico, and then cutting away the calico behind the satin.

The satin attached to the calico, right side

Calico cut away behind the satin, wrong side

So far, just the technique I'd use for embroidering on any fabric which was too delicate to be put directly into an embroidery hoop, and/or too expensive to waste. Then however, I sewed a piece of pink net onto the underside of the calico and satin piece.

Net applied and just visible, wrong side

This was then placed in an embroidery hoop.

Next, I traced the motif I wanted to use onto a piece of Stitch n Tear,and tacked this onto satin. In the book, the design is applied via an iron-on transfer.

The first stage of the embroidery is to outline each part of the motif in tiny running stitches.


Next, each part of the design is outlined in buttonhole stitch.


Finally, the fabric is cut away from some sections, leaving just the net beneath.


When I got the call from the hospital, the running stitch was complete, and I had experimented with buttonhole stitch with different thicknesses of embroidery floss. I'd reluctantly decided that although working with a single strand took longer, it gave a neater, and indeed daintier, finish.

The outlined design, and sample buttonhole stitching

One thing to bear in mind with this technique is that both the running stitch and the buttonhole stitch have to be done with a vertical, stabbing motion rather than with the needle more or less parallel to the fabric. This is because you must make sure that the net is held in place with each stitch. Easy enough if you have the embroidery frame clamped in a sitting stand like this one, rather harder if you are sitting in a hospital armchair and trying to work under a bed lamp, especially a lamp which has been angled to avoid disturbing the person in the bed!

This was the state of affairs when I got home last night.

Grrrrrr!

I looked at it this morning, and realised that I'd done the outer ring the wrong way round: the buttonhole edge should be on the inside of the circle, not the outside. Gah! This was where the Stitch n Tear came in very handy indeed; I was able to snip away the stitches without worrying about accidentally snipping the fabric. I've now completed the outer circle, correctly, and am ready to start on the flowers.

So not only is the Bodice challenge going to be very late, it's not looking good for Fairytale either!

Sunday 16 March 2014

Bodice - part one

The current Historical Sew Fortnightly challenge is Bodice. You can see the entries that other challengers have completed, on time, here and here.

This may sound strangely familiar, but I’m way behind on this challenge. I do have a good excuse this time, though. Mr Tulip is currently in hospital, having had a feeding tube fitted last week. What with sitting in the hospital for the best part of two days while our splendid but chaotic NHS trundled through pre-op admin, followed by twice-daily trips for visiting hours, I’ve not had a lot of sewing time.

The challenge is defined as:
"Make a bodice – a garment that covers the upper body. You can either abide by the strictest historical sense (see the blog post for history of bodice terminology) or can explore the idea of bodices in a more general sense."

I’ve gone for the latter definition, and am making a 1930s camisole to go under my slightly-more-translucent-than-expected entry for the Pink challenge. My inspiration is this rayon 1930s camisole from Candy Says, a UK-based online vintage shop.

Front view, with bust shaping and embroidery

Back view

Not having anything suitable to use for a pattern, I decided that as it is a fairly simple shape, I’d try to create it by draping fabric on the dressform. Because my fabric wasn’t bought locally, and I had a limited amount, I decided to wimp out and create the pieces in frost fleece first. Obviously this would have an entirely different drape to bias-cut thin satin, but my (very fuzzy) logic was that it would be a good start, and I could alter the satin version as I went along.

I started with the front but unfortunately I forgot to take any photos of the first few steps, so will have to use images of the back to illustrate the process.

As the camisole is to go under the pink top, the first thing that I did was put the top on the dressform, and mark with (large-headed, pearlescent) pins where the neckline lay. Then I marked where I wanted the upper edge of the camisole to be, with red-headed pins.

Neckline and camisole top edge marked with pins

Next I pinned on a piece of fleece, laying its straight edge along the V of the back neckline. I cut the other side of the top edge along the line of pins, cut straight down for the centre back and initially straight across for the lower edge.

The first piece pinned on

The front was done in the same way, with three small pleats pinned in place for the bust shaping. Then I marked where I wanted the bottom edge to be, in pen.

Front top, with bust shaping

The two pieces overlapped at the side, so I cut straight down through both of them to create the side seam.

Side seam

For the lower parts I repeated the process, pinning on fleece and cutting it to size. I also changed the shape of the upper back sections, to bring them in line with my inspiration piece.

Lower back piece, and realigned joining seam

Once I was happy with the shape, I unpinned everything and cut tissue pattern pieces, with seam allowances added. Then I cut out the satin, all on the bias. The lower front and back are each sigle pieces, cut on the fold.

The pleats were pinned in place. and then for both front and back the top and bottom were sewn together. I checked each completed seam against the tissue pattern, to make sure that they hadn’t stretched in sewing, then pressed the seam allowance towards the bottom and top-stitched very close to the seamline, just like the original. The side seams will be French seamed, but I only got the first part of that done before I ran out of time, so it looks rather baggy on the dressform.

Progress so far - front

I may need to take the side seams in a little at the top, but overall I’m surprised by how well a pattern draped in resolutely unstretchy fleece has translated into very floppy satin.

Progress so far - back

Next jobs are to finish the sides, hem top and bottom, and make and attach rouleau straps.

Mystery object

But what is the purpose of the mysterious white diamond pinned onto the front here? All will (hopefully) be explained next week. . . .

Sunday 9 March 2014

Glastonbury

Mr Tulip and I have been on holiday, to Glastonbury in Somerset. I was attending the wonderful Majma dance festival, which takes place there every year (this was my 12th festival!), and we stayed on for a few days after that.

The area has been inhabited since Neolithic times, and has a rich and varied history: some of it rooted in fact, some of it rather less so. There's a lot to tell, so this is quite a long post.

Easily the most prominent feature of the area is Glastonbury Tor ('tor' is an old English word referring to a high rock or a hill). At a height of 158m / 518' above sea level, it is clearly visible for miles around.

Glastonbury Tor, picture from Wikipedia Commons

The Tor consists of hard sandstone, which was left exposed when the softer ground around it was eroded. It is topped by St Michael's Tower, which is all which now remains of the 14th century church of St Michael. This church became a daughter chapel of Glastonbury Abbey, and like the abbey was demolished as part of Dissolution of the Monastries in 1539.

St Michael's Tower

The sides of the Tor are formed into seven deep terraces, and there is no definitive explanation of how these were formed. Suggestions include defensive ramparts to protect an Iron Age fort at the summit, man-made terracing in the Middle Ages to make the land easier to cultivate, a medieval 'spiral walkway' created for pilgrims to reach the church on the summit, or the remains of a three-dimensional labyrinth.

An image of the Tor, © The National Trust

These last two possibilities sum up the essence of Glastonbury. It has been a centre for Christian worship and pilgrimage for over 1300 years, but has also been associated with the 'Isle of Avalon' of Arthurian legend (a theory endorsed by the monks of the medieval abbey), Celtic mythology, and a number of other mythological and spiritual chronicles.

Below the Tor, in the centre of the town, are the remains of Glastonbury Abbey. The first stone church was built here in the 7th century, and was greatly enlarged before being destroyed by fire in the 12th century. The Abbey was rebuilt, starting with the Lady Chapel, which was constructed on the site of the very first church.

Interior of the Lady Chapel c1900, picture from Wikipedia Commons

The Lady Chapel today

North door of the Lady Chapel

During the rebuilding, the tombs of King Arthur and Queen Guinevere were allegedly discovered in the cemetery, and the bodies were reburied with great ceremony in front of the High Altar of the new abbey. Unsurprisingly, later historians have expressed scepticism about this story. Medieval monasteries were not above what we would today call 'marketing ploys' to encourage pilgrims to visit, and King Arthur's tomb would certainly be a draw!

The abbey ruins, looking west. King Arthur's tomb is marked by the black posts and chains in the centre

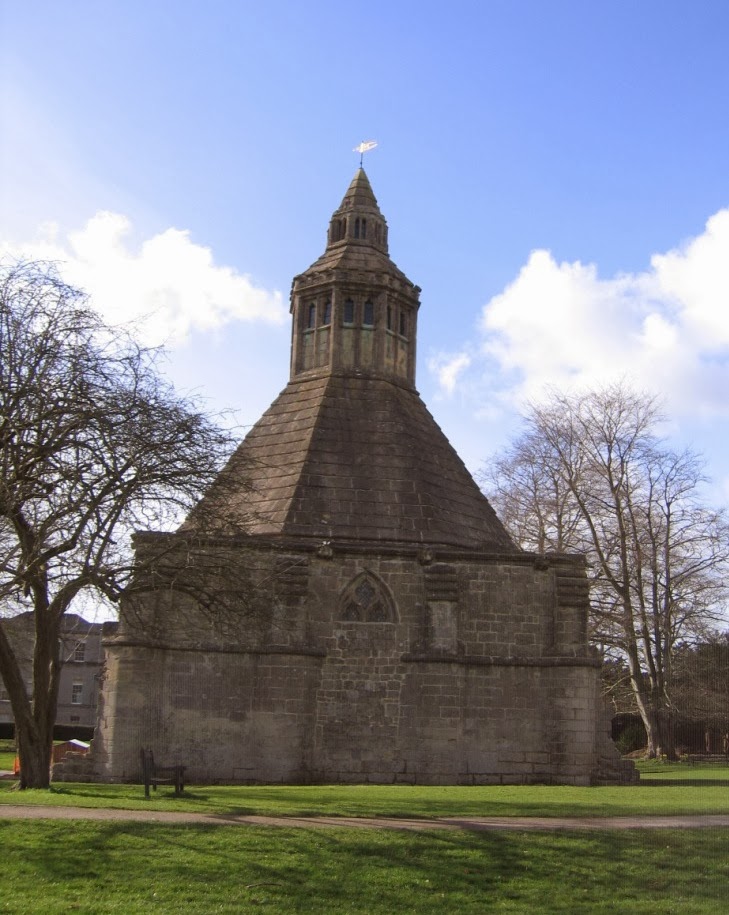
By the time of the Dissolution, Glastonbury was the second richest religious foundation in the land, second only to Westminster Abbey in London. The only building on the abbey site to remain virtually intact, the Abbot's kitchen, demonstrates just how wealthy and magnificent the abbey had become. The kitchen existed purely to prepare food for the Abbot's table, not for the rest of the monks. As it has four huge fireplaces, one in each corner, it's safe to assume that the Abbot dined well.

The Abbot's kitchen

If the kitchen shows the most privileged end of abbey life, St Patrick's Chapel shows the simplest. Built in 1512 and originally an almshouse chapel, it has recently been restored to show how a medieval chapel might have looked, with colourful wall paintings, some of the Abbey's original stained glass, and a simple altar.

East wall of St Patrick's Chapel

The abbey ruins, along with the surrounding parkland, are open to the public. The Visitor Centre contains displays about the history of the Abbey and religious life, plus a scale model of the Abbey as it would have looked before the Dissolution.

The Abbey entrance

Model of the abbey, including the gatehouse (bottom), the almshouses and St Patrick's chapel (beyond the gatehouse), the Lady Chapel (immediately in front of the two towers of the main abbey building) and the Abbot's kitchen (right)

Further evidence of the abbey's wealth can be found nearby, at the magnificent Abbey Barn. This was built in the 14th century to store the grain which the abbey received in tithes from its tenant farmers. The barn now forms part of the Somerset Rural Life Museum. This museum is largely responsible for my involvement in the Historical Sew Fortnightly, as it was here that I bought the pattern for my Glastonbury Bonnet last year.

The Abbey Barn

Barn interior

Outside both St Patrick's chapel and the Abbey Barn are Glastonbury Thorns. Often called 'The Holy Thorn', it is a type of thorn found in the Middle East, and is unusual in that it flowers twice a year; at Christmas and Easter.

Glastonbury Thorn outside St Patrick's Chapel

Legend has it that the first Thorn Tree was the staff of Joseph of Arimathea, and that when he travelled to Britain in the first century AD he came to the Isle of Avalon by boat, climbed Wearyall Hill and thrust his staff into the ground, where it took root and flowered. Sadly the Glastonbury Thorn on Wearyall Hill was cut down by vandals with a chainsaw in 2010, and a sapling grown from its remains and planted in 2012 was also destroyed last year.

The original Wearyall Hill Glastonbury Thorn, picture from Wikipedia Commons

By the way, the name "Wearyall" is from the Norse word for whale, and refers to the shape of the hill. The Wirral peninsular, near my home in Chester, takes its name from the same root.

Wearyall Hill seen from the Tor

Glastonbury became an important centre of pilgrimage (clearly the King Arthur story worked!), and pilgrims need somewhere to stay. In the 11th century a 'hospital' (then a place providing hospitality, not a place for people who are sick) for visiting pilgrims was built, with a chapel attached, not far from the entrance to the abbey. After the Dissolution there were of course no more pilgrims, and in the 16th century the single hall hospital was converted into two rows of almshouses. Stone from the now partially-demolished abbey was used for the alterations. One row of the almshouses was demolished in the 1960s, and now forms the garden of St Margaret's Chapel and Almshouses.

Chapel and almshouses, with the demolished row on the right

For pilgrims and other visitors looking for a little more comfort than a shared hall, the George and Pilgrims Inn was built on the High Street in the late 15th century, and is still a hotel today.

The George and Pilgims Inn

Further up the High Street are the Glastonbury Tribunal, a 15th century merchant's town house which now houses the museum and tourist information centre, and the church of St John's, also from the 15th century.

St John's

Glastonbury Tribunal

Between the Tor and the town lie Chalice Well Gardens. The Chalice Well is situated over a natural spring, and was the original water supply for the Abbey and the town. The water flows at the amazing rate of 25,000 gallons / 110,000 litres / 30,000 US gallons per day, at a constant temperature of 52 degrees centigrade. It has never failed, even during droughts.

The Chalice Well. The cover was made in 1919.

The name comes from the legend that Joseph of Arimathea hid the Chalice of the Last Supper beneath the waters of the spring, after which they flowed red. A more prosaic explanation is that the high levels of iron in the water are what gives it a reddish tinge! Like the hot springs in Bath, 21 miles away, the water is thought to have healing properties.

Red staining from the water

Glastonbury today has a strong 'New Age' feel to it; there are a lot (and I mean a lot) of alternative shops dotted around, with names like 'Enchantment' and 'The Psychic Piglet' (yes, honestly). But if you sit quietly for a while, on the Tor, in the abbey grounds, or in the Chalice Well Gardens, there is a sense of a place which has had its roots in faith, of whatever type, for a very long time.

Saturday 8 March 2014

Pink pics!

Well, in an attempt to record the true colour of my 1930s pink blouse, and to prove that it isn't really a glow-in-the-dark pink, I've grappled with the self-timer on the camera to take some non-flash photographs. And here they are. (Apologies for the waistband-less and very un-1930s skirt, I didn't have anything more appropriate to hand at the time.)

Front view


Back view. Clearly I need to improve my posture!
In the Great Outdoors

Sunday 2 March 2014

Layers of confusion

Although I’ve taken part in a number of the Historical Sew Fortnightly challenges so far, everything I have made has either been dance-related, or relatively recent i.e. from the 1930s onwards. I don’t have any background in sewing truly historical costumes.

What I do know however is that you can make the most beautiful, period-accurate costume imaginable, but unless it is worn over the correct underwear and support garments, it will just look wrong.

Two years ago I took part in the Bridges on the Body 1911 corset sew-along, so I have the support garment, but no underwear to go with it.

My 1911 corset

The current Historical Sew Fortnightly challenge is “Under It All”, so this seemed like a good opportunity to make a start. From what I had read I thought that the items required, although numerous, were quite straightforward. From the skin outwards: chemise, open-leg drawers, corset, corset cover, petticoat. The open-leg drawers, while sounding distinctly odd by modern standards, would have been a necessity when the waistband of your pants/drawers/undies was held firmly in place by a tightly-laced corset.

The chemise and drawers could be replaced by ‘combinations’, a single garment, and the corset cover and petticoat could be replaced by a princess line slip, but the basic idea remained the same.

Then, when I was flicking through Nancy Bradfield’s Costume in Detail, I came across an illustration of 1908 underwear with the quote, “The waist-petticoat with lace insertion, and the open-leg drawers, now at knee-level, go out of use by 1910”.

? Bother.

1908 drawers and petticoat

A later page, also 1907-08, shows a pair of side-fastening knickers, which are described as “now replacing drawers”. Given that the facing page includes an illustration of the new long-line corset which extends well down the thigh, I was more mystified than ever.

A third reference to 1908 underwear shows a highly trimmed pair of open-leg combinations with the description, “This wide, open-leg style remains in use for about 2 more years”.

1908 combinations

It all seems pretty consistent: open-leg drawers were a thing of the past by 1911.

To check this I turned to one of my purchases from Hay on Wye, a 1951 edition of The History of Underclothes by Drs C Willet and Phillis Cunnington.

Love the lace-design cover!

As well as plenty of illustrations and informative text, the later chapters at least include quotes, (often highly entertaining) from periodicals of the time. For example, among gentlemen in 1900, “the striped, coloured or piqué collar almost invariably bespeaks the bounder”.

Quite. But bounders aside, what did the Cunningtons have to say about drawers/knickers?

Adding further to the confusion, a 1911 illustration shows a chemise with loose, below-the-knee drawers worn underneath, while another 1911 illustration shows an especially long-line corset.

Chemise worn over drawers

Very long-line corset

The text states that in the period 1909-18 although the chemise, “lost favour it by no means disappeared”. Meanwhile a quote from “The Lady” magazine in 1909, “The fashion is to replace chemise and skirt-knickers by skin-fitting combinations and silk pantalettes; but it is more amusing than words can describe to observe how frequently the fashion is ignored”, suggests that not everyone was keen to abandon open-leg drawers.

More confused than ever ('skirt-knickers' was an entirely new term) I decided to look at what was actually available to buy at the time, rather than what later commentators thought that women wore.

The National Suit and Cloak Company and Sears provided clothing by mail order right across America. It seems unlikely that their catalogues would feature much in the way of unusual clothing with limited appeal; they would concentrate on what their customers wanted.

My copy of the 1909 National Suit and Cloak Company catalogue, which is an unabridged reproduction, shows a variety of undergarments for sale. There are six different chemises and three princess slips. Corset covers and waist petticoats are both available in 27 different styles, each available in multiple sizes.

Chemises and princess slips

Just some of the many corset covers

And some of the many petticoats

Of the 18 different styles of drawers available, all but one are described as being available as “open or closed”, so clearly at this time there was a demand for both styles.

Drawers

There are only three pairs of combinations available, so presumably such garments were not particularly popular. Naturally they are “open only” are described as “Combination Drawers and Corset Cover”, so were obviously intended to be worn over the corset.

Combinations

The 1909 pages of Everyday Fashions 1909 -1920 As Pictured in Sears Catalogues show only corsets, not underwear. However the two pages of underwear from the 1912 catalogue show princess slips in almost equal numbers to underskirts and corset covers. There is only a single chemise, which seems odd as a washable layer under the corset would still be required, regardless of what was worn over it. Of course, this apparent lack of choice in chemises may be due to which pages were selected for the book from the original 1912 catalogue.

The one ‘Combination Suit’ featured is described as ‘corset cover and drawers” so it must have been worn over the corset.

Princess slips, combinations, and a single chemise

Corset covers and waist petticoats

I seem to have hit upon what was a transitional period in underwear; as fashions moved from open-leg drawers worn under the corset to closed-leg drawers or narrower knickers worn over it. After all this, my best guess is that by 1911 most women wore a chemise, a corset, and then drawers and corset cover or combinations, and finally a petticoat. However if anyone out there has more information to confirm or deny this, I'd love to hear from you!