Showing posts with label New Look. Show all posts

Sunday, 31 December 2023

One last project

Talk about cutting it fine! This afternoon I finished one last item for 2023. It's another version of New Look 6070.

New Look 6070 (now out of print)

I made my first version way back in January 2015, so almost nine years ago. I hadn't worn it for a while, mostly because I didn't think it would still fit. But I tried it on, it fits, and the John Kaldor crepe still looks brand new, so it is now back in regular use.

Then I discovered in Deep Stash a bag of lengths of stretch velour from my dance costuming days. Most are long pieces, but there was a green piece which was shorter, so I decided to try making a version of the dress. Some of the creases from long storage just wouldn't budge, but I was able to cut around the worst of them.

Because I'm not used to working with stretch fabrics, I stay-stitched every edge which I thought might stretch.

I got through a lot of tacking thread in this project!

I also lined the dress, to give it a bit more stability. I had lined the original version, but was able to just sew the bodice lining to the neck facing.

My usual approach to adding linings

However because I was using velour, I dispensed with facings for this one. I ironed the interfacing onto the lining, and sewed round the edge to keep it secure. The bodice and lining necklines were cut to accommodate turn of cloth, and the velvet rolled in nicely when the two were sewn together.

Sewing fabric with a pile requires a different approach

Somehow, I made a complete hash of the zip. In several recent makes I have sewn the zip in too high up, and not had room for a hook and eye at the top. With this dress, I overcompensated. Really overcompensated.

*facepalm*

I wasn't that bothered, as this is really just a wearable toile, and a second hook and eye filled the gap perfectly.

And here is the finished dress, looking very festive.

Not bad for a last-minute project

Especially festive in this shot, where I appear to be wearing a Christmas tree on my head!

#sewnshownseated

Because both the velour and the lining came from stash, this meant that I was able to get the Stashometer down to a gain of under 20m.

It's looked worse at the end of a year

In fact, if I remove the 2022 purchases which I carried over, I actually used more fabric than I purchased! Yes it's a bit of a fix, but I'm taking it. Now to repeat the trick in 2024.

Green!

A Happy New Year to all.

Sunday, 21 August 2022

Curiosity

It's known for being a bad idea for cats, but what about dressmakers?

New Look 6594. I altered the pattern over and above my usual adjustments while I was making it, and then last week I altered the finished dress some more. I'm much happier with the sleeve position now, but moving the sleeve up the shoulder means that its hem is now far from level. And the bodice is still a bit too long. Plus, the very wonky fabric printing meant that I had to make all sorts of compromises when cutting the dress out.

In short, I wondered what the dress would look like if it were made properly.

Having another go

Redrafting the bodice to have a shorter, slightly dropped, shoulder and a shorter bodice overall was quite an exercise, especially as the pattern has no shoulder seam - the back comes over the shoulder to form a faux yoke. And the front is in two pieces. But happily, everything came together, and all the seams matched. I kept the sleeves the same length at the underarm seam, but lengthened them at the centre.

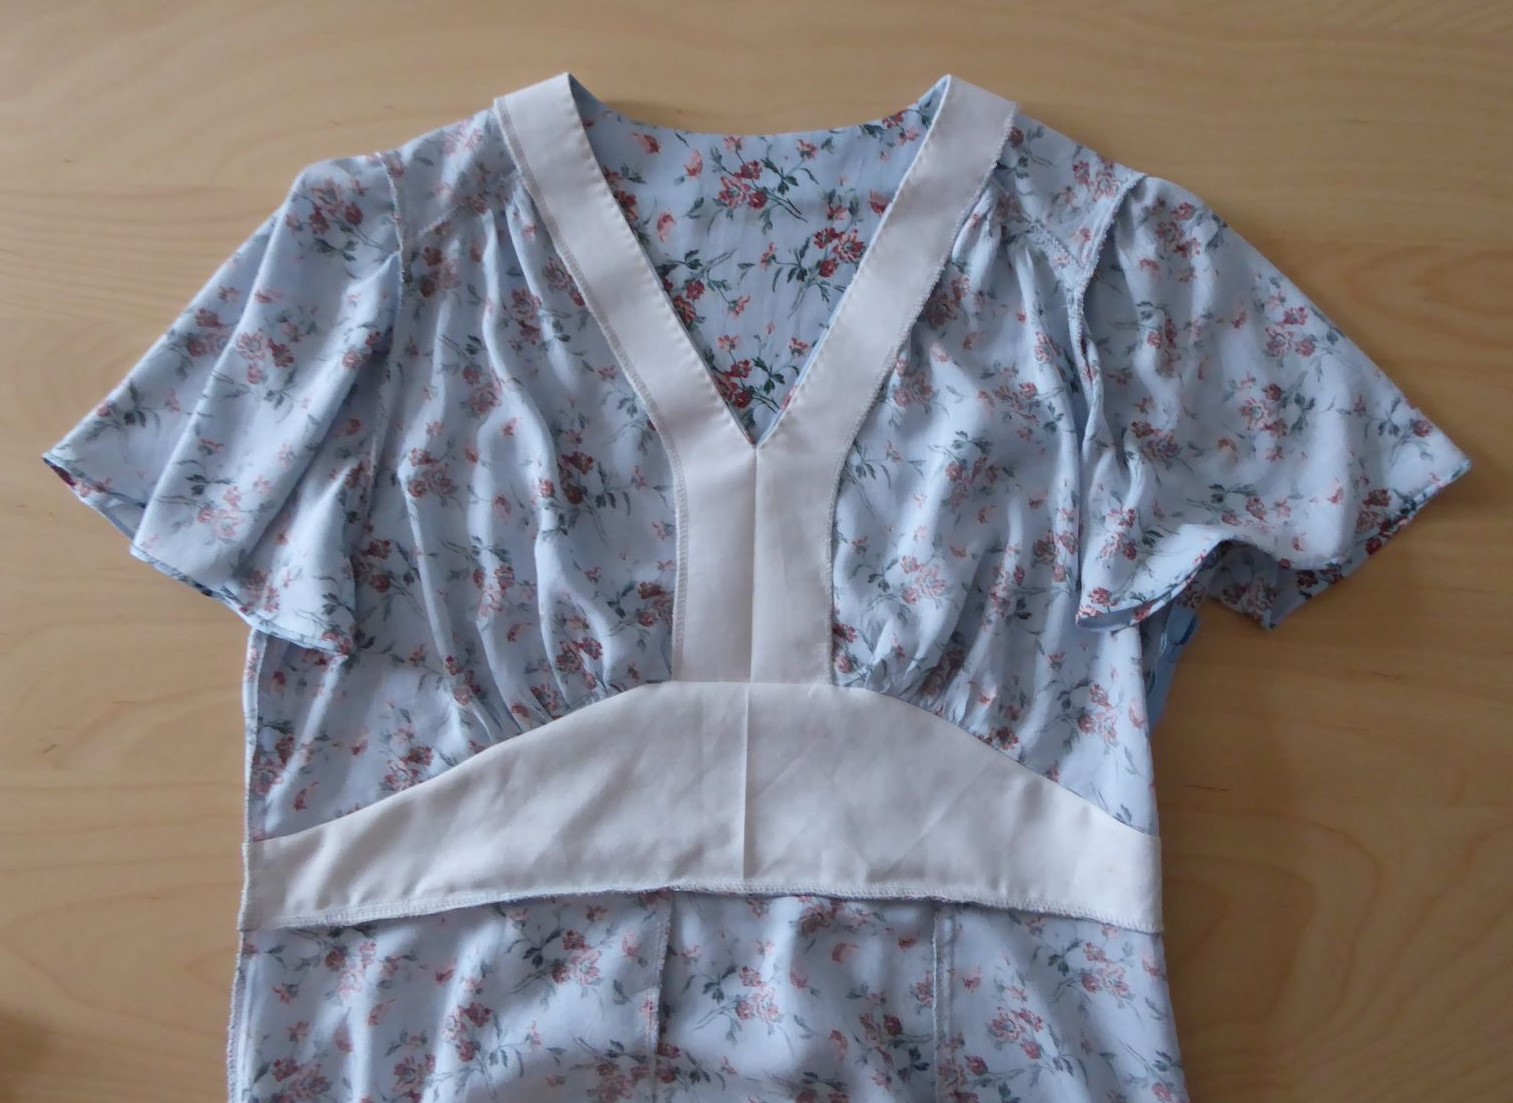
For fabric, I used a floral viscose which had been banished to the naughty bin because it was so thin that the pattern showed through anywhere where there were two layers of fabric. To get round this, I decided to use plain fabric for the facings and midriff lining. I had no plain viscose however, and all of my cottons seemed too stiff. Fortunately, I found an old toile from my dance-costume-making days, which had been made from an old and by now very soft bedsheet - re-recycling! It also had the advantage of adding a tiny bit of extra body to the midriff section.

Interior

There's not a lot to say about the construction, except that I managed to sew the skirt pleat the wrong way round, despite having the first version of the dress right next to me for reference! Sigh. I hand sewed small rolled hems on the sleeves to keep them drapey. As with the first version, I went for a length between views A and C.

Version two

Also as with the first version, I didn't sew down the front skirt pleat. The result is a skirt which doesn't bunch up when I'm sitting, but isn't hugely full, either.

#sewnshownseated

In terms of look, I see it as 'vintage adjacent'. It's a bit of a mix; the midriff section is very 1940s, while the sleeves (of this view at least) are more 1930s. The neckline is ideal for showcasing this 1930s necklace which belonged to my maternal grandmother, while the dark and light greens in the print go nicely with these shoes which I rarely get a chance to wear.

The necklace fits nicely

Showing off the shoes

I must admit though that I'm still not entirely happy with this dress. The right sleeve seems to hang slightly oddly, and the whole thing is a teensy bit baggy. Possibly a waist tie at the back might help? I see a strong possibility of more tinkering ahead! On the plus side, it has used up some more stash fabric, which is always good.

Still a long way to go - part two

Sunday, 14 August 2022

A new look from New Look?

Just a short post this week, because
a) it's hot
b) I'm not long home after a train journey which was far longer, slower, overheated and tiring than I expected, and
c) did I mention that it's really, really hot?

This week has been about lots of little sewing admin jobs. I've drafted the proper version of my alterations to Style 1271, and I've tweaked a dress which was annoying me - New Look 6594.

When I made this dress a year ago, I noticed that the shoulders were too long on me, so redrafted the armscye to shorten them by ½". But after wearing it several times recently, I came to the conclusion that the shoulders were still too long.

This is very odd. A quick glance at the Contemporary Gallery page of this blog shows just how many New Look patterns I've made up over the years. It was my go-to brand until I started vintage dressmaking in earnest, and my work wardrobe consisted almost entirely of dresses from New Look patterns. In short, I would have noticed if the shoulders were consistently too long.

I went back to comparing the line drawing of New Look 6594 to that of a tried and trusted favourite (I've made it four times!) New Look 6093. The distance from sleeve seam to centre front looked pretty similar. But whereas 6093 fits perfectly, the sleeve of 6594 is sliding off my shoulder and down my arm, even with the ½" reduction.

New Look 6594 (top) and 6093 (bottom)

I unpicked the top section of the sleeve seams, and repositioned the sleeves a further ¾" up the shoulder. The dress hangs better (although I could possibly adjust a little for shoulder slope), and I'm much happier with the way it looks.

The sleeve hangs much better now

But overall, that’s a whopping 1¼" difference from the pattern! All my other existing New Look dresses still fit fine, so it's not that my shape has changed. All of those dresses however are from patterns dated 2015 at the latest, whereas 6594 dates from 2019. Which makes me suspect that New Look have changed their sloper – the basic design from which all their patterns are derived.

It's hardly the end of the world. I rarely even look at new releases from the Big5 pattern companies these days, and if a new New Look pattern does catch my eye well, I know what alterations I need to make. But it's just a little irritating that a brand can change its product so much without warning.

Sunday, 22 December 2019

28 (and a half) years later

It's done! I have finally made a dress from the fabric I bought in May 1991!

Completed!

When it last featured on this blog, all was not well with the anemone dress. Quite simply, I didn't like it. Somehow it had a distinct 1980s/1990s bridesmaid feeling to it, which was really not the vibe I was originally going for. It has languished on the UFO pile since then, but I decided that I really wanted to get it completed before the end of the year.

When I tried it on, it still had that just-stepped-out-of-an-early-Richard-Curtis-romcom look, plus the neckline gaped oddly at the front (possibly an unintended consequence of my alterations to stop it from gaping at the back). Happily my attempts to un-bridesmaid it with accessories worked, namely wearing both of my net underskirts beneath it, and adding a belt and 1950s jewellery from Splendette. The neckline I fixed purely by accident -  I pinched the fabric together at the front, and discovered that this did the trick. I have sewn tiny pleats at the bust, something which is a feature on some of my vintage patterns, but I think I may change it to gathers to tie in with the ruching on the sleeves.

Bodice pleat detail

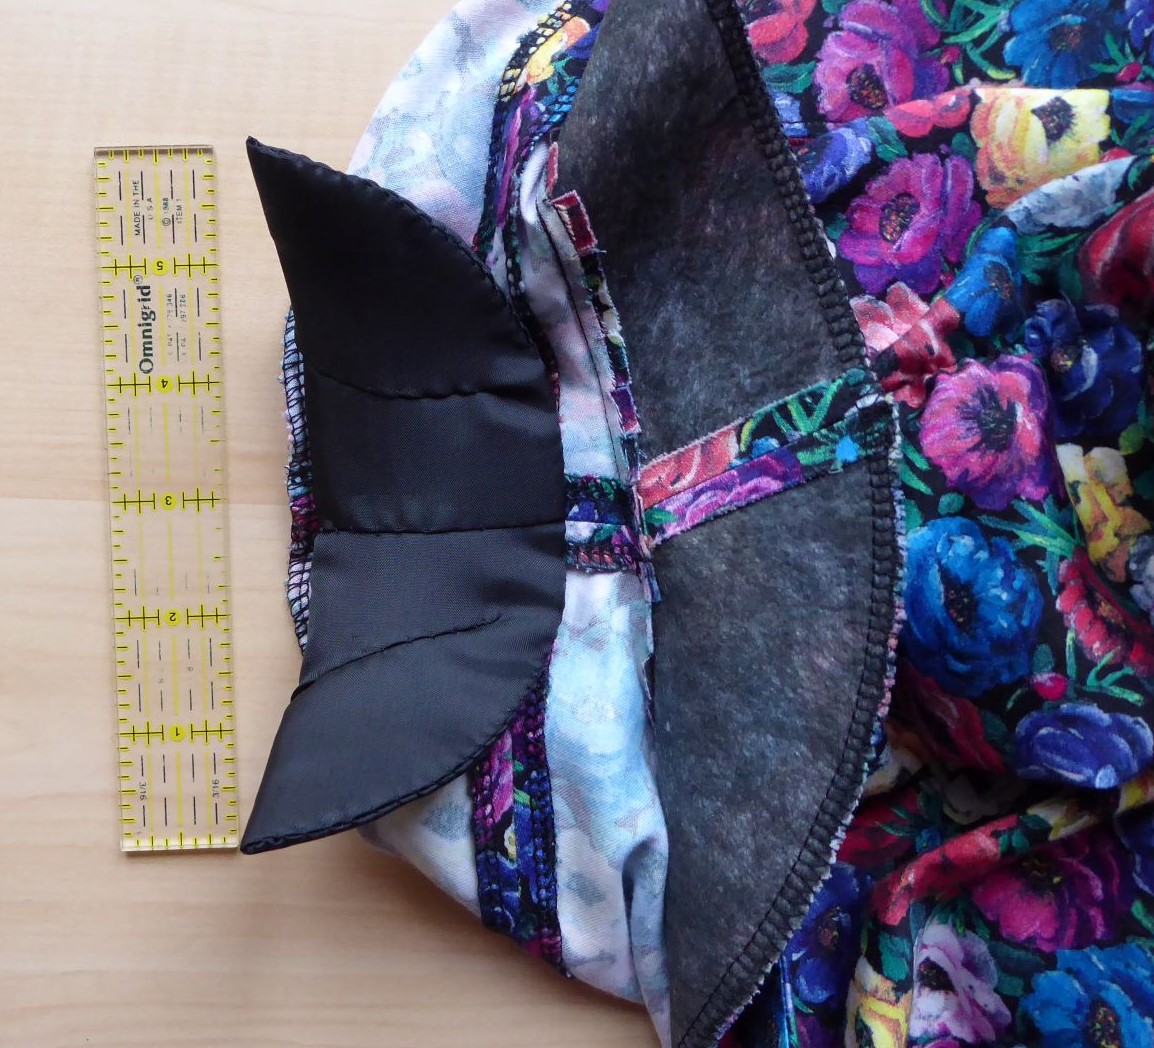
Then all I needed to do was sew in the shoulder pads (pinned in place since July) and hem the skirt. Admittedly this was quite an undertaking, as with the godets it is in effect a full circle skirt.

Demonstrating the full skirt

It does make for a very pleasantly swishy effect with the net underskirts.

Attempting to demonstrate the swishiness of the skirt

The end result is very much a 'vintage-y' dress, not of a specific era, but I'm OK with that. It's eminently wearable, and I'm just happy to have finally, successfully, used the fabric.

Mostly 1950s, with some 1940s details

I'm not really one for resolutions, but looking at these pictures I've decided that I do want to learn how to do my hair properly in 2020. My current method of putting it in randomly directional pin curls and hoping for the best leaves a lot to be desired. The wild mess you see here is actually the brushed out and vaguely styled version. On the plus side though, if I ever want to do 18th century 'hedgehog' hair, I'm sorted!

In theory, this completed dress should put the stashometer even further into credit. In theory.

However . . .

Alas, no. Fabric Was Bought during my London trip. But that's a story for another post.

Instead I'll finish with something you can just see in some of the photos above, my 'sewist' Christmas tree. When I was in London I found these cute felt tree decorations of buttons, cotton reels, scissors and a measuring tape in the V&A shop, and I just had to get some. In fact, I may make some more myself next year. Plus there was also this really sweet sewing bear with his own scissors and cotton, and a tape measure scarf, who makes a perfect 'fairy' for the top of the tree.

Merry Christmas from Black Tulip

Sunday, 1 September 2019

An August alteration

(OK, I know that it's now September, but I did finish this in August. Honest.)

Sadly, much as I like New Look 6723, it does not like me. I think that something went very wrong when I did my usual bodice-shortening alterations on the pattern, and as a result the bodice has never felt remotely comfortable to wear for more than a short time. The princess seams ended up improbably far apart, and the armscyes are way too high. Put it this way - I recently altered a shop-bought dress to fit me by taking the shoulder seams up by 1¼", and the armscyes on that are still a better fit than the ones on this dress.

Looks alright, but a nightmare to wear

Despite the fact that I only wore it a couple of times each summer, it has survived in my wardrobe because I do really like the fabric, and couldn't bear to get rid of it. I was bemoaning this state of affairs to my friend F at the start of the summer and she suggested that I should ditch the troublesome bodice and turn the rest into a skirt. This seemed like an excellent idea, but nothing actually happened until I read Juliana's Urban Simplicity posts about her Alter It August projects, and decided it was time to crack on.

I unpicked the lining (only the bodice is lined), and took out that pesky zip.Yes I could have just chopped of the top of the zip, but I had a suitable skirt-length replacement in my stash, and I couldn't bring myself to trash a perfectly good zip. Next I unpicked the bottom seam of the tie belt, and used part of it, along with some petersham, to make the waistband. Unfortunately when I attached the skirt to the bodice I had very carefully trimmed and graded the seam, and also pulled out the gathering thread, so couldn't just take the bodice off the skirt again. Instead I had to cut off most of the bodice, leaving a ½" strip attached to the skirt. However I was worried about the side and princess seams coming apart, so rather than just cutting the whole thing off and then attaching the waistband, I only cut a short section at a time. The photo below shows the tortuous process near its end.

Work in progress, with the waistband sewn in place on the right

The stitching to attach the waistband is not my neatest work by a long chalk, but for once I did remember to sew in the hanging loops as I was going along, so took that as a win. I wasn't sure what I would wear the finished skirt with, as I don't have any suitable white blouses, but then I noticed that the leaves on the trees are exactly the same colour as my Butterick 6620 top.

Chartreuse green leaves

I tried wearing the top over the skirt, but I think that I prefer it tucked in with a black belt (although preferably without my net petticoat showing at the front - annoyingly that one was by far the best of the many photographs I took!). Either way, at least I now have a wearable garment from a favourite fabric. Thanks Juliana for giving me the prompt to finally get it done!

Version 1

Version 2

Sunday, 28 July 2019

Slow going (and worse)

'Progress' on the anemone dress is achingly slow. In part this is due there being lots of other demands on my time at present, and in part because after a mere 28 years waiting to use this fabric, I really want to get it right. But on top of this, sometimes contending with my own stupidity takes up a lot of precious time.

Exhibit A on the stupidity front is the sleeves. They are taken from New Look 6093, but with the much flatter sleeve head of New Look 6299. I decided to make the elastic longer and the ruching less ruched because - well, I have no idea why I thought this was a good plan. The end result was a mess. It didn't look like a plain sleeve, and didn't look like a ruched sleeve either. So, I decided to unpick the elastic, shorten it, and sew it back in - after setting the sleeves into the dress. How hard could it be? Very hard, it turned out.

A completed sleeve

On the whole, New Look patterns fit me well once I have shortened the bodice. Occasionally though, they can gape at the back neckline. Again, it would have been sensible to check this fit detail before spending ages hand-picking the zip, but where's the fun in that? I couldn't face unpicking the zip to fix this, so instead I added an extra dart at the neckline either side of it. Fortunately I realised this mistake before I'd attached the facing.

Dart between the zip and the princess seam

The darts were added in an emergency fitting session with Mum, but we decided that even with this fix the shoulders still needed a little extra help. The shoulder seams are far too narrow to accommodate bought shoulder pads, so I had to make my own. I used the instructions in Vogue 2787 and drafted my own pattern pieces to fit the space available.

Completed shoulder pad

The one thing which I am happy with is the piecing and pattern matching in the back godets, which worked out really well. It is practically invisible.

Piecing like a pro

Join, what join?

But leaving aside the various fit and alteration issues, I have another problem with this dress. I was aiming for a vaguely vintage look, however I fear that instead it's developing a distinct 'late 1980s bridesmaid' vibe - and no-one wants that! I shall just have to plough on (slowly), and hope that I can somehow style it out.

Nooooooooooooooooo!

Sunday, 2 June 2019

The anemone dress - cut out

I've done it! I've actually taken scissors to fabric, and cut into the dress length that's been sitting in my stash for a mere 28 years.

In truth, once I'd made the decision to finally use the fabric, cutting it up wasn't that scary. After all, ruining a piece of cotton would hardly be the greatest calamity that's occurred in my life in the last few years. That said, I did do a fair bit of preparation before the dressmaking shears came out.

The design ended up as a mash-up of three New Look patterns.

Source material

Mostly it's the lengthened version of 6299 that I've made before. However I wasn't keen on either the neckline or the collar, so instead I'm using the curved neckline from view D of 6723, albeit raised a little to avoid a rerun of the Butterick 5997 problem. Rather than plain sleeves, I decided to go for the slightly ruched ones on my tried and trusted summer dress pattern 6093. (I was initially tempted just to make a new 6093 for this project, but the skirt panels are cut on the bias and quite wasteful of fabric, and after all this time I wanted to use as much of the material as possible).

Talking of which. . . When I laid out the pattern pieces for my adapted version of view D there was about half a metre of fabric left over, so I decided to try to add the godets which appear in views B and C. Because I'd lengthened the dress, the godet pieces are quite big. I could fit them in, but only if I cut one set upside down.

In theory, this wouldn't be a huge problem. Although the fabric design is one-way, it's not especially obvious.

The fabric draped in both directions

The only part which is clearly directional is the flower buds, which all point upwards.

Highlighting the buds, and the fold between the two fabric pieces
Realistically, if anyone got close enough to the skirt of my dress to notice that the tiny flower buds point in different directions then I think that my poor cutting out would be the least of my problems! But I just couldn't bring myself to overrule decades of good dressmaking practice and do it. So instead I had to work out a different layout.

This took several evenings, and was only achieved by using my pattern cutting board. It is marked into a grid of 2cm squares, so I could easily try out different layouts and see how much space they used. Because the grid shows through the tissue I could also be sure that all the pattern pieces were properly laid out along the grain. If you draft your own designs, or regularly go off-piste with commercial patterns, it's a really useful tool for working out how much fabric you'll need.

Pattern pieces laid out on the board

Try as I might, it was impossible to fit everything in, so I ended up piecing the back godets: the picture above shows where part of the pattern piece overlaps the 'fabric' edge at the bottom. However there were easily enough scraps to complete the piecing, and I even managed to match the pattern - yes, I am that obsessive! On top of that I was able to add pockets (because, pockets) and everything, even the facings, is cut in the right direction. Result!

Sunday, 3 June 2018

An entirely stash make

This wasn't what I'd planned to make next at all, and nothing to do with my pledge to make up some of my 1960s-1980s patterns, but sometimes these things happen.

Not a vintage dress!

It all started with a bit of a tidy-up in my workroom, when I found a remnant of this.

Northcott 'Artisan Spirit - Nature Studies', image from Northcott website

I'd bought it around the same time as I bought the 'Shimmer' remnant, and I'd intended to use it for another skirt. The problem was that the material is 108cm / 42½" wide, so I couldn't use the full width unless I wanted a floor-length skirt. I'd put it aside while I pondered what to do, and then forgot all about it.

Finding it again, it still seemed a shame to waste any of the fabric. I thought about making a dress from it instead, but it would need to be something straight and plain.

Enter New Look 6643, one of my go-to patterns. I've used it several times, my favourite being the peacock dress. View A seemed the ideal style for what I had in mind, and fitted the width perfectly. I cut the two back pieces from a single layer of fabric, to get the position of the motifs right and the horizontal pattern elements matching with the front.

Pattern also from the stash

I really like the shape of the neckline and armholes on this pattern.

The armhole shape gives the look of a small sleeve

The neck facing was made from a piece of stashed blue cotton, and I already had suitable bias binding for the armholes and (for once) a zip of the right length and colour. I even had matching thread!

The one problem with the peacock dress is that the front neckline gapes very slightly. Taking inspiration from Simplicity 4463, I added a small front opening, which had the effect of using up part of the neckline width in seam allowance. It didn't need to be functional, so I just sewed the buttons to both sides of the opening.

I was especially pleased with the buttons; they were the spares from a Monsoon jacket which I had years ago. The jacket is long gone, but the buttons were still in my button box - the large one was for the front, and the small one must have been for the cuff. They were the perfect colour, and a nice textural contrast.

Buttons and false opening

The fabric worked perfectly with the shape of the dress. The dark section gives a belt effect at the waist, and the strong vertical elements of the flowers in the skirt balance the horizontal stripes - as you can see when I finally remembered to take a picture without my hands in the way.

Showing the full dress

I'm so glad that I didn't press on and make the skirt, this has been a far better use of the fabric. Yay for procrastination!

Sunday, 9 July 2017

Giving up on green?

Sometimes you just have to admit defeat. After a cooling-off period in the back of the wardrobe I took a fresh look at Simplicity 1587, aka the Dress of Extreme Frumpiness. Sadly the dress-improving fairy had not paid a visit in the meantime. I rarely regard something as beyond saving, but in this case . . .

Then we actually had some hot weather, so I decided to wear the Blackbird Dress (New Look 6723). And discovered something which I somehow hadn't noticed last year - namely that the bodice centre front is weirdly wide, so the princess seams are nowhere close to where they should be, and the fit is just generally off.

This left me a) with a lack of green dresses in my wardrobe and b) in need of a simple sewing project. So when I found some mid-weight green and white cotton at 70% off in my local fabric shop, I decided to remake a favourite pattern; New Look 6093. What could possibly go wrong?

Easy!

I made this three (blimey! that long?) years ago in a fine cotton poplin in yellows, browns and greens. I liked the end result so much that I made it again in a blue poplin of a similar weight -  and forgot to blog about it. Both dresses have had a lot of wear since, and the only problem with them is that the neckline is rather lower than I usually wear. So this time I raised it. Only by 1½cm / ⅝", but I'm far more comfortable with the end result.

For now unfortunately that's about the only thing I'm comfortable with. The skirt panels are cut on the bias (see view B of the pattern envelope above), and in the slightly stiffer cotton they just don't hang that well. In fact, the whole dress feels a bit stiff. I'm hopeful that once it has been through the wash a few times it will look better, but at present it's a(nother) one to just wear around the house. Which is a shame, as it goes perfectly with my green shoes and hat.

Slightly sticky-out skirt . . .

The jury is also out on the sleeves. I think that they are slightly too long, but at least that is easily fixed.

. . . and slightly too long sleeves

But I'm beginning to wonder what it is with me and green. That's three dresses with various issues, and the 'Meh' skirt also has green in it. Perhaps I should just never make anything green again!

Sunday, 24 July 2016

Hello Blackbird

(Of course it should be, Bye Bye Blackbird, but that doesn't really work as a post title!)

New Look 6723, aka the Blackbird dress, is finished.

Finished at last!

Once I'd finished wrangling the zip, it was pretty straightforward. Because I couldn't find any lining remotely the same colour as the fabric, I'd just used white. But then I worried that it would show at the edges, so added narrow facings around the neck and armholes. This was more work in terms of sewing down the edges, which I did by hand, but it gave a neat finish.

All neat and tidy at the front

Slight mismatch at the back, but I can live with it

I also added in-seam pockets because, well, pockets. I used the pattern in Vogue Sewing, and went for the version which is sewn into the waistband rather than just hanging loose.

The joy of pockets

I decided that the dress would hang better with a belt, but couldn't find a suitable buckle, so just made a tie belt the width of one row of trees.

Simple tie belt

The hem was done by my usual method; overlock the edge, then turn it up once and hand sew into place.

I really like the neckline on this dress - unfortunately I didn't think to put my hair up, so it's not all that clear. This is definitely a 'make again' pattern.

I can see this getting worn a lot

Next it's back to vintage, and my first go at a pattern featured in the Vintage Sew-Along; Butterick 6582.

Coming soon (I hope)