Sunday 30 January 2022

Vogue 1266 - part 3, aaaargh!

It's going to be a short post this week, as 'progress' on my coat has been glacial.

I'm finding this project a real challenge, and not in a good way. Add in a whole load of Life Issues taking up a lot of time, and general January bleugh-ness, and I must admit I'm not exactly a happy camper right now. So if you don't fancy reading several paragraphs of whinging, I quite understand, and I'll see you next week!

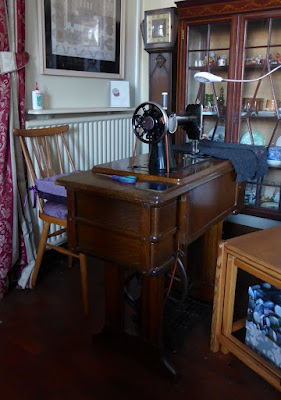
On the plus side, it was lovely to see how last week's introduction to Tilda the Treadle really struck a chord - thank you so much for sharing your own treadle experiences. Practice is making, if not exactly perfect, then at least a great improvement in my treadling skills.

This project has made me aware of what small parameters I usually work within; both in terms of the materials I use, and what I make. Yes, I do a lot of sewing, but it's usually with mid-to-lightweight fabrics which press easily. Even something like New Look 6594, for all the challenges, workarounds and Very Rude Words which went into its construction, fitted into this range. Also, I make surprisingly few things with collars which have separate pattern pieces. The last coats I made, Butterick 5716 and Simplicity 4896, both had grown-on collars.

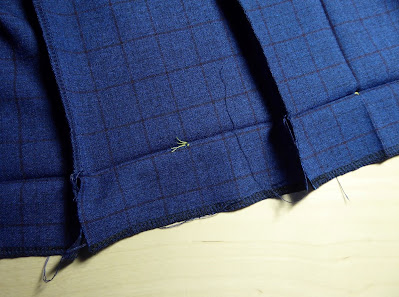
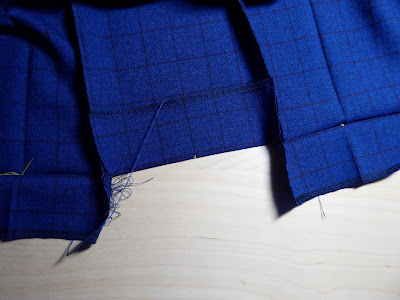
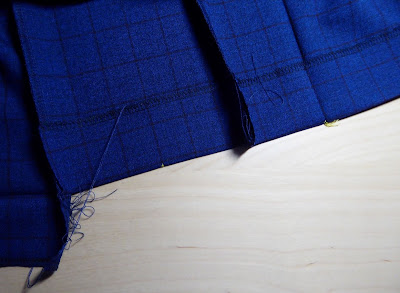
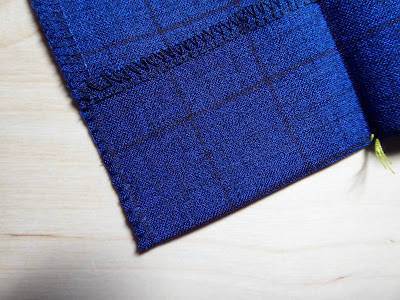
So, whinge number one. The coat fabric is fairly resistant to being pressed, and because of the shrinkage issue, I hesitate to use too much steam. As a result, I've taken to catching down all my seam allowances to keep the insides flat.

Looks neat, but takes time

I rarely tack/baste anything, being firmly in Team Lots-of-pins-and-hope-for-the-best. But because this fabric is so thick, the top layer tends to stretch out under the machine foot, especially on long seams. So all seams are now tacked, and I find I have to use stab rather than running stitch to keep the layers together properly. Which takes more time that I'm not used to expending.

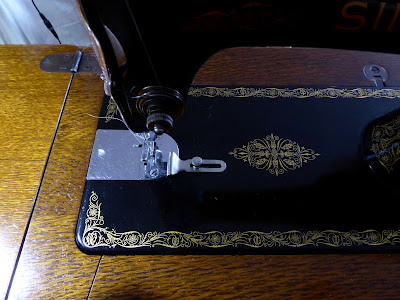
Also, the whole thing is very heavy and hard to manipulate, even though it doesn't yet have sleeves! Tilda's large work surface is a boon, but it is still tricky to keep the entire garment from sliding to the floor.

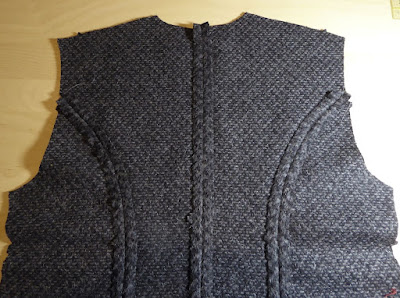
Finally (I did warn you there was a lot of whinging!) I'm just not used to tailoring methods. When collars do make an appearance in my projects, the construction tends to be: make the collar, sandwich said collar between facing and main garment, sew round from front to front, job done. With this pattern however, the back and fronts of the coat are sewn together at the shoulders, the neckline is stay-stitched, and the under collar is attached.
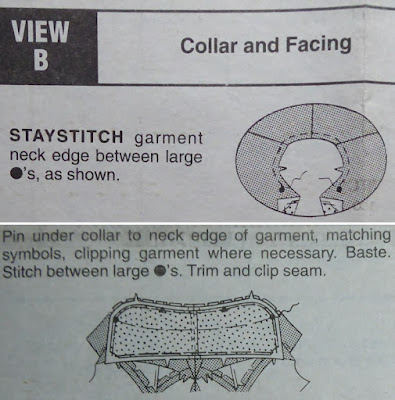
Instructions

This did at least produce something which looks a bit like a coat.

Sort of

The process is repeated with the facings and the upper collar. And then, the two are sewn together in three stages - the fronts first, and then round the collar. I found it very fiddly.

More instructions

This is as far as I have got. Next comes a whole lot of pressing, trimming seam allowances, and yet more pressing, much of which is likely to have limited effect. I see a great deal of understitching in my future, and I'm not looking forward to it.

Thank you for coming to my TED Rant!

Sunday 23 January 2022

Vogue 1266 - part 2, diversions and revelations

Following on from last week's post - the interfacing required more grappling than I was expecting.

The fabric was just labelled 'wool mix', with no indication of what was in the mix, and how much of it was wool. So, as I had decided to use fusible interfacing and I am in the 'use steam' camp, I thought that I had better check what effect said steam would have on said wool mix. I cut 15cm squares of fabric and interfacing, and fused away.

It was as well that I did so, as while the width of the square remained the same, there was a noticeable reduction in the length (along the grain of the fabric). This was a blow, as the pattern calls for the interfacing to be attached to the coat fronts rather than to the front facings, and by this time I had already cut the coat fronts out. Fortunately I hadn't yet cut out the facings, so they have had to be interfaced instead. I fused a large piece of interfacing to the remaining fabric, and cut the facings from the pre-shrunk piece.

That's a lot of potential for shrinkage

Then it was finally time to start sewing, which presented another dilemma. It's a sturdy fabric, and I really didn't want to risk putting it through my main sewing machine. My Jones dates from 1986, when machines were still mostly made of metal and fairly robust, but nonetheless, I feared for its motor.

So, I turned to my treadle. I bought this at the local auction two years ago, and somehow never blogged about it. I think that I was waiting until I could sew something on it, but then of course Things Happened.

Tilda

It's a Singer 66, made in 1933. The 66 model is almost exactly the same as the more common 99, just with a longer arm. As the model numbers suggest, the 66 was made first, and then the 99 was created as a smaller 'lightweight' version (note: the term is entirely relative, and probably wouldn't get past advertising standards today!).

The machine was in very good condition, and the only thing which appeared to be wrong with it was that the treadle belt was broken. I assumed that I would be able to get a replacement belt online, and I was right - I just didn't expect to be able to buy it from the Singer website! It's a testament to the brand that clearly there are enough antique and vintage Singer machines out there and still in use for Singer to consider it worth their while to sell spare parts on their UK website.

Although the machine appeared fairly clean and shiny on the outside, I got a bit of a shock when I took the endplate off. It looked as though something had nested in there - I genuinely expected a small creature to shoot out and scuttle off to a dark corner of my workroom!

Ewww!

Fluff gingerly removed with very long tweezers and new belt attached, I had a few attempts at treadling, and then stopped as other things took over. I certainly wasn't going to churn out sets of scrubs on a treadle machine! But for making a coat, it's ideal. For starters, the machine bed is flush with the rest of the table, and there's a large area to the side for resting the fabric.

Large, flat, working area

I'm always very fussy about not having drinks on my worktable in case of spillage, but Tilda's layout provides a handy but out-of-the-way place to put my mug of tea!

Perfection (biscuits for illustration only)!

On a more practical (but not more important) level, there's a lot of oomph behind that needle. It's a long time since I studied Higher physics, but I'm still vaguely aware that a large, heavy flywheel connected to a small driving wheel is going to generate a fair degree of force. Certainly, it glides through several layers of coating fabric with impressive ease.

I remember when I was a child trying, unsuccessfully, to operate my grandparents' neighbour's treadle machine. Courtesy of a few YouTube videos, I now know why I failed. I had my feet side by side, and simply wiggled my ankles. This seems the obvious method, but was never going to work. Ankle joints are fairly puny, and treadle mechanisms are heavy. What you need to do is have one foot in front of the other, and press down on each one in turn using the big muscles in your thighs. A bit like pedalling a bicycle, but up and down only. Getting the wheel, and therefore the feed dogs, to move in the right direction is still a work in progress, but I'm assured that it becomes second nature over time.

That's the treadle part, but I've also learned something really useful which applies to all of my vintage machines. None of them have the ⅛" gradations for seam allowances marked on the needle plate, so I have always had to work by eye, or put a bit of low-tack tape on the needle plate. No longer. A huge thank you to @Muchacha_Vintage for showing me how it's done, and what that mysterious bit of metal actually does.

So that's what it's for!

I love the fact that even though it's almost 50 years since Mum first sat me down in front of her Singer 99, I'm still learning something new!

Sunday 16 January 2022

Vogue 1266 - part 1, various workarounds

I've actually begun one of my MakeNine2022 projects! On the basis of starting with what I need most right now, I'm making my winter coat.

Vogue 1266, 2001*

First up, were the pattern adjustments. In the past, this would just have involved taking 5cm/2" out of the torso length above the waist, but now I also have to consider a full bust adjustment. Well, I say 'full', but the reality is that I only need to add 2.5cm/1" overall.

I've never done an FBA on a princess seamed garment, so went online, and found this tutorial. It's clear and comprehensive, but by its own admission it involves a lot of steps. So, as I was making a mere ½" change, I decided to cheat a bit. I was making a toile anyway, and worked on the basis that if it all went horribly wrong, I could try again with the correct method.

The four main coat pieces

I traced the centre and side backs (6 and 7) and the side front (2) off the originals, shortening by 2" as normal, and put back pieces aside. I had made sure to leave spare tissue to the front of piece 2, and didn't cut it out. I marked the seam line on the front edge, from the top to the waist notches. Next, I marked a point ½" out from the seam line at the apex of the bust and drew a new seam line freehand, again from the top to the waist notches. Finally, I added the seam allowance to this new line.

My bust adjustment

I measured the original and new seam lines, and calculated the difference. The new line was ⅜" longer, so I shortened the front (1) by 1⅝" instead of 2", and trued up the notches.

The toile needed to be made in something of a similar weight to the coating, so I used some old curtain fabric (wrong side out to avoid being distracted by the rather vibrant pattern). I only made one sleeve, just to check the length. It all looks a bit droopy here on Nancy but on me, with clothes underneath and shoulder pads pinned in, it fitted perfectly. I'm not sure I would recommend my method for a large bust adjustment, but if you're confident with pattern alterations and only making a small change, it worked a treat.

Completed toile

Toile done, it was time to start cutting out. My fabric is a wool mix, with a short pile. It is thick and heavy, so I decided to cut out from a single layer. Somehow, I managed to completely misread the cutting layout and only realised once I'd cut several pieces. I'm quite used to making up my own layouts, but it's normally from necessity, not stupidity! Fortunately, everything fitted into my freestyling version.

Making tailor tacks proved to be difficult, as it was impossible to make such a small stitch in a single movement and also go right through the fabric. If a pattern has tailor tack markings of different shapes (and most Vogue patterns do, including this one), I always sew them in different colours, so that I can tell them apart later on. So I put a pin of the appropriate colour through the pattern hole, lifted the tissue off, and used stab stitches to create the tailor tack around the pin.

Marking triangles (blue), large dots (red) and small dots (yellow)

I am going to cut the upper collar out of some black coating I have in my stash. As I mentioned above, the fabric has a pile. It's rather rough, and I think that having it pressing against the back of my neck, pile upwards, could quickly get uncomfortable. There are also some odd, really quite wiry, white strands in it, some of which I've removed. I'm considering making the back and sleeve facings out of the plain black as well, to avoid any other itchy bits.

Weird mystery fibres

The next step is to grapple with interfacing. Onward!

* - Well, I thought that this pattern dated from 2001, as that's the copyright date on the envelope. However, when I was checking the cutting layout (prior to totally ignoring it), I noticed that the copyright date on the instruction sheet was 1993. While writing this post I dug a bit deeper, and discovered this envelope illustration on the Vintage Pattern Wiki. Same figures, same accessories, not even a mirror image, just standing in the opposite order. I appear to be making a 'vintage' coat by accident!

1993 version - clearly a timeless design!

Sunday 9 January 2022

2022 plans

"Hope Springs Eternal" and all that. Despite, and/or because of, last year's dismal showing on the UseNine front, I have decided to simply roll the unused five fabrics (one is part-done, and will appear on the blog shortly) forward to this year.

My (woeful) total for last year

One big difference for this year is that because I have specific patterns in mind for eight of my nine choices, I'm changing over to MakeNine.

Some old, some new

So, going from top left to bottom right.

When I featured this exuberant printed cotton last January, I wasn't sure what to make with it. Over the summer I settled on Butterick 5556, a reissue of a 1955 pattern. Unfortunately, Life got in the way before I could start.

Pattern choice made

This fabric, and the pattern to go with it, have appeared on the blog before. Waaaay back, in October 2014! I've thought about making the coat more or less annually, but have always been put off by the fact that I would have to shorten the bodice on nine pattern pieces (five for the lining and front facing, four for the outer coat). Now I have the additional thrill of needing to do a bust adjustment on the five front pieces, but nonetheless have decided that the time has finally come. I'm making view B, but without the braid on the sleeves. (Also, I don't imagine I'll be wearing it with a chunky polo-neck jumper, as I'm not planning to audition for a remake of The Cruel Sea any time soon!)

Coats! A new challenge for a new year

The next two, printed florals in viscose and cotton, are carry-overs from last year.

Familiar faces

The first of the year's two entirely new fabrics is my 'wild card' of bunch. I made the mistake of 'just popping in' to my local fabric shop's sale - and this remnant mysteriously fell into my basket! It's a woven cotton, quite thick but not brushed. I don't know what I'm going to make from it yet; it depends what I can eke out of 2.8m and pattern match the checks, but it's a good match for this vintage belt clasp which I've had for ages.

Showing the back and the front of the belt clasp

Bought on the same trip, but with a pattern in mind, this viscose twill is a perfect ditsy floral for a 1940s style.

Yet another Style pattern

Another two carry-overs. Hopefully it will be third time lucky for this pink floral crepe, which has been on my 'to make' list since 2020!

More familiar faces

Finally, this true vintage printed cotton featured on the blog last August, along with the pattern, thread, and zip which the original owner had planned to use to make it up. Unfortunately, the fabric is printed quite noticeably off-grain. Therefore I think that this pattern, with its bias-cut bodice, might be a better bet. Judging from the numbers, 1479 for the original and 1374 for the possible replacement, the two patterns are from the same era.

Plan B for this gorgeous 60s cotton

As ever, I wondered what to do with the Stashometer. Just rolling all unused fabric into The Stash feels like cheating, so instead I have carried over the unused 2020 purchases, and the 2021 purchase I plan to use in MakeNine2022. Plus, I've added my two new acquisitions.

Starting the year over 23m in the red!

Given my dismal showing on last year's UseNine, this should be more than enough to keep me busy. But, this year's challenges for the Historical Sew Monthly have been announced, and I really want to get back into historical sewing this year. I have Plans, let's see if they come to fruition.

Because I haven't got enough to do already

Sunday 2 January 2022

2021 review, including one last project

I had hoped to squeeze a final UseNine creation into the week between Christmas and New Year but, in keeping with 2021 in general, it was not to be. I did complete a half-done garment, though, which is better than nothing.

So as I don't have a completed dress to show, it's time for a review of the year. I didn't feel as though I've done much sewing this year, but putting it all together in a collage proved me wrong.

2021

The year started with a venture into lingerie-making; which I enjoyed far more than I was expecting and want to pick up again this year. I also dabbled with separates - two blouses and two skirts - including a sleeveless blouse made especially for getting my first Covid jab. Of course, it received another outing last month (topped with a thick cardigan!) when I went for my booster.

As ever, I put the 'dress' into 'dressmaking' by making six of them, culminating in my 'Holly' dress.

The Holly dress was definitely the highlight of the year, but apart from that, it's two of my most simple projects which have brought me the most pleasure. Firstly, keeping all my project notes in one place has proved to be a really good idea - who knew?! - and having a special book to record them in makes sure that I resist my old habit of scribbles on random bits of paper.

Still so pleased with how this embroidery turned out

Secondly, and proving that I should stick with dressmaking and not branch out into fortune-telling, the summer blouse which I fixed to make wearable but I "doubted would ever become a favourite" became - just that. Every time I wore it, I was so glad that I'd made the effort to rescue it.

Mystic Tulip fails again!

Those with eagle-eyes and long memories may have noticed something in the collage above which hasn't been blogged about. My inverted-pleat skirt was banished to the naughty corner in June for crimes against fitting properly, and has languished there ever since. But it struck me that finally fixing it would make a tiny improvement on the Stashometer before the year ended.

The 'fix', such as it was, was to unpick the back darts and so convert them into loose pleats. It's not ideal, and I definitely need to tweak the pattern before I use it again, but at least the skirt is wearable.

This just left the hem to do, but because the skirt is constructed in the vintage method of a separate back panel for the pleat, it was a bit more complicated than normal.

First, I decided on the skirt length and pressed the hem up. Then, I unpicked the seams attaching the panel to the skirt, as far as the pressed line.

Hem marked and seams unpicked

This meant that I could fold the hems for the panel and the skirt up separately, without the seam allowance getting in the way.

The back panel hem folded up

With one skirt piece also folded up

Finally, once the hem was sewn, I tidied up the unpicked seams with blanket stitch.

With the unpicked seam allowance stitched down

It was a real rush job in drizzly weather to get it photographed before I set off to Mum's for Hogmanay, so please excuse the poor pictures. At least my hair cooperated, for once!

Worn with Simplicity 8243

#SewnShownSeated

Completing the skirt took the Stashometer to a 6.4m deficit, so if it hadn't been for that trip to the Museum of Liverpool in October, and my detour into John Lewis's small and limited fabric department, I would have ended the year in credit. Thank goodness they don't still have the large and excellent fabric department which I remember from the 1980s - the damage could would have been far worse!

In three years of the Stashometer, this is the worst yet!