Sunday 31 July 2022

Another rescue project

Yesterday (30 July) was World Embroidery Day, so naturally I took the opportunity to sit down with some stitching. Specifically, to have another go at the embroidery which I accidentally trashed a while ago.

The problem

Enough time has passed for me to feel a bit calmer about it. Plus, I noticed that the Ukrainian company from whom I bought the frame* for the project have, after a break, reopened their Etsy shop. It struck me that if they can continue to operate during a war, I really ought to get over myself and my colour-run failure.

Various attempts at washing out the leached colour had changed it from pink to a sort of tan, so I decided to try tea-dyeing the piece. I've never done this before but, as with the re-do of my two-tone Vintage Vogue dress, I figured that it couldn't make things any worse. If it dyed to an even colour, then hopefully the previous marks would disappear altogether, and even if I ended up with a mottled effect, then they would blend in.

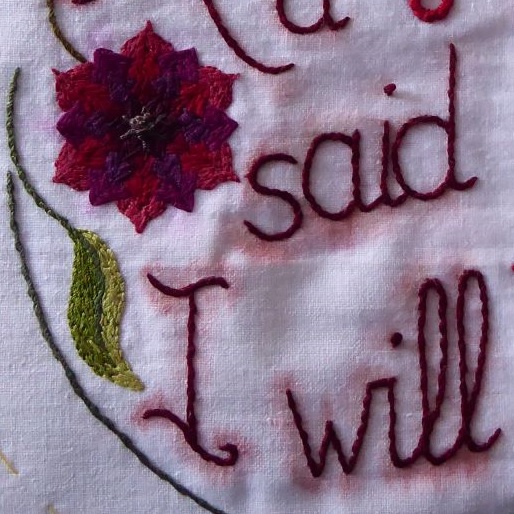
Shadows of the lettering were left, even after several washes

I followed these instructions, and steeped the teabags for 10 minutes. Then I poured the 'tea' into the lid of a Pyrex casserole dish. This meant that I could lay the area to be dyed flat without any crumpling. I pressed the cloth firmly into the liquid, to remove any air bubbles and to make sure that the whole area remained submerged. Unfortunately, I was so busy concentrating that I forgot to take any in-progress pictures!

When I took the piece out, it was a deeper colour than I wanted - even allowing for wet fabric looking darker. However I was able to rinse some of the tea out, and I then put the cloth in the vinegar/salt/water solution to set the colour.

The end result was pretty much the colour I'd envisaged, and the marks were completely invisible - result! I chose a greenish-brown thread for the lettering, as this went best with the new colour scheme. It's not that obvious in the photo, but there was a real colour difference between the dyed area (within the frame) and the white fabric round the edges which hadn't been in the tea.

Set up for stitching

I did all this prep on Friday, including re-marking the lettering. So yesterday, all I had to do settle down to sew for a few hours (oh, the hardship!).

Re-embroidered

The dyeing process seems to have raised the texture of the cotton fabric, and given it quite a rustic look. The frame did come with a circle of clear plastic sheet, but I decided that the effect was too flattening (visually, not literally), so left it off.

Close-up texture image

And here is the end result. Obviously it's not quite what I originally intended, and I haven't yet decided where to hang it for maximum effect, but since its whole point was to remind myself to actually do things, I’m glad that I got it done.

The end result


* - I have bought circular wooden frames in the past, but they seem very hard to get hold of now. The shop, RukoJob, offers them in a variety of woods and sizes, and the one I bought is beautifully made.

Sunday 24 July 2022

Style 1271 - part one, laying foundations

There wasn't an opportunity to do a fitting session on my black dress with Mum this week, so instead I've started (yet) another unscheduled project!

New project

Back views

I want to use views A and C of this pattern with two lengths of vintage fabric which I've got. Obviously, with both of these I have limited yardage and no room for error. So my new project is to iron out any possible issues by making a wearable toile of the pattern, using some cotton print fabric which has been in my stash for ages.

The original plan was to make a very basic version of view C, with plain short sleeves and a tie belt, a quick and easy project - ha! (When will I ever learn that such a thing doesn't exist in my world?) Then I remembered that I still had some of the plain green cotton I'd used for the lining of my sewing bag and my 1950s Butterick top. It turned out to be a perfect match, so the plan was amended plan to view B, with contrast cuffs.

Such a good match

Amazingly, I found a buckle of suitable size and colour in my buckle box - well, it seemed rude not to use it. So now a proper belt has been added to the project.

And the perfect buckle, too

For someone who doesn't much like 1960s fashions, I seem to have quite a few late 50s/early 60s Style patterns in my collection.

Patterns I have definite plans for . . .

. . . and ones I just liked . . .

. . . and more

As I have so many 'Style Print' patterns, and as this dress is such a simple design with no complicated shapes, I decided to use it as a 'fitting shell'. Most of the big pattern brands issued fitting shell patterns; a very basic design based on the pattern sloper from which all their other patterns were derived. The idea was that a dressmaker could use this shell to identify what fitting alterations they required, and then apply these to all patterns from that brand rather than having to fit each new pattern from scratch.

Vogue fitting shell pattern

Progress has been slow, as I have to stop and check the fit after every step, but I think that the exercise will prove worthwhile. I have already established that both the shoulder width and the shoulder angle for these patterns need to be changed. In fact, the shoulder could be made slightly narrower still, but as this is just a wearable toile, I'm leaving this version as it is.

Progress so far

The cuff proved surprisingly complicated, but that's a story for another time.

Sunday 17 July 2022

Butterick 7598 - belt and pockets

Not a lot to report this week, as progress has been very slow.

The belt was made by my usual method of buckram wrapped in cotton and then covered with the dress fabric - in this case, satin side out. I added two rows of machine sewing for a decorative effect; both because it is a very 1930s detail, and also to mimic the stitching on the trim. As ever Tilda, my trusty treadle machine, purred though all the layers effortlessly. The buckle was bought at the Festival of Vintage, specifically for this dress.

Belt buckle and stitching detail

Because the belt was made with satin fabric cut lengthways, I cut the strips for the trim the same way. There was no need for bias cutting as all the decoration is in straight lines, and I wanted to be sure that all the satin parts would look the same in any light. (This is probably being overly fussy, but that's just me!)

I decided to make the pockets first, as they involved handling shorter lengths of trim. The pockets on the inspiration dress are triangular, with none of the base fabric showing.

Inspiration dress from Carnivale Vintage

I experimented with paper cut-outs held against the skirt of the dress until I got a size and shape I was happy with, then thread-traced the pocket shapes onto a spare piece of fabric. I made both pockets simultaneously; partly because a larger piece of fabric was more stable to work on and partly so that they would look the same. I learned the hard way many years ago that if you are making two identical items one after the other using a new-to-you technique, the second one will look very noticeably better!

Partway through making

Once all the strips of trim had been sewn on, I checked if there had been any shrinkage, cut out the pocket shapes, then neatened the raw edges and turned them under. The pockets are now ready to be attached to the dress.

Pocketses!

Then it was on to the dress itself, and this is where things got tricky. I want three rows of trim across the front, sleeves and back, evenly spaced out and horizontal. But of course, the lengths of the dress bodice front and back are not the same; because the back goes straight down and the front, ahem, does not. Plus, what looks horizontal when the dress is laid flat will not necessarily look horizontal once the dress is worn. I tacked the whole dress together, and then considered how to tackle the trim.

A dress form helps, but only to a certain extent. Nancy, my main dress form, is an accurate representation of my shape, apart from around the neck. This dress is close-fitting at the neck, so it’s impossible to do it up at the back on Nancy.

Nancy - shoulders good, neck bad

My other dress form has a narrow neck, so the dress can be done up. However, the shoulders are a completely different shape from my narrow, sloping ones.

Norah - shoulders bad, neck good

Both of these issues mean that what looks right on a mannequin doesn't look right on me. I can do a certain amount of the trim positioning on myself, but not all. As ever, the solution is to take it to my Mum's for help and a second pair of hands. Unfortunately though, both our homes are in the 'red alert' area of the current heatwave, so driving between them will have to wait for a few days. Still, it's not as though I'm desperate to complete a black dress with three-quarter sleeves to wear in this weather!

Sunday 10 July 2022

All the sparkly dresses

As promised last week. Click on any of the images to enlarge them.

Shimmer and Shine: Beaded Evening Dresses 1920 - 1940 is the new costume display in the Walker Art Gallery in Liverpool. It consists of 14 dresses from the National Museums Liverpool collection, mostly from the 1920s but with a few from the 1930s as well.

Part of the display

As an aside - the display is in the Craft and Design gallery, and as is apparent in the image above, it is all in glass cases. This meant that I had to contend with reflections when taking pictures - the bane of my life when taking exhibition photos for this blog! A number of the dresses were impossible to photograph well enough to use the pictures, so this post concentrates on the ones which I could photograph.

Many of what are now considered the archetypal beaded dresses of the 1920s originally came in 'kit form'; panels which could be bought ready-beaded such as this one, and then made up into a dress by a local dressmaker.

Silk crepe panel with beads and imitation pearls, 1925-30

While the dress panel was obviously dress-shaped, other pieces in the exhibition were far simpler, and clearly designed to be worn over a slip.

Showing the modern reproduction slip underneath

Silk net with beads and sequins, 1920-24

This one was more substantial. The exhibition notes speculated that it might have been designed for an older woman. Although sleeveless, it had an interesting detail around the armhole.

Silk marocain with clear beads, 1922-25

Armhole detail

The dress next to it did have sleeves, but they weren't original. They had been added, complete with beaded trim, at some time in the 1930s.

Silk georgette with silver beads, 1924

Beaded rayon sleeve added 1932-34

This red and black dress was one of my favourites, probably because of the colours. It has red vermicelli beading on the bodice, a band of red and black beaded motifs, and then black beading in a geometric design on the skirt.

Silk net with glass beads, 1921-23

Vermicelli beading on the bodice

Densely beaded circle motifs

More structured design on the skirt

Most of the dresses appear to be, like the beaded sample, entirely flat front and back. They have no bodice shaping, and no fullness in the skirt. This did make me wonder how easy or otherwise it was to display them. After all, a rigid mannequin can be padded out if necessary, but its bust cannot be flattened to replicate the effect of this c1925 corset in Corsets and Crinolines.

Corsetry to achieve the desired tubular shape

These two dresses do at least have a small amount of gathering in the skirt.

Cotton net with beads and sequins, 1925-28

Cotton with white glass beads, 1925-26

If the red and black dress was a favourite because of the colours, this dress was a favourite despite being a colour which would do me few favours. Rather than an overall beaded design, it is dotted with beaded sprigs of flowers, and has chequerboard details at the neckline and hem.

Silk georgette with coloured beads, 1925-30

Close-up of one of the floral sprigs

Squares on orange at the neck

And alternating with black at the hem

The only 1930s dress which I was able to photograph was this pale green sequined one. The sequins were clearly sewn on in a curved design to complement the shape of the dress.

Cotton net with sequins, 1930-35

Back view showing undecorated fabric

The rest of the gallery holds the permanent display of craft and design items, including some of the etched panels from this mirror made for the ocean liner Mauretania.

The mirror in situ in the Cabin Class restaurant

The panels are displayed next to one of the exhibition cases, so I was able to photograph the dresses reflected in the mirror.

Art Deco dresses reflected in an Art Deco mirror

Shimmer and Shine runs until autumn 2023.

Sunday 3 July 2022

A midway change of plan

There's not much in the way of pretty pictures this week, just musings. (If that's not your thing, I'll be back next Sunday with lots of sparkle from an exhibition I went to recently.)

Yesterday was the middle day of year - that's to say, there were 182 days before it, and 182 days to come. So it seemed like a good time to review progress on my MakeNine2022.

MakeNine2022 plans

This didn't take long, as there has been almost none. The coat is part-done, and that's it. Instead, I've completed a dress I started last year, rescued a not-quite-right dress I made last year, done a couple of non-dressmaking projects, and been sidetracked by a totally new project.

Theoretically, I probably could make eight dresses by the end of year if I put my mind to it. I could replace the pattern choices which I'll have to regrade with ones which are my size, simply shorten the bodices by my standard 5cm/2" regardless of the effect on the overall proportions, and make them exactly as they appear on the pattern envelope. But I don't want to do any of that. I want what I make to fit properly and look right, I have plans for several of the dresses which involve extra steps and, increasingly, I find that this slower and more detailed approach is how I choose to work.

In May I took part in #thevintagefashionchallenge, and one of the things I really enjoyed about it was the number of posts by vintage-wearers who clearly thought a lot about how we can square our love of 'dressing up' with the challenges of reducing consumption. They gave me so much to consider.

Then, for the last eight(?) weeks, I've been watching the latest series of The Great British Sewing Bee with a faint sense of disquiet. Don't get me wrong; I love the programme, the contestants were clearly all very talented, and I'm fully aware that it's a television show whose primary purpose is to entertain. But the emphasis on speed over quality, and the resulting standard of the garments produced (many of which looked unlikely to survive an encounter with a spin cycle) just don't sit right with me. It also gives a completely unrealistic impression of how long making a garment actually takes. I was at least reassured when I discovered that some other sewists have similar concerns about the show.

Most weeks, I had a Sewing Bee mini viewing party with my friend F. She doesn't sew but is a talented artist, and watches similar programmes on painting. She told me that these emphasise the unreality of the situation, and stress that artists would usually take far longer than the time given to complete a picture. Some even have a section where pieces which the contestants have completed at home are included for judging. The format of the Bee hasn't changed since the first series in 2013, but views on clothing sustainability have - perhaps it's time for a bit of a shake-up?

But back to my own sewing. Obviously I still want to sew, but with an emphasis on quality not quantity, and improving my skills rather than concentrating on numbers made. So for the latter half of the year, I'm setting myself four goals:

1 - Complete my grey coat
2 - Make at least one thing with complex decorative details
3 - Improve my pattern drafting skills by making at least one thing which requires extensive pattern alteration or regrading
4 - Make one thing from a self-drafted pattern for the same reason.

Goals

Goal 2 can be combined with goals 3 or 4, they don't have to be separate garments. I also hope to use a few of my MakeNine choices in the process, but I'm not aiming or expecting to use all of them.