Showing posts with label vintage pattern reissues. Show all posts

Sunday, 7 June 2026

De-frumping

Well, this is not what I expected to be writing about this week. In fact, until Friday afternoon this wasn't even what I expected to be sewing this week.

Yes, one of those

For the last nine years Simplicity 1587, aka The Dress of Frump, has been the nadir of my dressmaking, the benchmark of disaster. Whenever something didn't turn out as planned, from faint disappointment to major calamity, I always asked myself, "Is this as bad as The Dress of Frump?". And the answer was always, but always, "No".

On Friday I was having a tidy up/clear out when I found The Dress of Frump scrunched up in a ball under a pile of other stuff. This was a surprise, as I thought I had thrown it out years ago. I guess it was reprieved because I really liked the fabric, so couldn't bear to get rid of it. Out of curiosity, I tried it on. And it didn't look as bad as I was expecting. Although to be fair, over nine years it has come to be so hideously unappealing in my memory that anything which didn't actually cause the mirror to crack was going to look better than expected.

I still really like the fabric, and started to wonder if there was any way I could fix the dress. The material had been distinctly off grain and, instead of just living with it (hardly an issue with a floral print), I had tried, and failed, to correct it - and ended up with a very wonky garment. On top of that, the design of the skirt did me no favours. A skirt yoke may suit some people, but I am not one of them, and the gathering of the lower skirt just looked skimpy and messy.

There is nothing appealing about this look

Also, some of the gathers stuck out weirdly.

All of the centre section sticks out

On the bodice, the yoke was probably too long, but the main thing was that the pleats were all over the place.

Messy

This was hardly surprising, as the neckline turned out to be longer on one side than the other, and the pleating wasn't remotely symmetrical.

Three small on one side, two large on the other - why?

Somehow, I had even sewn in the centre tab off kilter.

The tab seam and the yoke seam do not line up

I have no idea what I thought I was doing here

There are other, smaller, issues, but I came to the conclusion that what made the dress look so bad overall was that the biggest faults are right in the centre front. So, on the basis that the worst I could do was ruin an already bad dress I didn't even know I had, I set to work.

I started with the skirt, unpicking the section of the seam which joined the yoke to the gathered lower section. Then I pressed out the gathering, and started reattaching the skirt out from the centre, but flat. Once I had attached the centre third of the skirt, I folded the excess fabric into inverted box pleats. I would have preferred a single deeper pleat in the centre, but the curved shape of the yoke made this impossible - I had to place the pleats where the yoke edge was more horizontal. It took some fiddling to get them to hang straight, but I feel it's a neater effect than the gathers.

A smooth skirt front, and the pleats line up with the bodice gathers

Encouraged by this success, I tackled the neckline. This was a lot trickier, and with hindsight I wonder if I should just have fixed the wonky tab and left well alone with the pleats. Once unpicked, they really did not want to be pleated back up in a slightly different way. But eventually, I got everything back in place. Finally, I added some shoulder pads to raise the yoke-bodice seam a little and add support to the sleeve heads.

Not great, but better

The end result is still not brilliant, and things like the uneven hem were impossible to fix without ending up with a shorter dress than I wanted. But it's a lot better than it was, and worth the effort to get it more or less wearable.

Definitely improved overall

My next 'little' job is fixing some damaged cushions from my local community café, and then I can get back to what I was meant to be doing this week - making a dress out of the 1986 toile.

Sunday, 16 April 2023

Simplicity 4463 complete

Some actual sewing to show at last, as I've finished my latest iteration of Simplicity reissue 1777. Some of the changes I made to the design are obvious, others not at all, but overall I'm very pleased with it.

I made this dress on Joan, my 1934 enclosed cabinet treadle. I do not have an open-toe foot for any of my Singer machines, so when it came to attaching the centre front to the bodice sides, I couldn't use my normal method for doing the lapped seam. Instead I had to improvise a little with a zipper foot. It worked fine, probably helped by being able to sew slowly on the treadle.

Sewing the lapped seam

As it turned out, I didn't need the extra allowance I had added in the side seams. What I did need, however, were some slight changes to the pocket. On the previous versions, the pocket bag has been sewn into the side seam, and held in place in the front waist seam.

How I've done the pocket on previous versions

This version has no waist seam, so I reshaped the pocket to reflect this. Also, I have a high and pronounced hip curve, and because this version of the dress has no pleats at the front, I had to add this curve to the side seams to allow the skirt to fit properly. My versions of Vogue 2787 all have the same tight curve, and it works well, but any pocket in the side seam has to be placed below it where the seam is straighter. Finally, the cotton fabric is slightly fuzzy on both sides, and I was concerned that the skirt and pocket bag would stick together and cause the skirt to hang weirdly, so most of the bag front is made from a scrap of lining fabric.

How I did the pocket on this version

Talking of lining fabric. The quality of shoulder pads really seems to have deteriorated in the last few years, with even the ones from the better brands getting twisted and mangled by the gentlest of washing*. So, in an attempt to prolong their life, I covered these ones with some more of my lining scraps. (Yes, I do have a box in my workroom labelled "spare lining bits", doesn't everyone?!) Placing the lining on the bias and making the underside slightly smaller also helps to maintain the curve of the pad.

Covered shoulder pad

The one thing which this dress doesn't have is buttons. I wore the unfinished version for a #hatlarks picture a couple of weeks ago, fastened with a 1930s brooch, and really liked the look. I might add buttons at some point, but for now it's a good chance to use some of my vintage brooches.

Worn with Vogue 7694, view C

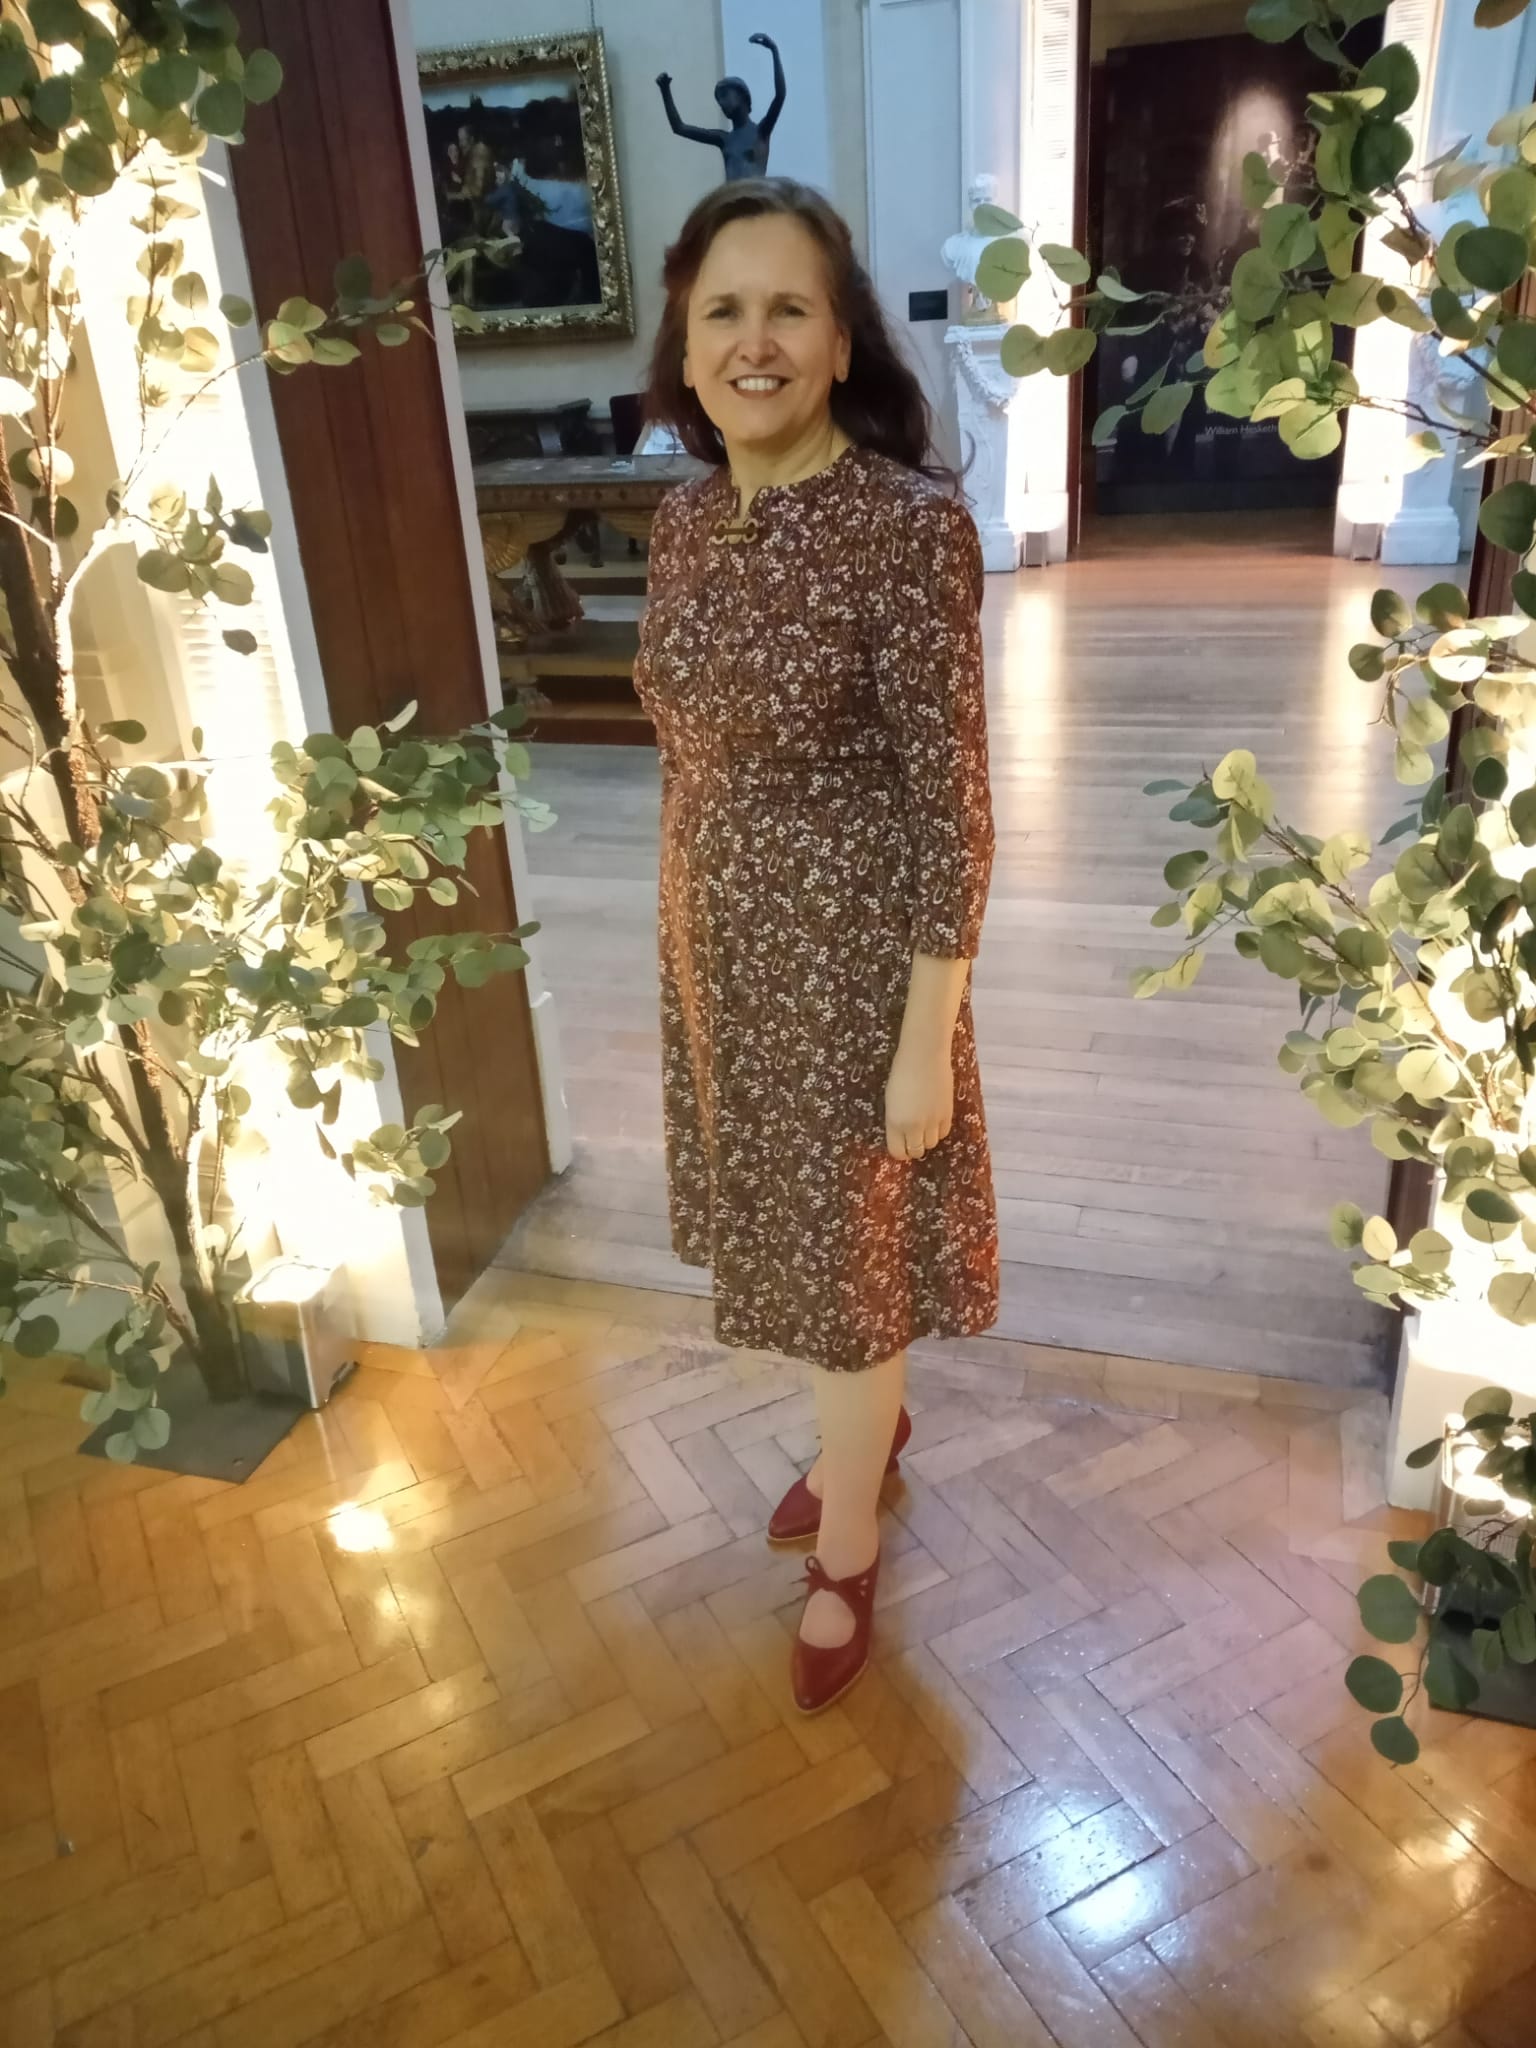
So here is the finished dress. Last week I went to the preview of the Flower Fairies exhibition at the Lady Lever Art Gallery, and made the most of being a) somewhere other than my back yard and b) with a friend who could take photographs for me.

The back is unchanged from versions two and three, which have the waist ties.

Back view

I managed to stand with my hands clasped in front of me in almost every picture, but it's just possible to see that the flared front falls into a very slight inverted pleat, albeit not nearly as pronounced as the envelope illustration suggests.

Front view, with (tiny) pleat

The skirt is as full at the hem as the original version of 1777, so the lack of pleats is not obvious when you are moving. Nor did it feel especially different when I sat down. In fact, I think I actually prefer not having all that fabric in my lap.

#sewnshownseated at the feet of Art!

When I was planning this project I came across this paisley print cotton fabric and thought that it would be perfect for the job, so I bought the exact amount I needed. Which means that the Stashometer bottom line is unchanged.

3.1m in, 3.1m out

Finally, the Lady Lever was beautifully decked out in greenery for the occasion, so I must include a couple of pictures from inside the gallery.

Leafy archway at the gallery entrance . . .

. . . which we used for a photo


* - I did wonder if I was imagining this. However, my first Simplicity 1777 is a favourite dress which has seen some pretty heavy wear since it was made in 2016. Despite this, when I came to photograph the pocket for this post, I noticed that the pads are far more robust and in better shape than those on much more recent makes. Cost-cutting is clearly everywhere.

Sunday, 26 March 2023

Not exactly Simplicity 1777

I've made Simplicity reissue 1777 (originally Simplicity 4463) three times. Each time, I've made various adjustments to make the dress more 1940s. The first time, I added length and shoulder pads, and attached the centre front bodice panel using a lapped seam. Subsequently, I changed from a centre back opening to a side opening (placket or zip) with a buttoned front neckline and added waist ties. But I've never tackled the really big difference - the shape and construction of the dress front. Until now.

In 1777 the bodice and skirt fronts are separate pieces, with the skirt cut on the fold and heavily pleated. In 4463 they are one piece, with a centre front skirt seam, and the skirt is flared - slightly at the front and more at the sides. There is a small amount of gathering around notch number 4, but no pleats.

Different approaches to the front

This is how the skirt pieces compare. The mauve tissue is 1777, cut to the same size as 4463.

Similar at the hem, but very different at the waist

The grainline of the bodice is significantly different in the original.

Both pieces laid along the grainline on my cutting board

Given the designers of 1777 only had the original illustration to work from, it's not hard to see where the confusion arose.

That skirt looks suspiciously well-gathered, all things considered

I was curious to see how these differences would work in practice, but as I have already made all the fit adjustments I need to my version of 1777, I didn't want to start again with 4463. Instead, I drafted a new front from my existing pattern pieces. I started off by laying the bodice and skirt pieces of 1777 together along the red lines.

All the pleating is in the centre section

Then I used the 4463 front piece to draft the skirt. Because I wasn't sure how well this would work, I went for the vintage approach of extra seam allowance in the side seams, making them 1" wide.

My pattern piece, ready to cut out

This is how the two completed fronts compare.

My first version of 1777

The current version - the gathering around the point is barely visible

Because the print is so busy, the skirt seam and the directional change on the bodice aren't at all obvious. I'll have to wait until the dress is completed to see what, if any, differences there are when the dress is worn rather than laid flat.

Sunday, 29 August 2021

Reissue, reuse, recycle

I've long been interested in how patterns reissued by the 'Big 4' use illustrations. It started off with a Simplicity reissue, which I wrote about here.

Original and reissue - spot the differences*

Then, when researching my dissertation, I looked at the other three companies**. At the time I was doing this McCall's had dispensed with original illustrations altogether, Butterick reproduced them unchanged, and Vogue took the same approach as Simplicity - using what appears to be an 'original' illustration but is actually slightly altered. Not necessarily for the better, either; personally I find the extreme thinning of the (already slim) limbs in this example unnecessary and distasteful.

Slightly different hair and poses - and, apparently, a crash diet

I had always thought that pattern reissues were a relatively modern development, but apparently not. When I was looking at the Autumn 1951 Vogue Pattern Book, this dress in particular caught my eye.

Vogue 7453

Thanks to the Vintage Patterns wiki, I was able to find the pattern, and also discover that it was reissued in 1956. In this case, the reason for the reissue seems to have been the arrival of printed patterns (or in this case, printed and perforated - something for everyone!) Completely new artwork was created, although long white gloves seem to have remained a theme throughout.

Vogue 7453 and 9059, images from the Vintage Patterns wiki

This pattern showed a completely different approach to reissuing, however.

Style 1541, 1960s

I have failed to get hold of this pattern on ebay not once, but twice! But I thought that I had struck lucky when I spotted this.

Style 1189, late 1950s?

At first glance I thought that it was exactly the same pattern, just with different heads. I assumed that, like Vogue 7453/9059, it had been reissued as a printed version, with a coloured envelope and contemporary hairstyles.

Side by side, for better comparison

But when I looked closely, and also compared the pattern backs, I discovered that there was more to it than bouffant hair and slightly shorter skirts.

1189 pattern pieces

1541 pattern pieces


The most obvious change is that the dress on the left is now sleeveless, giving three different styles instead of two. The belt/waistband piece has been removed, instead there is a waist seam, and the detail at the left of the dress waist is round rather than pointed. Plus, the sleeves have been simplified, removing the small pleats at the bottom.

In fact, this not-quite-reissue is the opposite of Vogue 7453/9059. Whereas those had different artwork for the same pattern pieces, the two Style patterns reuse artwork for a (partially) different design. The poses are almost identical, and the accessories, the fur, purse and magazine, are identical. Clearly Style was a very thrifty company! Now, of course, I'll be keeping an eye out for further examples.


* - In the colour illustration the figure on the right, in brown, has a different pose and handbag, is holding her gloves instead of wearing them, and has lost both her hat veil and her waist tie at the back.

** - My inherent interest/nerdiness was helped along immensely by Gillian Rose's Visual Methodologies, which explains, in a very readable manner, just what to look for in images.

Sunday, 16 May 2021

Simplicity 8243 - part 2

Simplicity 8243 is finished, and while there are a few little issues, I'm really pleased with it overall. Unfortunately, a thunderstorm arrived just as I was about to go out and take the photos, so I had to find an indoor location with semi-reasonable light.

The completed blouse

The sleeves are very 1940s, with three small darts to shape the sleeve head rather than gathering, and a shoulder pad for support. I took my usual approach of attaching the sleeve to the armscye first, and then sewing the sleeve and side seams in one.

The pattern has what I assume is a period detail where the opening for the cuff is in the side seam, rather than a separate split in the body of the sleeve which is then finished with a placket. I've never come across this before, but then I've never made up a vintage pattern with cuffed sleeves before, either. Confusingly (for me, at least) the cuff piece is marked for the button and buttonhole, but the notch for joining it to the sleeve is bang in the centre of the piece. This means it's not obvious which cuff goes on which sleeve, and I'm not convinced that I got it right!

The cuff, and its annoyingly central notch

I took the advice in last week's comments (thank you again!), and went for the light buttons. Various online reviews of the pattern, which unfortunately I only read after I had cut it out, mentioned that the front button placement seemed odd. The general opinion was that the top button was too high, and the bottom button was annoyingly right under the skirt waistband, and that both should be adjusted - and this is what I did.

The reviews also mentioned that the blouse seemed a bit short by modern standards, and I found this as well. I made the hem as narrow as possible, to try to compensate.

I find that the upper collar/facing bags out slightly when I'm wearing the blouse, but I don't know if this is a fault of the pattern or a result of my (unnecessary) alteration to move the top button up. Either way, it can be easily fixed by securing the facing to the blouse underneath the reveres.

The left side facing is bulging out a bit here

None of these issues are drastic, but I will bear them mind if/when I make this pattern again. I may also finally grapple with a FBA, as the blouse is slightly snug at the bust point, but not due to lack of ease.

Slight pull on the bust when I have my arms back

As a general vintage blouse I like this a lot, however, and it would be well worth taking the time to tweak the pattern, as I can imagine getting plenty of use out of it.

I will write up the collar point turning method as a separate post, to make it easier to find.

Finally, the Stashometer has inched a little further towards stash-neutral.

Another 1.8m used

Sunday, 9 May 2021

Simplicity 8243 - part 1

I must admit that after all the DIY effort that went into my 1930s wrap dress, it is nice to be making something (almost) straight from a pattern for a change!

Simplicity 8243 is a 2016 reissue of a 1940s pattern. For once, Simplicity's annoying habit of only putting the decade, not the year, on their reissues is appropriate, because according to the CoPA website this pattern was issued twice in the 1940s; as 4279 in 1942, and as 2337 in 1948. The artwork is the same on both versions.

Simplicity 8243

I bought the pattern just for the blouse, as I Don't Wear Trousers (I suspect that this is the sole thing that I have in common with Anna Wintour!). In the past, there has been a lot of talk online about the ridiculous amount of ease added to reissue patterns, something which I found out the hard way with Vogue 8686. 8243 was created around the time that Simplicity started using original patterns for their reissues (rather than making an educated guess from the envelope artwork), but I wasn't sure how accurate it would be in terms of sizing. So, I took an original, slightly later, Style pattern and calculated what degree of ease was included in that. Then I looked at the 'finished garment' measurements on the pattern envelope, and this confirmed that the amount of ease was period-appropriate.

I worked out the ease allowed on this 1950s pattern

It was 3½", and 8243 allows the same

I'm making the long-sleeved version, using a remnant of Liberty Tana Lawn from my stash. Tana Lawn is made in a very old-fashioned width, 136cm/53½", so I had to work out my own cutting layout. It's a beautiful fabric to work with, though.

The fabric

Two pockets seemed a bit much so I chose to only have one, which doesn't really show on this fabric, anyway. After the neckline issue with Butterick 5997, I decided to play it safe and move the top button and collar up slightly; I also let the collar centre back seam out a little to accommodate this. The collar front seemed alarmingly large on the pattern tissue (I blame my horror of massive collars on growing up in the 1970s!) but the finished article, although bigger than I'm used to, doesn't look too bad. I tried a new method of turning the collar points, which worked a treat - I will write it up for the next post.

Progress so far (and invisible pocket)

I have, as ever, a button dilemma. I don’t have any buttons which match the pink accents in the print, and white buttons just don't look right. So, the choice is to pick up the light blue or the dark. The dark blue buttons are more pearlescent than they appear in the photograph, but I wonder if they will be too much of a contrast. The light blue buttons meanwhile look more 1950s than 1940s. Fortunately I can put off the decision for a bit and concentrate on the sleeves.

Button choices

Sunday, 12 April 2020

I finished a thing!

Normally I wouldn't get this excited about finishing a dress, but these are not normal times. I was chatting to my friend F the other night* and we both agreed that our concentration levels are hopelessly low at present. So I'm taking the completion of any task, no matter how basic, as a win.

Woohoo - a finished dress!

This is my second dress made from Vogue 2787. I decided that I wanted to finish it before I started my April projects, as it has been on a hanger on the door of my workroom for ages. I thought it had been there since last year, but actually I started it in August 2018!

The pattern

Its previous appearance on the blog

After I made the front I sewed the centre back, shoulder and side seams, and that was as far as it got. Amazingly, I hadn't lost the facing pieces in the intervening 18 months, so the next thing was to sew those together and attach the facing.

With side seams, and pinned-on facing

After that, all that was needed was the zip (hand-picked, as ever), the sleeve and skirt hems, making and attaching the shoulder pads, and the buttons at the back neck. Far and away the trickiest thing was selecting the buttons. Buttons of any yellow apart from an exact match - which of course I didn't have - looked dreadful, so I experimented with picking out the other colours in the fabric.

Possible button choices

In the end, I settled on the vintage red set on the left.

The buttons in situ - with matching earrings

The soft cotton that I used this time is a far more appropriate fabric choice for this pattern than the crisper cotton I used previously; the gathered sections drape much better.

Showing the gathered sections at the neck and hip.

Sadly, because this was finishing off a dress already cut out, there's no impact on the Stashometer. However, the shoulder pads were covered with lining fabric taken from my 'lining offcuts' stash, and the seams beneath the armholes (the weakest point of this dress) were reinforced with tape from my 'leftover bits of tape and binding' box. Even though I'm a firm believer in wasting as little as possible, sometimes in the past it has seemed a bit daft to keep all these odds and ends when I live so close to a fabric shop and can 'just pop out' for anything I need. Suddenly however it doesn't seem so silly any more!

Home-made covered shoulder pad

Tape to stop the side seam from tearing below the armhole

I'm really pleased with how this dress turned out, and so glad that I finally finished it. I'm looking forward to it getting lots of wear when I can get out and about, and might even manage to get some pictures of it somewhere other than in front of a yellow wall!

Blending in


* - Not in person, obviously. When we stopped to think about it, we realised that our socialising mostly consists of me going round to her house for a good natter and a couple of glasses of wine followed by copious cups of tea - all of which we could easily replicate over the phone. Sadly what I can't do is play with her cat; but he does recognise my voice over the phone, and miaows a greeting to me!

Missing this handsome chap!