Showing posts with label contemporary. Show all posts

Sunday, 19 July 2026

The three Graces

2019 me - What happened to that dress pattern you didn't really like, the one you described as, "OK . . . a good basic dress . . . but I can't say that I love it . . . it just looks a bit sort of rumpled and untidy."?

2026 me - *embarrassed coughing* I've just finished my third version.

To be fair, I did admit in my post on my second one that the Grace Dress from Wardrobe by Me had grown on me. And as predicted, I do wear both dresses a lot. So much so that I decided that I needed a cooler version for when it's too hot for a dress with long sleeves and cuffs.

While on the Great Muslin Hunt for my 1915 ensemble (explanation coming soon), I came across a bright floral cotton lawn which was both lovely and half price, so naturally I caved in and bought a length. It was perfect for my summer Grace.

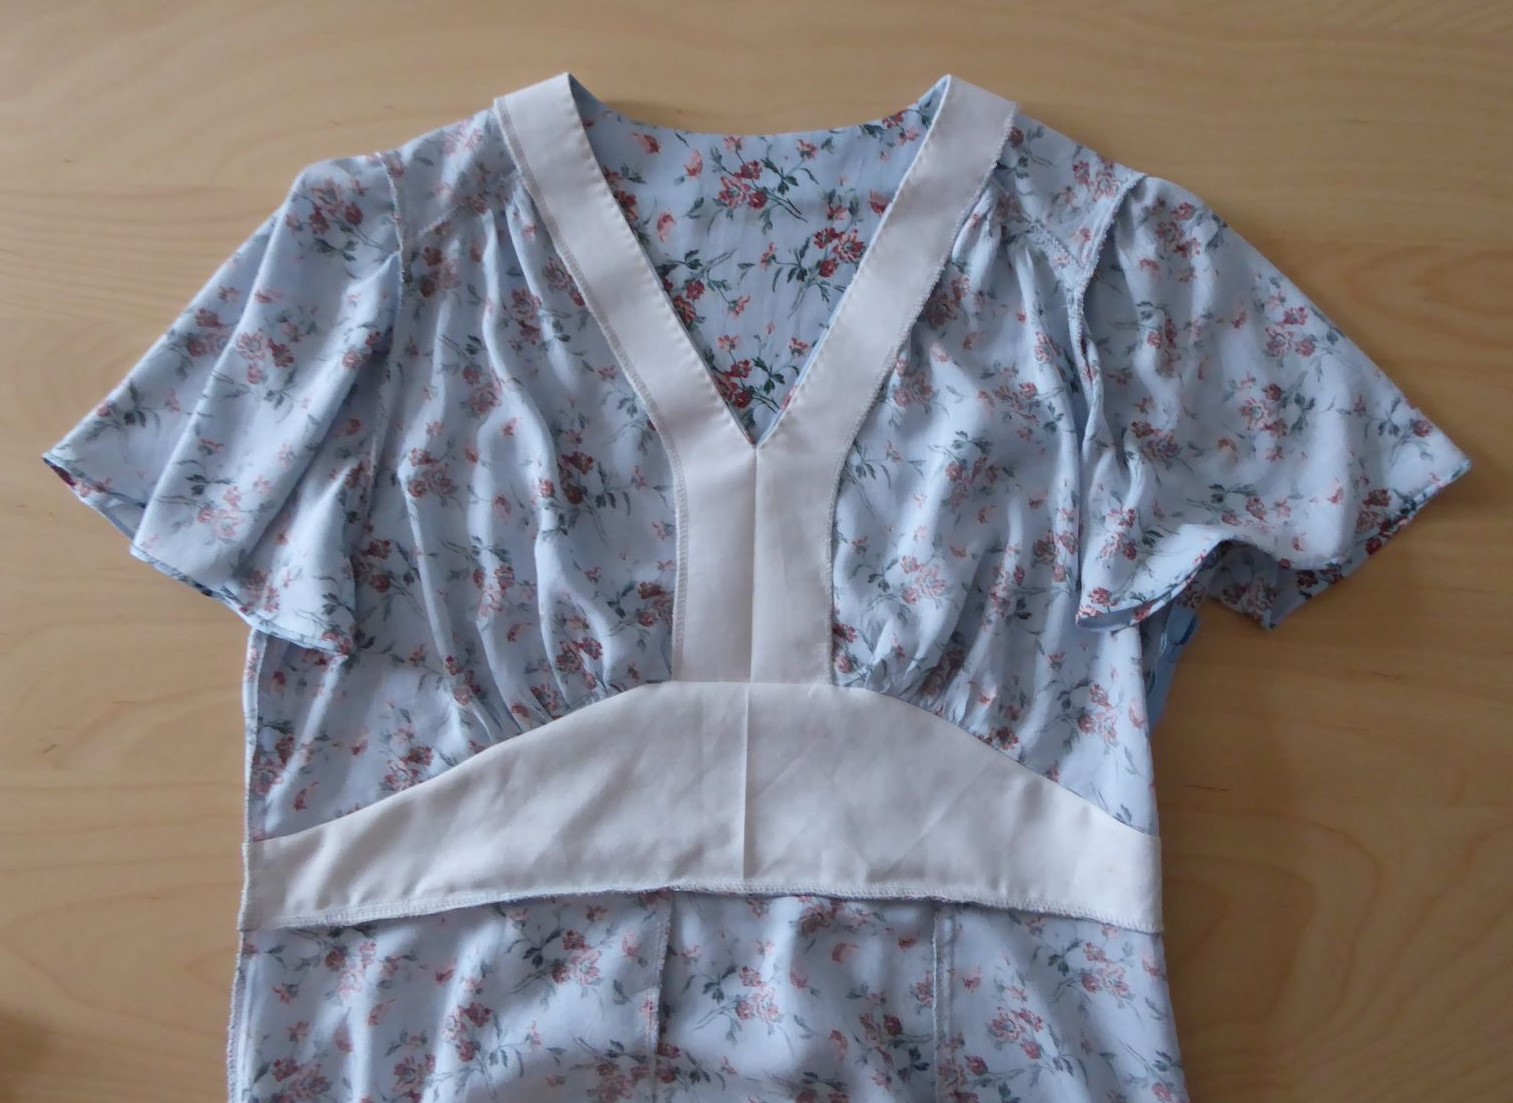
There's not much to say about the construction that I haven't said already. Only that because the fabric is so thin, this time I used plain white cotton in a couple of places so that pattern wouldn't show through to the front. The first was the inside yoke. Because I still don't fully understand or trust the burrito method, this involved checking and rechecking that I had the white and patterned pieces the correct way round. I even photographed the burrito before I unrolled it, so I could re-roll it for unpicking if necessary!

Just in case I needed it

Fortunately, I'd got it right.

All done

The second place was the outer layer of the pocket bags. I wanted to be sure that the white wouldn't show at the pocket edge, so I gave it a wider seam allowance, laid it slightly inside the skirt piece, and machined through all the layers close to the folded edge.

Inside view

From the outside, it just looks like the top-stitching I normally do on the pockets.

Outside view

The short-sleeved version of the pattern includes a wide frill around the bottom edge.

Line drawing of the sleeve option

A quick scroll through the gallery pages of this blog will show that I don't do frills (with the exception of Vogue 8388, where the ridiculous frilliness was the whole point). I considered either a pleated edge or a circular frill and, in the absence of Mum, bombarded my friend F with pictures of possible options. Her view was that the sleeves were better just left plain, and she was right. (What she doesn't realise is that she has now got the job of Official Second Opinion, something which she may come to regret.)

Completed dress, with plain sleeves

#sewnshownseated

I still have some fabric left over, so am wondering what else I can make.

More in than out, as ever

Finally, for once, here's a rare shot of one of my creations in the wild! Way back in the days when I used to dance, Meroe was the director of our middle eastern dance troupe, Ya Raqs. I wore the (completed that morning) dress to her birthday party yesterday, and was able to get a photograph with her and two of the other Ya Raqs girls. Of course, we had to pose outside the tent we used at events.

L to R - Meroe, me (Noor), Pheonece and Kebi

I'm sure that like the other two, this third Grace will get a lot of wear.

Sunday, 3 November 2024

New Look 6000, again

Finally, my sewjo appears to be making a cautious but welcome return. I've made a new dress - entirely unplanned and, for once, not in a vintage style!

It's a pattern from the 21st century!

When I went to the preview of the Bedazzled exhibition the other week, guests were encouraged to wear their most sparkly outfits. Unfortunately for me, the most/only sparkly thing in my wardrobe was the purple version of New Look 6000 view C with its beaded buttons.

The sum total of bling in my wardrobe

Given that I made it back in July 2012, I wasn't sure if I would still be able to get into it! To my amazement, I could, and wearing it again reminded me just how much I liked it. So much so that I decided on a whim to make a new version, using a stashed length of blue/grey fabric. It is suiting weight, slightly stretchy, and was part of a bundle of sewing stuff that I had bought in a charity shop because I wanted something else in the bundle.

New dress!

There isn't really a lot to say about the construction. I made the sleeves a little longer and omitted the cuffs as they are a nice feature, but bulky. Something which can't be worn with a jacket or cardi over the top was fine when I worked in a warm office - nowadays, not so much! I had also forgotten just how much New Look patterns run short on me; even though I had lengthened the skirt, it still needed a seam binding finish in order to make the hem as tiny as possible. Finally, I definitely need to learn how to do a full bust adjustment on a sheath dress, as it's undoubtedly snug in that area. Overall though, I'm happy.

#sewnshownseated

I'm particularly pleased with the button on the collar. I wanted to do some sort of beading again, but couldn't think what. Then I remembered this hair ornament which Dante Gabriel Rossetti used in several of his paintings.

Clockwise from top left, details from: Monna Vanna, The Beloved, A Christmas Carol, Mariana, The Bower Meadow

I drew a spiral freehand on some tearaway stabiliser (accidentally in the opposite direction to the original!), and sandwiched the fabric between this and a scrap of cotton to stop it from pulling out of shape. I sewed down a small cabochon at the centre, then couched a string of silver beads around this and along the spiral, and removed the stabiliser. Finally, I did single stitches in silver thread between the rows of beads, and arranged the end result over a large self-cover button. Because the fabric underneath blends into the dress, I feel that it gives a similar effect to the Rosetti ornament.

Close-up of the button

Finally, this unplanned project is another reduction on the Stashometer.

I'm amazed that I've used that much, tbh

It may only be a couple of metres, but with less than two months to go to the end of the year, I'll take any win I can get!

Sunday, 5 May 2024

A new 'Grace'

Some things are slow burners.

Exactly five years ago next week I finished making a Wardrobe By Me Grace dress. As I wrote at the time, I wasn't totally enamoured of the end result. It was nowhere near Dress of Frump standard (my benchmark/nadir for dressmaking failures), but it certainly wasn't my new favourite dress, either.

To be fair, I did describe it at the time as a "good basic dress", and over time it has become one of my go-to dresses. The drawstring waist means that it's always comfortable - and a doddle to iron, as well. It always looks smart, and can be dressed up or down. And it has pockets. In short, it's had a lot of wear over five years, and while it still looks perfectly presentable, I decided that it was time to make another one.

I suspect that part of the design's allure is its late-1970s vibe. The band collar, shoulder yoke, and lack of darts or waist fitting - these are all details regularly found on my beloved 1979 Style patterns. So when, while documenting some more of the Stash Shop, I found a length of cotton which I had bought simply because the print was so utterly 1970s . . . well, it was clearly a match made in heaven.

1970s details, meet 1970s fabric

Happily, I had just the right amount.

The layout did take careful planning

There isn't a lot to write about the construction, except to say that I was glad that I'd noted the first time that all the work is in the bodice, as it seemed to take forever to complete. I reinforced the pocket edges again, this time using selvedge from the fabric. I also lengthened the skirt back at the centre, which made it easier to get the hem level.

One thing I really like about this pattern is that it has proper sleeves with cuffs, a detail which is vanishing rare these days. To my delight and astonishment, I found the perfect buttons in my button tin.

Right colour, size and number - it's a miracle!

And here is the finished dress. I was a little concerned that the cotton poplin might hang more stiffly than the viscose I used previously, but it is fine.

With pockets!

One thing which has changed since I last made this dress is that I now take seated photographs. So here is Grace, seated.

#SewnShownSeated

I may have had my doubts about my first Grace, but I have none about this one; it is undoubtedly going to join its predecessor in the 'heavy rotation' category in my wardrobe. Plus, it's a few more metres out of the stash.

Another 3.5m gone

Sunday, 31 December 2023

One last project

Talk about cutting it fine! This afternoon I finished one last item for 2023. It's another version of New Look 6070.

New Look 6070 (now out of print)

I made my first version way back in January 2015, so almost nine years ago. I hadn't worn it for a while, mostly because I didn't think it would still fit. But I tried it on, it fits, and the John Kaldor crepe still looks brand new, so it is now back in regular use.

Then I discovered in Deep Stash a bag of lengths of stretch velour from my dance costuming days. Most are long pieces, but there was a green piece which was shorter, so I decided to try making a version of the dress. Some of the creases from long storage just wouldn't budge, but I was able to cut around the worst of them.

Because I'm not used to working with stretch fabrics, I stay-stitched every edge which I thought might stretch.

I got through a lot of tacking thread in this project!

I also lined the dress, to give it a bit more stability. I had lined the original version, but was able to just sew the bodice lining to the neck facing.

My usual approach to adding linings

However because I was using velour, I dispensed with facings for this one. I ironed the interfacing onto the lining, and sewed round the edge to keep it secure. The bodice and lining necklines were cut to accommodate turn of cloth, and the velvet rolled in nicely when the two were sewn together.

Sewing fabric with a pile requires a different approach

Somehow, I made a complete hash of the zip. In several recent makes I have sewn the zip in too high up, and not had room for a hook and eye at the top. With this dress, I overcompensated. Really overcompensated.

*facepalm*

I wasn't that bothered, as this is really just a wearable toile, and a second hook and eye filled the gap perfectly.

And here is the finished dress, looking very festive.

Not bad for a last-minute project

Especially festive in this shot, where I appear to be wearing a Christmas tree on my head!

#sewnshownseated

Because both the velour and the lining came from stash, this meant that I was able to get the Stashometer down to a gain of under 20m.

It's looked worse at the end of a year

In fact, if I remove the 2022 purchases which I carried over, I actually used more fabric than I purchased! Yes it's a bit of a fix, but I'm taking it. Now to repeat the trick in 2024.

Green!

A Happy New Year to all.

Sunday, 21 August 2022

Curiosity

It's known for being a bad idea for cats, but what about dressmakers?

New Look 6594. I altered the pattern over and above my usual adjustments while I was making it, and then last week I altered the finished dress some more. I'm much happier with the sleeve position now, but moving the sleeve up the shoulder means that its hem is now far from level. And the bodice is still a bit too long. Plus, the very wonky fabric printing meant that I had to make all sorts of compromises when cutting the dress out.

In short, I wondered what the dress would look like if it were made properly.

Having another go

Redrafting the bodice to have a shorter, slightly dropped, shoulder and a shorter bodice overall was quite an exercise, especially as the pattern has no shoulder seam - the back comes over the shoulder to form a faux yoke. And the front is in two pieces. But happily, everything came together, and all the seams matched. I kept the sleeves the same length at the underarm seam, but lengthened them at the centre.

For fabric, I used a floral viscose which had been banished to the naughty bin because it was so thin that the pattern showed through anywhere where there were two layers of fabric. To get round this, I decided to use plain fabric for the facings and midriff lining. I had no plain viscose however, and all of my cottons seemed too stiff. Fortunately, I found an old toile from my dance-costume-making days, which had been made from an old and by now very soft bedsheet - re-recycling! It also had the advantage of adding a tiny bit of extra body to the midriff section.

Interior

There's not a lot to say about the construction, except that I managed to sew the skirt pleat the wrong way round, despite having the first version of the dress right next to me for reference! Sigh. I hand sewed small rolled hems on the sleeves to keep them drapey. As with the first version, I went for a length between views A and C.

Version two

Also as with the first version, I didn't sew down the front skirt pleat. The result is a skirt which doesn't bunch up when I'm sitting, but isn't hugely full, either.

#sewnshownseated

In terms of look, I see it as 'vintage adjacent'. It's a bit of a mix; the midriff section is very 1940s, while the sleeves (of this view at least) are more 1930s. The neckline is ideal for showcasing this 1930s necklace which belonged to my maternal grandmother, while the dark and light greens in the print go nicely with these shoes which I rarely get a chance to wear.

The necklace fits nicely

Showing off the shoes

I must admit though that I'm still not entirely happy with this dress. The right sleeve seems to hang slightly oddly, and the whole thing is a teensy bit baggy. Possibly a waist tie at the back might help? I see a strong possibility of more tinkering ahead! On the plus side, it has used up some more stash fabric, which is always good.

Still a long way to go - part two

Sunday, 14 August 2022

A new look from New Look?

Just a short post this week, because
a) it's hot
b) I'm not long home after a train journey which was far longer, slower, overheated and tiring than I expected, and
c) did I mention that it's really, really hot?

This week has been about lots of little sewing admin jobs. I've drafted the proper version of my alterations to Style 1271, and I've tweaked a dress which was annoying me - New Look 6594.

When I made this dress a year ago, I noticed that the shoulders were too long on me, so redrafted the armscye to shorten them by ½". But after wearing it several times recently, I came to the conclusion that the shoulders were still too long.

This is very odd. A quick glance at the Contemporary Gallery page of this blog shows just how many New Look patterns I've made up over the years. It was my go-to brand until I started vintage dressmaking in earnest, and my work wardrobe consisted almost entirely of dresses from New Look patterns. In short, I would have noticed if the shoulders were consistently too long.

I went back to comparing the line drawing of New Look 6594 to that of a tried and trusted favourite (I've made it four times!) New Look 6093. The distance from sleeve seam to centre front looked pretty similar. But whereas 6093 fits perfectly, the sleeve of 6594 is sliding off my shoulder and down my arm, even with the ½" reduction.

New Look 6594 (top) and 6093 (bottom)

I unpicked the top section of the sleeve seams, and repositioned the sleeves a further ¾" up the shoulder. The dress hangs better (although I could possibly adjust a little for shoulder slope), and I'm much happier with the way it looks.

The sleeve hangs much better now

But overall, that’s a whopping 1¼" difference from the pattern! All my other existing New Look dresses still fit fine, so it's not that my shape has changed. All of those dresses however are from patterns dated 2015 at the latest, whereas 6594 dates from 2019. Which makes me suspect that New Look have changed their sloper – the basic design from which all their patterns are derived.

It's hardly the end of the world. I rarely even look at new releases from the Big5 pattern companies these days, and if a new New Look pattern does catch my eye well, I know what alterations I need to make. But it's just a little irritating that a brand can change its product so much without warning.

Sunday, 7 March 2021

Fixing Butterick 5997

Back in February 2019 I posted about making Butterick 5997 and the problems with the finished article, namely the absurd amount of overlap on the cuffs and the alarmingly low front. (There was no doubt about the cuffs, but I wondered if I was being overly fussy about the front, so I asked a friend for a second opinion - her response of, "Blimey, I see what you mean", convinced me that I wasn't being fussy!)

The cuffs were far too wide for me, hence the massive overlap

The low-cut front, with a tee-shirt underneath

I vaguely thought about trying to fix it, but other projects always claimed precedence, so it just hung on a hanger for the better part of two years.

The catalyst for doing something about it was that I recently read Overdressed, by Elizabeth L. Cline (thanks for the recommendation, Juliana), about fast fashion. While I don't buy many clothes nowadays, Cline's exhortation to fully utilize the clothes you own - either by wearing them or passing them on to charity, did make me think about my unworn top. At the same time I read somewhere that charity shops in the UK can't resell handmade clothes because they lack the legally-required composition labelling, so just sell them on for scrap. I don’t know if this is true, but the risk of my top being shredded for seat stuffing struck me as a criminal waste of Tana Lawn, so there was no option but to finally fix it.

The cuffs were relatively straightforward. I calculated that there was 1¼" of excess fabric beyond the button, so I cut off the button, unpicked the cuff from the sleeve, thanked past Ms Tulip for not trimming the seam allowances to nothing, shortened the cuff, pleated up the excess sleeve width, reattached the cuff and reattached the button. There was already a pleat at the buttonhole end of the cuff, and I was sorely tempted to create a matching pleat at the button end so that I wouldn’t have to unpick the whole cuff. But if a job's worth doing . . . . Regretfully, I decided that there was no point replacing something which annoyed me with something else which annoyed me slightly less, and did the job properly. There are now two pleats at the buttonhole end.

The fixed cuff, with pleats (plural)

The only possible solution for the low front was to make an infill piece. I did consider making it from leftovers of the fabric, but decided that it would look odd. So instead I made it from scraps of plain white cotton left over from my Victorian underwear.

The first job was to work out the size of the new piece. The top is pull-on, and there would be no point in carefully making and attaching the infill, only to discover that I couldn't get the end result over my head! Once this was decided, a 'pattern' was made by laying a piece of tissue inside the top in the correct position, drawing along the finished edge, and then adding an allowance for the overlap. I hand-pintucked a piece of the cotton, and added some tiny purple buttons. Next, I sewed on another piece of cotton along the top edge, right sides together, and folded it over. This created a neat edge, and also made the insert less flimsy. I marked the outer edge of the pattern with a frixion pen, and machined the two pieces together.

Making the insert from cotton scraps

I had considered unpicking the neckline of the top and fitting the insert between the top and the facing, but this seemed a step too far. Instead I overlocked the edges of the insert, and sewed it onto the facing, close to the edge.

The attached insert, from the inside . . .

. . . and from the outside

It's fortunate that the print of the fabric is quite old-fashioned looking, so the insert doesn't look entirely out of place. Also, I think that sewing the pieces together as close to the blouse edge as possible helps to make the insert look like part of the top rather than something worn underneath.

Wearing the updated top

I doubt if this will ever be a 'favourite' top, but it has a lot of design features which I like, and I will, now, finally, get some wear out of it. It’s always very tempting to just move from one shiny, exciting new project to the next one but as with the 'Meh' skirt, I did find taking the time to finally fix this a surprisingly satisfying job.

The side view makes it clearer that the insert isn't a separate garment

Sunday, 1 December 2019

Saying 'thank you' with sewing

Readers who have stuck with this blog through the long process of my Masters dissertation (thank you!) will have seen references to the Dissertation Police. These are the two friends who kept me going while I wrote it, using a judiciously applied mix of encouragement, nagging, mild threats, cups of tea, and occasional alcohol. Some time ago I promised that I would make something for each of them as a thank you once I had completed, and the first of these makes is now done.

F loves teddy bears, and has asked me to help her to make one herself, which is going to be a learning curve for both of us. However she is busy at work until Christmas, so this is a project for next year. D meanwhile asked for a dressing gown.

For the pattern I settled on Vogue 8964 - partly because I like Vogue patterns and have had good results with them, but also because the dressing gown is lined. D lives in a cold Victorian house which is even colder than my cold partly-Victorian house, so an extra layer seemed like a good idea. He also dislikes synthetic fabrics, so my plan was to make it up in some sort of thick cottons. However, it was only when I had actually arrived in the fabric shop that I realised that I had forgotten to ask him what colour he wanted! Proof of how rarely I sew for other people. The reply to my hastily-sent text was "claret". I found some cotton remnants which fitted the bill, plus a roll of plain thick cotton twill. The colour was listed as 'burgundy', but I decided that this was one occasion when I could safely mix my drinks!

The pattern and the fabrics

My plan was to use the twill as the main fabric, the more subdued remnant on the left as the lining, and the brightly coloured remnant for the cuffs, revers, and pocket tops. I did worry that D might think the second remnant was a bit much, but fortunately he loved it.

The dressing gown comes in two lengths. Vogue patterns are always too long on me, but D was happy to go with the longer length, to make the end result as warm as possible. I also thought that the sleeves might be a bit too long, but again D saw the idea of extra coverage as a bonus.

The thickness of the cotton twill provided certain challenges. Making the belt loops by sewing them right sides together and turning them through proved impossible, so I folded the raw edges in and in effect top-stitched them. Similarly folding the fabric twice for the hem was not going to work, so I turned it up once, and enclosed the raw edge in bias binding.

Belt loop

Hem

The twill also proved a nightmare to press. The slightest touch of an iron was enough to create a shiny patch, so I needed my press cloth at all times. Pressing the seams open also left a mark on the right side, so I improvised a seam stick from a length of dowel wrapped in a piece of cotton - the curved shape means that the iron only presses against the centre section.

The pattern was straightforward to put together, but when it came to attaching the facing/lining to the main garment I realized that there was no allowance made for turn of cloth. Vogue Patterns, I expected better of you (although to be fair, the pattern is intended for thinner fabrics). This was easy to improvise by pinning the facing slightly inside the main piece.

DIY turn of cloth

The pattern does however include instructions to attach the lining at the top and bottom of the sleeve seam with French tacks - a nice couture touch.

French tacks secure the lining to the main part of the garment

None of the issues encountered were really problematic though, and I was very pleased with the end result.

Showing the lining, and the fabric-conserving facing

It was only when I came to photograph it that I realised something. Vogue 8964 is a decidedly modern pattern.

The pattern envelope

However, with the choice of colours and the contrast sections, I had produced something more like view A of this pattern (albeit minus the breast pocket).

Vogue 8753, circa 1940

Spot the similarity

It's as if I just can't stop myself from sewing vintage styles!

Because the dressing gown was finished earlier in the week it meant that I was, finally, able to participate in a Sewcialists theme month challenge, namely November's Giving Challenge. I've watched previous challenges come and go but been too busy to take part, so it was great to have both the time to do it and the perfect project.

Also on the giving theme, I decided that the Stashometer wasn't going to turn to the positive in the space of a month without help, so I had a destash. A bit of a cheat I know, but desperate times require desperate measures. Several lengths of fabric that I knew that I would never use except for mock-ups (which seemed a waste as they were perfectly good fabric, just no longer part of my sewing plans) were donated to charity. Hopefully they will be just what someone else wanted.

It's green - woohoo!