Sunday 30 May 2021

Inverted-pleat skirt - part 1

Only a short post this week. I had planned to finish my new skirt this weekend, but then a mysterious yellow, round, hot thing appeared in an unusually blue sky, and all plans went out of the window. May has been such a miserable month that I just had to take advantage of a super-rare sunny Bank Holiday weekend, and enjoy the novelty of sitting outdoors without being hailed on!

To recap on my plan: I wanted to make a vintage-style skirt with a centre front pleat and a slight flare, to go with my new shoes.

Plans

This was my starting point, but it was not my size and the skirt was straighter than I wanted.

Simplicity 2480, 1937

View 2 of this had a similar overall look, without the problems, so seemed like a better bet.

Style 2025, 1977

When I came to look at the pattern pieces, however, I discovered that the two patterns handle the centre pleat very differently. The Style pattern has the extra fabric for the pleat running the full length of the skirt, which seemed to me to add a lot of unnecessary bulk to the front.

There's a lot of fabric in that skirt front

The Simplicity pattern uses a construction I've never come across before. The skirt front pieces have an extension for the pleat which folds back at the centre, and then a separate 'pleat underlay' forms the back of the pleat.

The skirt front folds along the dots, and the underlay is attached

Of course, I wanted to try this out, so I drafted my own design using elements of both patterns. The skirt back is cut in a single piece and the zip is in the side seam, which is the Simplicity construction method.

The pattern is missing its instructions, but it was fairly easy to guess the skirt construction. I had made life harder for myself by choosing a fabric with a check in it, but I was able to match the two fronts and the pleat underlay.

Pinning the underlay in place, the chalk Ws are for 'wrong side'

Stupidly, I cut the front with the red line at the centre and the back with the blue square at the centre, so the horizontal lines match at the side seams, but the vertical lines do not. I stabilized the curved zip opening with tape, and hand-picked the zip.

Pattern semi-matched, and the completed zip

And that is as far as I've currently got. Tomorrow is forecast to be even hotter, so I might want to just stay indoors and sew!

Sunday 23 May 2021

Simplicity 8243 - the blouse collar

Here, as promised, are my notes on how to turn the very pointy collar points of Simplicity 8243. The approach I used is a little more complicated than just using something sharp to push them through, but there's no risk of accidentally pushing the scissors/bodkin through the fabric and making a hole.

The blouse collar has a very sharp point

Unfortunately, I can't remember where I came across this method, so I can't give credit where it's due. If I ever find it again, I'll be sure to update this post with the details.

I forgot to take any photos of the process as I was making the blouse, so for the purposes of this tutorial I made a mock-up of just the collar point. I've made no attempt to compensate for turn of cloth, and I've used contrast thread to make it more visible. If you've never used this method, you might want to make a similar mock-up to try it out before working on the real thing. Click on any photo to enlarge it.

First, mark where the stitching needs to pivot at the collar point.

Seam allowances marked with Frixion pen

Next, sew the seam and stop one stitch before the pivot point, with the needle down. Raise the presser foot.

The needle positioned one stitch before the point

Cut a length of thread in a contrast colour, approx. 20cm/8" long. This should be proper sewing thread (Gütermann, Drima etc.), not soft basting thread, as it needs to be strong. I've used red, and will refer to this as the 'red thread' from now on. Lay the red thread between the two layers of fabric, at right angles to the stitching line, and pull it straight and back slightly so that it is right up against the needle. The two ends either side of the needle should be of equal length.

The red thread pulled up against the needle

Lower the foot, and take a single stitch, ending with the needle down.

Raise the foot, and pivot the fabric ready to sew the next part of the collar. With the foot still up, take the left end of the red thread, and carefully bring it round the back of the needle so that it ends up lying parallel with the right end, still between the two layers of the collar. Make sure not to pull on the right end in the process.

The left end of the red thread (top) moved round to join the right end (bottom)

Take both ends of the red thread, and tuck them inside the collar, pulled taut and lying against the machine sewing you have just completed. You may need to temporarily unpin a section of the next part of the seam to do this. In the next picture, I have folded back the top layer of the mock-up to show the red thread, but it should be lying further to the left. It's important that it's out of the way of the next line of machine stitching.

The red thread positioned inside the collar

Once the red thread is in place, repin the seam and continue to sew the collar. The red thread has now formed a loop around the stitch at the point of the collar. Repeat the process on the other collar point.

The mock-up stitching complete, with the red thread just visible

Press the seam, then trim and grade the seam allowances. Taper the seam allowance to almost nothing at the collar point. Snip the curves.

Seam allowances trimmed etc.

Turn the collar right side out, leaving the points to last.

Turning the collar out

Take hold of both ends of the red thread, and gently but firmly pull on them. This will pull the point out.

After pulling on the red thread ends

To remove the red thread, simply pull on one end.

The red thread is easily removed

Press the collar, and admire your pointy points!

The real life collar

As ever, if you have any questions please get in touch via the comments, and I'll do my best to help.

Sunday 16 May 2021

Simplicity 8243 - part 2

Simplicity 8243 is finished, and while there are a few little issues, I'm really pleased with it overall. Unfortunately, a thunderstorm arrived just as I was about to go out and take the photos, so I had to find an indoor location with semi-reasonable light.

The completed blouse

The sleeves are very 1940s, with three small darts to shape the sleeve head rather than gathering, and a shoulder pad for support. I took my usual approach of attaching the sleeve to the armscye first, and then sewing the sleeve and side seams in one.

The pattern has what I assume is a period detail where the opening for the cuff is in the side seam, rather than a separate split in the body of the sleeve which is then finished with a placket. I've never come across this before, but then I've never made up a vintage pattern with cuffed sleeves before, either. Confusingly (for me, at least) the cuff piece is marked for the button and buttonhole, but the notch for joining it to the sleeve is bang in the centre of the piece. This means it's not obvious which cuff goes on which sleeve, and I'm not convinced that I got it right!

The cuff, and its annoyingly central notch

I took the advice in last week's comments (thank you again!), and went for the light buttons. Various online reviews of the pattern, which unfortunately I only read after I had cut it out, mentioned that the front button placement seemed odd. The general opinion was that the top button was too high, and the bottom button was annoyingly right under the skirt waistband, and that both should be adjusted - and this is what I did.

The reviews also mentioned that the blouse seemed a bit short by modern standards, and I found this as well. I made the hem as narrow as possible, to try to compensate.

I find that the upper collar/facing bags out slightly when I'm wearing the blouse, but I don't know if this is a fault of the pattern or a result of my (unnecessary) alteration to move the top button up. Either way, it can be easily fixed by securing the facing to the blouse underneath the reveres.

The left side facing is bulging out a bit here

None of these issues are drastic, but I will bear them mind if/when I make this pattern again. I may also finally grapple with a FBA, as the blouse is slightly snug at the bust point, but not due to lack of ease.

Slight pull on the bust when I have my arms back

As a general vintage blouse I like this a lot, however, and it would be well worth taking the time to tweak the pattern, as I can imagine getting plenty of use out of it.

I will write up the collar point turning method as a separate post, to make it easier to find.

Finally, the Stashometer has inched a little further towards stash-neutral.

Another 1.8m used

Sunday 9 May 2021

Simplicity 8243 - part 1

I must admit that after all the DIY effort that went into my 1930s wrap dress, it is nice to be making something (almost) straight from a pattern for a change!

Simplicity 8243 is a 2016 reissue of a 1940s pattern. For once, Simplicity's annoying habit of only putting the decade, not the year, on their reissues is appropriate, because according to the CoPA website this pattern was issued twice in the 1940s; as 4279 in 1942, and as 2337 in 1948. The artwork is the same on both versions.

Simplicity 8243

I bought the pattern just for the blouse, as I Don't Wear Trousers (I suspect that this is the sole thing that I have in common with Anna Wintour!). In the past, there has been a lot of talk online about the ridiculous amount of ease added to reissue patterns, something which I found out the hard way with Vogue 8686. 8243 was created around the time that Simplicity started using original patterns for their reissues (rather than making an educated guess from the envelope artwork), but I wasn't sure how accurate it would be in terms of sizing. So, I took an original, slightly later, Style pattern and calculated what degree of ease was included in that. Then I looked at the 'finished garment' measurements on the pattern envelope, and this confirmed that the amount of ease was period-appropriate.

I worked out the ease allowed on this 1950s pattern

It was 3½", and 8243 allows the same

I'm making the long-sleeved version, using a remnant of Liberty Tana Lawn from my stash. Tana Lawn is made in a very old-fashioned width, 136cm/53½", so I had to work out my own cutting layout. It's a beautiful fabric to work with, though.

The fabric

Two pockets seemed a bit much so I chose to only have one, which doesn't really show on this fabric, anyway. After the neckline issue with Butterick 5997, I decided to play it safe and move the top button and collar up slightly; I also let the collar centre back seam out a little to accommodate this. The collar front seemed alarmingly large on the pattern tissue (I blame my horror of massive collars on growing up in the 1970s!) but the finished article, although bigger than I'm used to, doesn't look too bad. I tried a new method of turning the collar points, which worked a treat - I will write it up for the next post.

Progress so far (and invisible pocket)

I have, as ever, a button dilemma. I don’t have any buttons which match the pink accents in the print, and white buttons just don't look right. So, the choice is to pick up the light blue or the dark. The dark blue buttons are more pearlescent than they appear in the photograph, but I wonder if they will be too much of a contrast. The light blue buttons meanwhile look more 1950s than 1940s. Fortunately I can put off the decision for a bit and concentrate on the sleeves.

Button choices

Sunday 2 May 2021

Hack it or draft it - part 2, finally complete!

My hack-it-or-draft-it challenge dress (the one which was meant to be completed in *coughs* March), is done at last!

Once I had an actual dress-shaped garment to try on, I decided to take out the front skirt pleat - it wasn't needed, and it seemed to make the skirt hang oddly. The next thing to consider was the waist ties. On the original pattern they are cut as a single layer of fabric and hemmed, but because I was using satin, I had to make them double thickness. My initial cutting layout had allowed for very long ties, and I chose to make them the full length of the fabric available, on the basis that I could shorten them later if I wanted, but I couldn't lengthen them.

This did make the ties quite heavy, and when tied they pulled down from the waist. To get round this I added a belt loop at the point where the bow is tied. Both waist ties are pulled through the loop, but despite this it only needed to be small, as the fabric compacts a lot.

The teeny tiny belt loop

The loop sewn is stitched through the dress and onto the waist stay inside. I have put waist stays into several dresses, but Gisella's comment on last week's post (and a huge thank you to her and to everyone else who takes time to comment - I do read them all) reminded me that not everyone may be familiar with this handy feature.

A waist stay or stay tape is basically a close-fitting internal fabric belt on a dress. It is usually made from petersham or grosgrain ribbon, with either a snap or hook-and-eye fasten (I prefer the latter). In effect, it acts as a waistband and provides structure to the dress; supporting full, heavy skirts such as those on Vogue 8789, and/or allowing the bodice to create a blouse effect, such as Vogue 5215. Without a waist stay, both of these dresses would just hang from shoulders and distort.

Dresses with waist stays - Vogue 8789 and Vogue 5215

The waist stay is usually only attached to the dress at the seams; sides, centre front and centre back. However, because this dress is made from such a drapey fabric, I chose to attach the stay to the waist seam allowance all the way round. Sewing the belt loop onto the stay rather than just the dress gives it more support to hold the weight of the ties. I also attached long hanging loops to the stay, to take the weight when the dress is on a hanger.

The waist stay and a hanging loop

After the amount of effort which went into this dress, I would have liked to get some decent pictures of it. Unfortunately, other commitments meant that this was not possible just now, so it was quick back yard shots instead.*

(Update, 10/05/21: The photos have been updated. Still back yard shots, but better light and better hair!)

I started off with the waist ties in a big bow, as per my inspiration image.

In a bow at the side

But then I realised that I could wrap them round my waist, and have a small tie like the one on the pattern illustration.

Centre front tie

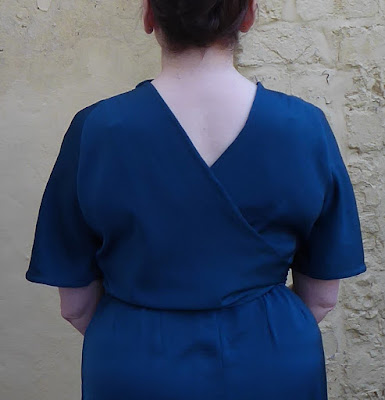
I can't remember if I mentioned it in a previous post, but I redrafted the back pieces to make the crossover point slightly higher up.

Back view showing the wrapover

Clearly I need a longer slip, as the skirt generates static and sticks to my legs with the slightest movement, but I'm really pleased with the dress. Plus, it's more fabric out of the stash, and my first UseNine2021 project completed as well - woot!

Getting closer to stash-neutral (for this year at least)

One down, a mere eight to go!

* - In other news, I am experimenting with growing out my fringe. I've had it for over 25 years, and decided that if I wanted to grow it out, the time when it already had five months of lockdown growth was the time to try. Prepare for all manner of unfortunate hairstyles until either I give up or it gets long enough to fasten back properly!