Showing posts with label black velvet dress. Show all posts

Sunday, 19 December 2021

and . . . All done!

You know what? For once I'm not going to lead into this. I'm just putting it right there, at the top of the post.

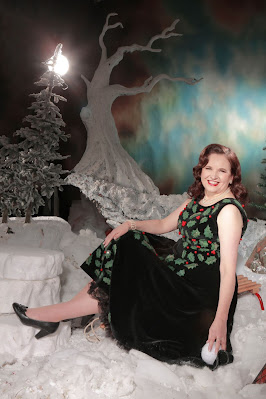
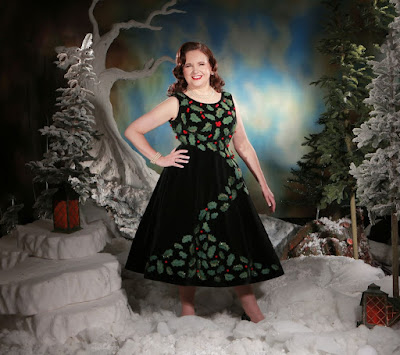
Looking ever-so-slightly different

No, there hasn't been a sudden extreme snowfall in my back yard. And also no, I haven't vastly improved my hair and makeup skills in the last few weeks, either. All will be explained shortly.

I actually finished the dress in the very early hours of Monday morning (night owl tendencies right there), almost 36 hours before it was needed. Possibly some sort of record.
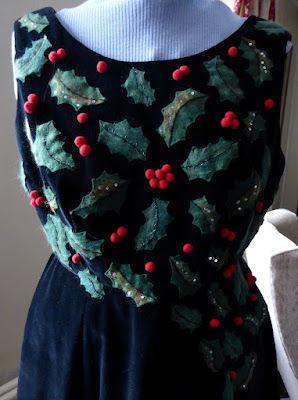
Love the glinting sequins in this shot

As ever, I hadn't kept a tally, but I reckon that I spent about 200 hours working on this dress in total. That's a lot of hours for one dress. But it all comes down to why I sew. As I've mentioned several times before on this blog, I don't sew because I need more clothes (although being able to create garments which fit is a huge benefit), I do it because I enjoy sewing. I enjoy creating, I enjoy the tactile qualities of working with cloth and thread and, especially over the last two very trying years, being absorbed in a sewing project does wonders for my mental health. But in order to experience these benefits without ending up with a bulging wardrobe, it's necessary for at least some of my projects to be long and labour-intensive ones.
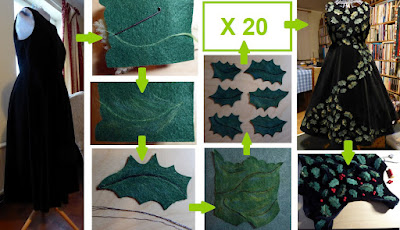
This is where most of those 200 hours went

In some ways, having the blog makes this more difficult. Because I'm posting every week, it's hard to overcome the feeling that there needs to be a steady stream of shiny new toys to maintain interest, rather than progress reports on the same, long, project. But on the other hand, sewing does take time, and perhaps I should be reflecting that. I'd be interested to hear what readers think - let me know in the comments.

But anyway. A dress which took that long deserves a better record than my usual back-yard-or-indoors-if-wet snaps, and for this I have Ms1940McCall to thank. She regularly works with professional photographers to create stunning pictures of herself wearing her beautiful forties creations and I discovered that one of these photographers, Neil Kendall, is based in Chester.

Now much as I don't like having my photograph taken, when you're a vintage dressmaker and you discover that you live literally a ten-minute walk away from an award-winning vintage photographer well, it seems silly not to take advantage of the situation. In fact, it was Neil's announcement that he was taking booking for shoots on his 'Winter Wonderland' set, complete with hair and makeup by Bethany Jane Davies, that spurred me into finally starting on my version of the holly dress.

I woke up on the morning of the shoot thinking, "What. Have. I. Done?", but I needn't have worried. The whole thing was very relaxed. Although Neil and Bethany frequently work with professional models, they were brilliant at putting a complete novice at ease. Bethany, who has won awards for her Old Hollywood hair and makeup, gave me a look entirely in keeping with the mid-fifties provenance of the dress. While the makeup was definitely not an everyday look, I'll certainly be attempting to recreate the hair. Even a couple of days later, people were telling me they loved the style!

Neil meanwhile is a master of old school lighting to recreate that real vintage feel, and also a master at calming nerves and suggesting poses.

Going for that Picture Post look

Of course, there were some seated shots as well.
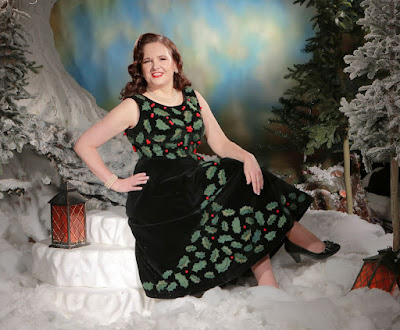
#sewnshownseated

Showing the non-leafy side

It was all entirely new to me, totally out of my comfort zone, and huge fun in what has largely been a fun-free year.

Meanwhile, the practicalities. This has brought my number of #UseNine2021 makes to the miserable total of three! Family commitments have limited my sewing time this year, but that's still poor.
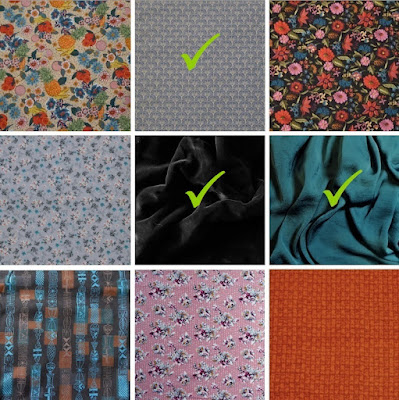
Ouch

I've also only managed to use one of the four fabrics I carried over from last year. The dress actually took 3.5m of the 4.5m remnant, but what's left is too marked and full of weaving faults to be much use, so I'm writing it off, stash-wise.
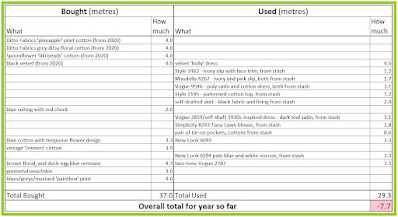
Sigh

But - I'm proud of what I achieved with this dress, and I'm thrilled with the pictures, too, so I'll finish with a final one.
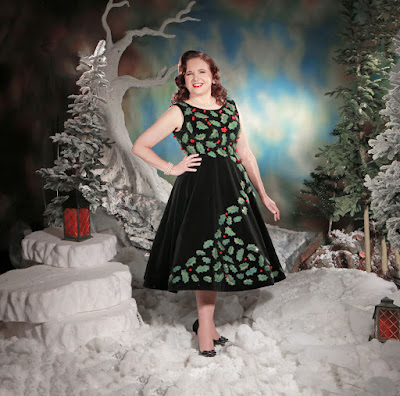
Worth all the work

Sunday, 12 December 2021

Progress!

I'm onto the home stretch with the holly dress, and expect to finish it tomorrow. Given that it's needed for Tuesday lunchtime, by most people's standards this would represent cutting it terrifyingly fine. However, as I recently mentioned, by my standards this represents a triumph!

It's beginning to look a lot like - a holly dress

I decided to do the hem before sewing the leaves on, so that if the hem turned out to be really visible, I could hide it with leaves! Up to now, the dress has always been on either me or Nancy with petticoats underneath. But at one point it was on its own, and looked really droopy.

Cue the saddest of sad trombones

Clearly the skirt needs lots of support, so I ordered a second biiiig petticoat from Hell Bunny. The effect is alarmingly reminiscent of the dresses in the original Come Dancing, and the trail of destruction I leave when walking round my workroom in the full get-up is impressive, but it does the job. Almost.

#skirtgoals

For even more support, I decided to put crin round the hem of the dress. It's not something I've used before, and I don't know if I got it right, but this was my method. First, I marked the fold of the hem in chalk, and basted the crin in place. Because of the curve of the hem, it had to go onto the skirt, not the hem allowance, so I made as small stitches as possible on the right side.

The crin basted in place

Then, I folded the hem allowance over and pinned it to the crin, easing the excess fabric into place. (I had overlocked the raw edge of the hem when I made the dress, to stop it from shedding velvet fluff everywhere.)

Enclosed in the pinned hem

I sewed the hem allowance onto the crin along the top and bottom edges, and then sewed the hem in place, pulling out the basting as I went along. All in all, I sewed round a 3.4 metre hem four times!

The three rows of stitching are just visible

Fortunately, it all worked. The crin adds structure to the bottom of the skirt, and the hem doesn't show at all.

Then it was on to the leaves. I remembered to take Nancy's cover off, so nothing could get pinned to it, and pinned the leaves on by eye. Those on the bodice are quite widely spaced, to allow more room for berries, but on the skirt they are closer together.

The final arrangement

The 'drift' of leaves comes down from the left side of the bodice.

Showing how the leaves extend from the bodice

I used Microsoft 'Paint' to check the effect of red berries - hardly high-tech, but it worked.

The pops of red make such a difference

And then, it was lots and lots and lots more hand sewing, as I attached the leaves. I sewed down the centre vein in black, catching down the black felting wool at the ends to stop it from coming loose, and then sewed down the leaf points in green.

Finally, they were all done.

All the leaves in place

Now I am attaching the berries, which are tiny pom-poms cut from a bobble trim and sewn on individually with red thread. Once those are done, it's just a case of catching down the neck and armhole facings (and cleaning off dislodged wisps of felting wool, of which there are plenty) and I have a dress! Woot!

Berry time - the end is in sight

Sunday, 28 November 2021

Holly dress update

It's still all about the leaf-making at Tulip Mansions, but there is some progress to show.

I'll start with how I'm making the second type of leaf design, the ones with the brown and light green highlights. For these, I wanted more control over colour placement than I could get from the variegated green felting wool I used on the first design. So I bought eight individual wools from the many shades available from Molten Designs.

The wools I bought (the conifer shade is less blue in reality)

The centre vein is marked with a thin twist of Lawn, and then the outer side of the curve is covered with a very thin layer of the variegated wool. Over this, I lay strands of Rust, Gooseberry, and Sage, and felt them all in place. (This is based on the original embroidery; in my pictures of the Balmain dress, I couldn't find any leaves with a single curve where the brown embroidery/spangles combination is on the inside of that curve.) The inner side of the curve is covered with Moss, Conifer or Willow wool, or combinations of two or sometimes all three colours, and felted in a more random arrangement. Finally, the centre vein is felted again with a twist of Raven - without the sparkly nylon threads which appear in the first leaves. Once the leaves have been steamed and pressed with the clapper, tiny silver sequins are attached with ordinary sewing thread.

Some of the completed leaves

Once I'd made a reasonable quantity of leaves, I wanted to see what they would look like in situ. So I put the dress on Nancy, and started pinning leaves on more or less at random. One thing which I hadn't considered is that the embroidered leaves frequently overlap one another.

Lots of the embroidered leaves overlap

I think that this would look rather clumsy with the felt leaves. As it is, they look far more solid than the embroidered versions.

Leaves pinned onto the bodice, with gaps for the berries

I sent this picture to my friend F, as a progress report. The dress needs to be complete for 14 December, and having done such sterling work as one half of the Dissertation Police, F has now been reinvented as the Procrastination Police - tasked with ensuring that it is finished rather earlier than 23:59 on 13 December!

F, like me, felt that this degree of leaf coverage over half the skirt, as per the original, would be too much. There is also the small matter of weight to consider. (A big thank you to reader and regular commenter Dos Galgos for pointing this out, I hadn't even thought about weight issues.)

The Balmain original, with its dense foliage

Both F and I came to the conclusion, independently, that some sort of serpentine drift of leaves down the front of the dress and into a pool at the bottom would be a better look. (Also, from a purely practical point of view, it's fewer leaves to make, and less chance of sitting down on a knobbly berry by mistake!)

First attempt at a plan for the skirt

Next to see the progress pictures was Mum, who made another observation that I hadn't considered; namely that the leaves are all much the same size. Again, the overlap of leaves on the original makes the uniformity of leaf size less obvious. Mum suggested that some smaller leaves would add interest.

This was easier said than done, however. The leaves I had made so far are all around 2½" to 3" in a straight line from one vein end to the other. Initially, I tried drawing leaves sized 1½" to 2". These looked fine when drawn on paper, but when I cut them out it was obvious that they would be far too fiddly to make. So I stuck to 2" leaves only. Even then, some of them looked rather scrawny, and had to be fattened out a bit to make useable shapes.

Ideally, the smaller leaves should have thinner central veins to retain the proportions. Making the veins in a layer of green with a layer of black on top didn't really work for that. So instead, I have marked the chalk line with small stitches in soft black basting thread, and only make the veins in black wool.

Thread-marked leaf veins

The black stitching is a bit tricky to find under the felted layers, but it does work. As with the larger leaves, I'm doing the easier blue/green ones first. I haven't added the silver stitching down the centre, yet.

An original leaf flanked by two smaller ones

This dress is, undoubtedly, a long job. But it is being helped, immensely, by all this input from other people. Apart from Mum, I don't know anyone remotely locally who sews. Mr Tulip didn't sew either, but he had picked up enough knowledge over the years to be able to make (mostly!) helpful suggestions, and had a good eye as well, so was often my first port of call. But since he died, I have mainly worked in isolation. I'm really enjoying being a bit more 'out there' with this project.

Sunday, 14 November 2021

Making the leaves

I've been making felt holly leaves this week. Not as many as I would like, as I haven't had a lot of free time, but I am getting faster as I refine the process.

For now, I am just making the plain blue-grey leaves, I'm leaving the more complex style with rust and light green highlights and spangles until I have more experience.

Sticking to the green and silver leaves for now

I started off with two lots of merino felting wool from Molten Designs - black blended with sparkly nylon threads, and a variegated green.

The raw materials

The green is lengths of different coloured wools stranded together.

Cross-section of the green wool, and more accurate colours

I have no idea if the method I'm using to make the leaves is in any way correct, but it works for me. First, I lay one of my leaf patterns onto the plain green felt.

The patterns are taken from the drawing on the toile

Then, holding it in place in the centre and lifting each end one at a time, I mark the central vein line in chalk.

The vein marked in chalk pencil . . .

I twist strands of the pale green wool together with my fingers to make a very loose yarn, and use a single felting needle to secure this over the chalk line. This gives me a marker to work from.

. . . and then felted

Then, I tease out strands of the other greens, and lay them over the felt. I found this duck-egg blue felting wool in my local fabric shop, it's ideal for adding that cooler tinge to the green.

Ready to build up the leaf

Laying out the wool fibres . . .

I use the paper pattern to check that the entire shape is covered.

. . . and checking coverage

And then I felt in the fibres using a felting 'pen', which contains three felting needles.

Partway through felting, and the pen

I continue adding wool until I'm happy with the end result. Then I make another twist, this time from the black wool, and felt it over the green 'yarn' at the centre of the leaf. The embroidered leaves do not have a central vein, but the direction of the stitches creates a similar effect. I found that the black has to be added last, as it gets lost under the other felting otherwise.

Felting complete

I pin the pattern back on, and cut round the shape using my curved blade scissors (possibly the hardest-working tool in my workbox, they were vital for both my Autumn Roses hat and my lace-trimmed slip).

Ready to cut out

The silver stitching along the centre line is done in metallic stranded thread from DMC.

Adding the metallic thread

There's a lot of bits of wool fleece involved, and I've taken to wearing my hatting apron, so that my clothes don't get covered in fluff. To bed in any loose fibres on the leaf, the final step is to steam it and press it with my tailor's clapper.

As is obvious from the pictures above, at first I only had a big enough felting surface to make one leaf at a time. Which was OK, but slow. But then I bought a felting mat from The Crafty Kit Company, and moved to mass (well, six at a time) production.

My felting mat - I actually work with a sheet of felt over it

I had found the sparkly black wool quite tricky to work with, as the nylon threads were difficult to felt. So, I bought some plain black from Molten Designs and blended it with the original, and the increased wool content fixed the problem.

Now with slightly less sparkly veins

Six leaves made at once, just waiting for silver thread

Combined with a red pompom berry, I think the end result works quite well.

Completed leaves

Sunday, 7 November 2021

Trimming the dress

I've posted before about the double-edged sword that is being able to sew; namely that it gives you Ideas, some of which are brighter than others.

For example, most people would look at a densely embroidered vintage couture dress and think, "It's beautiful, but a) it's tiny and b) it costs a fortune", and leave it at that. I thought, "It’s beautiful, tiny and very expensive - but I wonder if I could make something along the same lines?" And so it goes.

Which is why it's time to reveal the purpose of the black velvet dress - six years after I first saw it, I'm finally having a go at making my version of the Pierre Balmain holly dress. This is probably my most ambitious/daftest (delete as appropriate) project yet.

This may not be a good idea! Image © Kerry Taylor Auctions

By dint of piecing together various close-ups from the original Kerry Taylor Auctions listing (yes, I had kept all images for reference, just in case) I worked out that there are approximately 200 berries on the dress and 300 leaves, all hand-embroidered by Maison Lesage. Unusually for a couture dress, it doesn't appear to have been lined, so it's possible to see the wrong side of the embroidery, and the stitching holding the red velvet berries in place.

Interior view, image © Kerry Taylor Auctions

My version will have rather fewer berries and leaves, and they won't be hand-embroidered (I may be wildly over-ambitious, but I'm not that wildly over-ambitious). The berries will be made from some bobble trim which I bought for this purpose from Barnett Lawson's old London shop years ago, and have dismantled to leave just the red bobbles on a single cord.

Stored on card to stop it from tangling

After considering various options, I decided to make the leaves out of felt. However, just leaf shapes cut from plain felt would look too much like Fuzzy Felt Christmas, so I am going to needle-felt the leaves with other colours to add some depth.

First, I needed to get an idea of the leaf size. Working from this image of the bodice, which also appears on the back of the printed catalogue, I drew leaves freehand onto my toile using a Frixion pen. This meant that I could iron out any bits I wasn't happy with, and try again.

Bodice front, image © Kerry Taylor Auctions

I roughly copied the original's layout of approximately six leaves between waist and neckline. The resulting leaves were bigger than I expected.

Drawing (and removing) the design

It took 33 leaves to cover the front of the bodice toile. I traced them all off onto tissue paper, and will re-use the shapes over the dress. Using a leaf pattern as a guide, I needle-felted some green wool rovings into black felt. Then I pinned the tissue pattern onto the embellished felt, and cut it out.

The needle-felted felt

The leaf cut out

I wasn't sure whether to use green or black felt as the base, so I tried both, and pinned examples onto the faulty back piece which I cut out originally. Green gives a sharper line, but think that I may include some black, to add variation to the design.

Two black felt leaves, and a green felt one in the middle

This close-up of the embroidery shows that there are two different styles of leaf. One is all sewn all the same green thread with a blue-grey tinge, with a dull metallic thread added near the centre. The other style is sewn in what, in some lights, appears to be a slightly warmer green, and on one side of the leaves there are stitches in light green and rust, and tiny spangles.

Embroidery close-up, image © Kerry Taylor Auctions

I have been experimenting with different colours of wool roving added to the green, and also metallic threads and shredded sari waste. I don't feel the need to stick rigidly to the Lesage colour scheme, but I do think it's a useful reminder that I don't need a huge range of variations. I've still to decide on the amount of embroidery to add, and how to attach the leaves to the dress. So, lots to think about!

Leafy experiments