Showing posts with label Simplicity 4463. Show all posts

Sunday, 4 August 2024

This year's dressmaking efforts - doubled!

I've actually finished something - yay! My cotton lawn Simplicity 4463 is complete. Unfortunately, after several days of sunshine today was very cloudy, so it was hard to get decent photos. The fabric isn't nearly as washed-out as it looks here.

Done!

I have made so many versions of this pattern and its reissue, Simplicity 1777, that there isn't much more to say. This one has a zip fasten rather than a placket, and the V-neck front. In the end, my version of the V-neck turned out so small that I would struggle to get the dress on over any sort of up-do, but at the same time I wouldn’t want to make the V any lower! Any future iteration might require a small back opening.

Because the fabric is so fine, I faced the front section with plain white lawn so that the pattern wouldn't show through. I interfaced the facing, and now wish that I hadn't - it makes the centre front section rather stiff, and prone to bulging out a bit.

The problem with the neckline

There is, as ever, a pocket. As with the previous version, I placed it slightly lower to avoid the hip curve. The front of the pocket bag was also made from plain lawn.

Pocketses (well, one pocket)

As well as being more accurate to the 1940s, the plainer skirt of 4463 feels easier to sit in than the heavily pleated version of 1777. It's also far easier to iron!

#sewnshownseated

And that’s it, apart from the update to the Stashometer. I can't believe that it's August and I've only just completed a second dress for the year.

Stash-neutral status is within reach!

Sunday, 21 July 2024

Progress of a sort

I've had lots to do this week (a situation which isn't going to change any time soon), so not much time for sewing or knitting. I have however got a little bit of both done, with one project going rather better than the other.

My summer version of Simplicity 4463 is coming along. I have made up the front and the back, joined them at the shoulders, and attached the sleeves and the facing. After the problem of Butterick 5997 I am always worried about V necklines ending up too low, so I raised this one a bit - and then worried instead about whether or not I could get my head through it! Happily, it has turned out just fine.

Happy with the front . . .

. . . and with the back

There's a lot of hand sewing to do next, so it will be a while before I have a completed dress.

I'm also continuing to work away on my Confidette bolero. I must admit, I'm not enjoying this pattern as much as I did Wondrella. The back and fronts were fine, but once they were joined together, I found the long rows (over 200 stitches) a real slog. Assuming that I do knit a second version in my 'good' wool, I think that I will knit the three pieces separately, and sew them together. This also means that I can do the whole thing in lever knitting.

Confidette progress

Yes, there are two balls of wool attached to the bolero in the above picture. I have changed the order of construction. Instead of knitting the main border and then the sleeves, I'm doing the sleeves first. Although I had a lot of wool left over from my first Wondrella, it turned out that I did need to buy an extra ball, and it was impossible to match the dye lot. The new lot doesn't look any different from the original, but in an abundance of caution I've decided to knit the body of the bolero in the original wool. If the new ball is a slightly different colour, it won't show so much in the stripes of the border.

I'm not thrilled with my pick-up-and-knit on the sleeves, either. It looks very loose, so much so that I think I will need to sew it slightly tighter - in which case I might as well have knitted the sleeves separately as well.

The join is very gappy

It looks messy on the inside, too

I'm not entirely sure that I have understood the instructions for the sleeve, either, and am bracing myself for having to frog it and try again. Hopefully with a better cast on. On the plus side, knitting the pattern in a basic acrylic before trying it in more expensive wool is currently looking like a very sound move!

Sunday, 12 May 2024

Old and new

I'm combining a new-to-me method with some tried and trusted favourites.

My big worktable on which I do my cutting out is temporarily out of commission, so I'm having to use my dining table instead. Obviously, this gets used for lots of things, and if I want to do any cutting out, I have to clear it first. So to minimise the time spent clearing things off and putting things back, I have decided to try batch cutting. The intention is to cut out the pieces for three separate dresses at once, and then sew them.

My starting point

I know that lots of people do this, possibly for the reason for which I'm giving it a go, but I have never tried it before. Given my fondness for squirrel projects, I have always been worried that I will end up with multiple cut-out but unsewn projects lying around. So I will have to be disciplined for once, and actually do the projects I have planned!

To improve the (limited) chances of this actually happening, I am sticking with patterns which I have used before and which I therefore know I can make reasonably easily and quickly. Like the Grace dress, the existing versions are all in heavy rotation in my wardrobe.

First up, Simplicity 4463. I have found that I greatly prefer this, with its simpler skirt, to its reissue version 1777.

The original illustration

It's very much a winter dress however, made in a thick, slightly fluffy, cotton. I decided that I want a summer version as well, and I am going to use a cotton lawn which has been in my stash for a while. I originally had other plans for it, but decided that it would be perfect for this project. As a slight change, I am going to make view 1, albeit all in the same fabric.

The original plan

Butterick 2535 is another easy-to-wear 1940s dress which gets a lot of use. (My taste seems to be moving away from full-skirted dresses, and I don't think that it's just because of all the ironing involved!)

I haven't decided on sleeves, yet

For this I'm using a cotton print which is, gasp, not blue! I rarely wear brown, so I'm not entirely sure how this will turn out, but I do need to try other colours occasionally.

Another fabric bought because I liked the print

Finally, Style 1271. I don't feel that view C of this has really worked. I don't know exactly what the problem is, but it just feels frumpy. It has been put aside while I consider how to tweak it. View B, however, always gets compliments when I wear it.

My versions of B and C turned out very differently

I wasn't really planning to make another one of these, but then I spotted this remnant, which I thought would be perfect. The stripes are across the fabric, but I will cut it out with the stripes running lengthwise.

Jaunty!

It's going to be a challenge to cut out, as there isn’t a lot of fabric. At least that has limited the damage to the Stashometer.

It was going quite well!

I must admit that even I am dubious about how well batch cutting will work for me, but here goes!

Sunday, 16 April 2023

Simplicity 4463 complete

Some actual sewing to show at last, as I've finished my latest iteration of Simplicity reissue 1777. Some of the changes I made to the design are obvious, others not at all, but overall I'm very pleased with it.

I made this dress on Joan, my 1934 enclosed cabinet treadle. I do not have an open-toe foot for any of my Singer machines, so when it came to attaching the centre front to the bodice sides, I couldn't use my normal method for doing the lapped seam. Instead I had to improvise a little with a zipper foot. It worked fine, probably helped by being able to sew slowly on the treadle.

Sewing the lapped seam

As it turned out, I didn't need the extra allowance I had added in the side seams. What I did need, however, were some slight changes to the pocket. On the previous versions, the pocket bag has been sewn into the side seam, and held in place in the front waist seam.

How I've done the pocket on previous versions

This version has no waist seam, so I reshaped the pocket to reflect this. Also, I have a high and pronounced hip curve, and because this version of the dress has no pleats at the front, I had to add this curve to the side seams to allow the skirt to fit properly. My versions of Vogue 2787 all have the same tight curve, and it works well, but any pocket in the side seam has to be placed below it where the seam is straighter. Finally, the cotton fabric is slightly fuzzy on both sides, and I was concerned that the skirt and pocket bag would stick together and cause the skirt to hang weirdly, so most of the bag front is made from a scrap of lining fabric.

How I did the pocket on this version

Talking of lining fabric. The quality of shoulder pads really seems to have deteriorated in the last few years, with even the ones from the better brands getting twisted and mangled by the gentlest of washing*. So, in an attempt to prolong their life, I covered these ones with some more of my lining scraps. (Yes, I do have a box in my workroom labelled "spare lining bits", doesn't everyone?!) Placing the lining on the bias and making the underside slightly smaller also helps to maintain the curve of the pad.

Covered shoulder pad

The one thing which this dress doesn't have is buttons. I wore the unfinished version for a #hatlarks picture a couple of weeks ago, fastened with a 1930s brooch, and really liked the look. I might add buttons at some point, but for now it's a good chance to use some of my vintage brooches.

Worn with Vogue 7694, view C

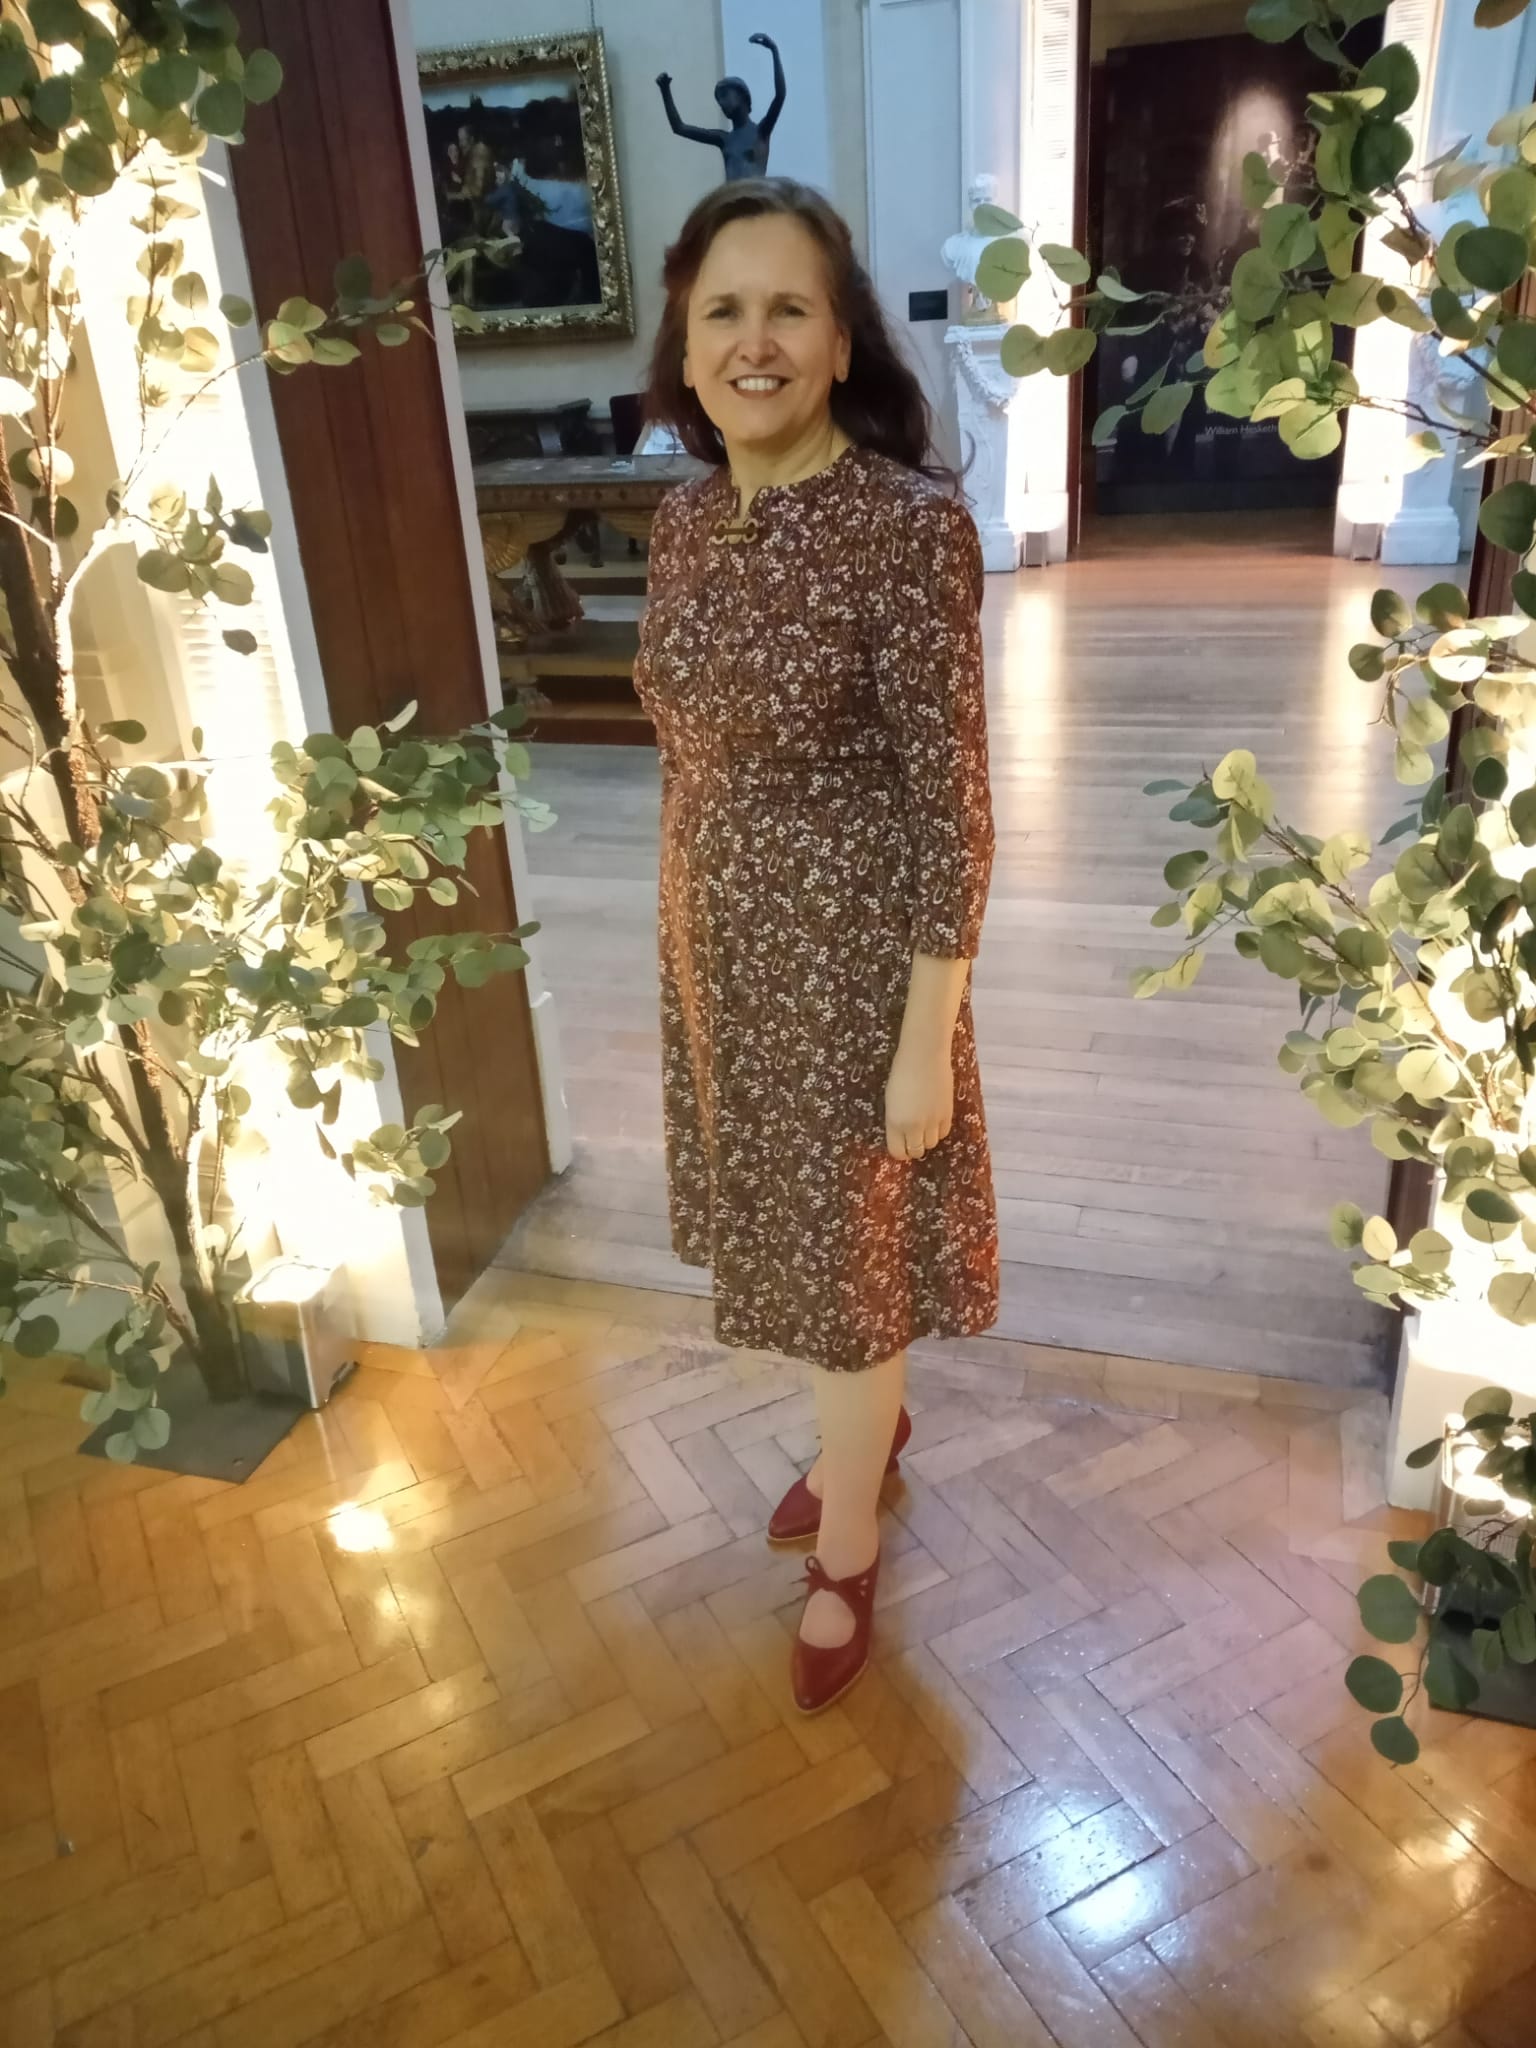
So here is the finished dress. Last week I went to the preview of the Flower Fairies exhibition at the Lady Lever Art Gallery, and made the most of being a) somewhere other than my back yard and b) with a friend who could take photographs for me.

The back is unchanged from versions two and three, which have the waist ties.

Back view

I managed to stand with my hands clasped in front of me in almost every picture, but it's just possible to see that the flared front falls into a very slight inverted pleat, albeit not nearly as pronounced as the envelope illustration suggests.

Front view, with (tiny) pleat

The skirt is as full at the hem as the original version of 1777, so the lack of pleats is not obvious when you are moving. Nor did it feel especially different when I sat down. In fact, I think I actually prefer not having all that fabric in my lap.

#sewnshownseated at the feet of Art!

When I was planning this project I came across this paisley print cotton fabric and thought that it would be perfect for the job, so I bought the exact amount I needed. Which means that the Stashometer bottom line is unchanged.

3.1m in, 3.1m out

Finally, the Lady Lever was beautifully decked out in greenery for the occasion, so I must include a couple of pictures from inside the gallery.

Leafy archway at the gallery entrance . . .

. . . which we used for a photo


* - I did wonder if I was imagining this. However, my first Simplicity 1777 is a favourite dress which has seen some pretty heavy wear since it was made in 2016. Despite this, when I came to photograph the pocket for this post, I noticed that the pads are far more robust and in better shape than those on much more recent makes. Cost-cutting is clearly everywhere.

Sunday, 26 March 2023

Not exactly Simplicity 1777

I've made Simplicity reissue 1777 (originally Simplicity 4463) three times. Each time, I've made various adjustments to make the dress more 1940s. The first time, I added length and shoulder pads, and attached the centre front bodice panel using a lapped seam. Subsequently, I changed from a centre back opening to a side opening (placket or zip) with a buttoned front neckline and added waist ties. But I've never tackled the really big difference - the shape and construction of the dress front. Until now.

In 1777 the bodice and skirt fronts are separate pieces, with the skirt cut on the fold and heavily pleated. In 4463 they are one piece, with a centre front skirt seam, and the skirt is flared - slightly at the front and more at the sides. There is a small amount of gathering around notch number 4, but no pleats.

Different approaches to the front

This is how the skirt pieces compare. The mauve tissue is 1777, cut to the same size as 4463.

Similar at the hem, but very different at the waist

The grainline of the bodice is significantly different in the original.

Both pieces laid along the grainline on my cutting board

Given the designers of 1777 only had the original illustration to work from, it's not hard to see where the confusion arose.

That skirt looks suspiciously well-gathered, all things considered

I was curious to see how these differences would work in practice, but as I have already made all the fit adjustments I need to my version of 1777, I didn't want to start again with 4463. Instead, I drafted a new front from my existing pattern pieces. I started off by laying the bodice and skirt pieces of 1777 together along the red lines.

All the pleating is in the centre section

Then I used the 4463 front piece to draft the skirt. Because I wasn't sure how well this would work, I went for the vintage approach of extra seam allowance in the side seams, making them 1" wide.

My pattern piece, ready to cut out

This is how the two completed fronts compare.

My first version of 1777

The current version - the gathering around the point is barely visible

Because the print is so busy, the skirt seam and the directional change on the bodice aren't at all obvious. I'll have to wait until the dress is completed to see what, if any, differences there are when the dress is worn rather than laid flat.