Sunday, 25 September 2022

The Great Tapestry of Scotland

Warning - picture-heavy post ahead!

I've been back in Edinburgh for a few days. The main reason for the trip was to attend the wonderful SewOver50 Frocktails event, but I also managed to catch up with old friends, finally meet some online friends in real life, visit the town where I grew up, and take a trip on the Borders Railway down to Galashiels to see the Great Tapestry of Scotland.

The Great Tapestry of Scotland - opening panel

The 'tapestry' actually consists of 160 separate embroidered panels, worked mostly in wool on linen by groups of volunteers from designs by Andrew Crummy. They are displayed in chronological order, covering the period from the creation of the land mass which would become Scotland to the end of the twentieth century - a mere 420 million years!

One of the seven 'zones' of the tapestry

Panel 3 - The Formation of Scotland

Each group received a linen panel with the design sketched onto it, a coloured drawing, yarn, small linen practice squares, and instructions.

An example of a panel 'kit'

Having been involved with several group projects myself, I was very impressed with the way the project struck a balance between keeping enough consistency to create a harmonious overall look, but not being so rigid as to produce something uniform but lifeless. The addition of other materials such as lace, sequins etc was forbidden, but the group could decide what stitches to use. They also had licence to add small details of their own, relating to events which occurred during the construction of the panel. For example, the astronaut Neil Armstrong died while the Border Reivers panel was being stitched. As he was descended from a Borders family, a small moon was added to the top right corner of the panel.

Panel 45 - The Reivers and the Rescue of Kinmont Willie

Panel 45 detail

Some of the panels have a muted palette, and rely on stitch detail to provide the interest.

Panel 22 - The Flowers of the Borders

Panel 22 detail

Others are far more colourful.

Panel 27 - Haakon at Kyleakin

The tapestry doesn't shy away from the darker elements of Scotland's history, such as the persecution of 'witches'. (I should add that you don't need to know Scottish history to enjoy the tapestry, each panel has a well-written 'story' beneath it, explaining the context. All of my school education took place in Scotland, but there was still a lot which was new to me.)

Panel 49 - Witches

There are more humorous panels as well, such as the battle of Sheriffmuir in the 1715 rising - a confusing and indecisive encounter in which both sides were simultaneously attacking and fleeing!

Panel 58 - The Jacobite Rising of 1715

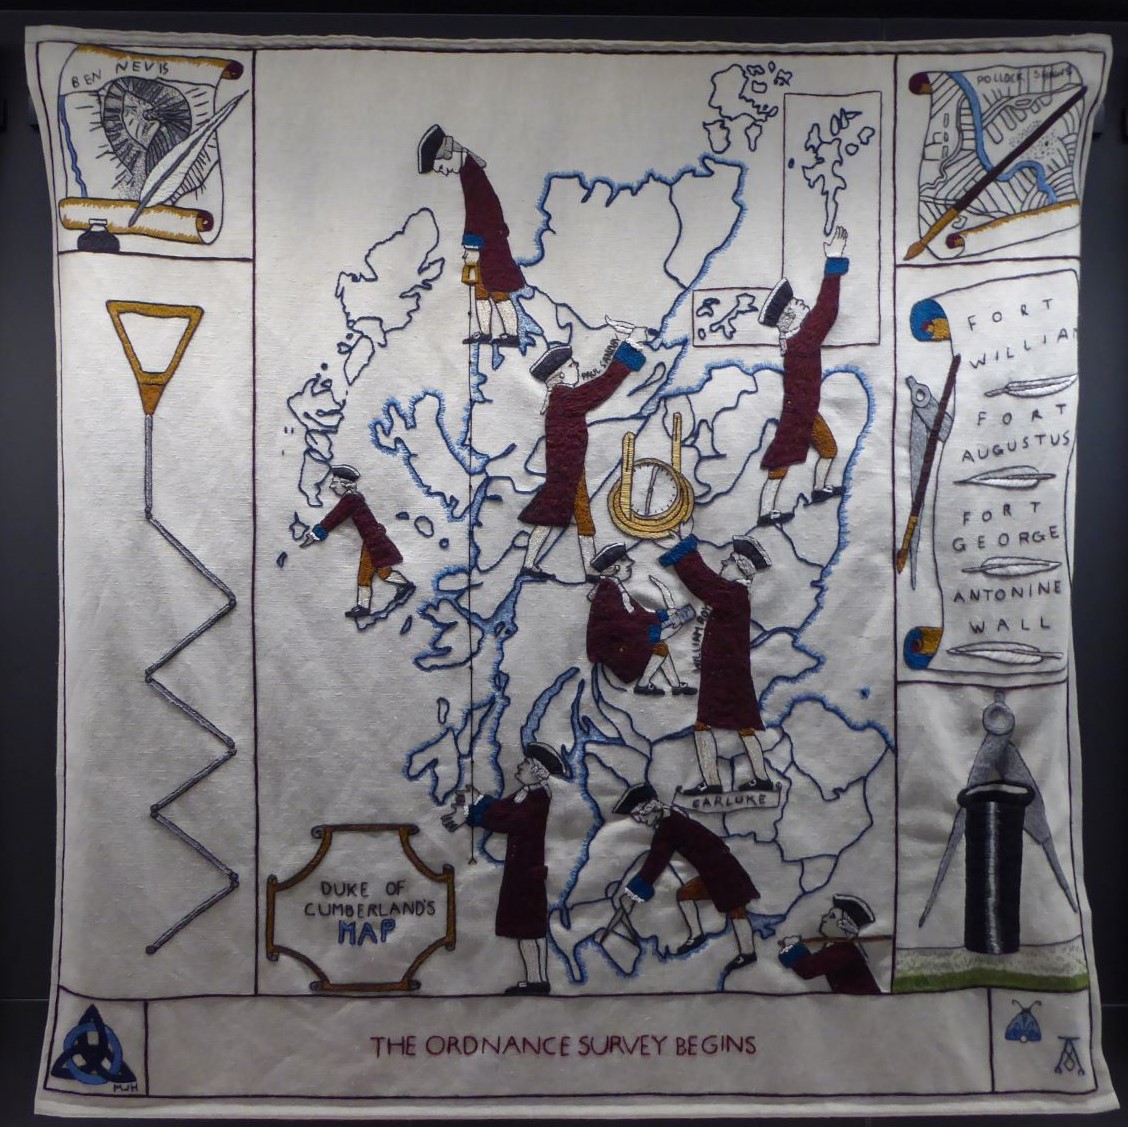
As a geographer, I particularly liked this panel.

Panel 61 - The Ordnance Survey

Some of the detail is astonishingly well rendered, such as the warp threads and the woven cloth in this panel.

Panel 73 - Weaving and Spinning

Panel 73 detail

In fact, I found that it was easy to get too absorbed in the details. Sometimes I had to make a conscious effort to step back and take in the sweeping lines and clever effects of the overall design.

Panel 95 - The Railway Boom

But back to the details. Tucked down the side of the Clydebank blitz panel was one which was particularly relevant to me - the Singer factory clock tower.

Panel 132 - The Clydebank Blitz

Panel 132 detail

At the start of the exhibition there is a small display of 'things to look out for'. It includes a section on "Beasties" (animals), and there are lots of them, including a Jacobite-supporting mole and a Polish soldier bear!

Panel 60 detail

Panel 133 detail

The 'history' element of the tapestry ends with the opening of the Scottish parliament in 1999.

Panel 155 - The Scottish Parliament Reconvenes, 1999

The final two panels are a double one, mirroring the double panel at the start, and a tree listing the project's supporters.

Panel 159 - The Surge of the Sea

Panel 160 - The Credit Tree

I could very happily go back for another visit, as there is just so much to see in the tapestry. The entry ticket lasts all day, so it's possible to nip out for a cup of tea and a break, as I did, but even with that I'm sure there’s a lot that I missed.

The Great Tapestry of Scotland is open seven days a week and is in the centre of Galashiels. It's very easy to find, just follow the thread along the pavement!

Follow the blue yarn road

Sunday, 18 September 2022

Mystery project

As in, it's a mystery to me, too! Usually when I make something, either I'm using a pattern or I've worked out all the details before I start - sketches, dimensions, notes etc. This time, it's very much making it up as I go along.

I've wanted to make a 1930s-themed clutch bag to use with my dress version of Vogue 2859 for some time. To me, few things sum up that decade like the sunburst design.

Pye radio, 1931 (image © Victorian and Albert Museum, London)

Browsing through images of 1930s bags online I came across this, and thought that the shape would work well with the sunburst motif. I experimented with variations on size and proportions until I came up with a pleasing shape which could hold everything I need to put in an evening bag.

1930s clutch bag, image found on Google

For once, I knew that I had the perfect fabrics in my stash. Years ago I bought a fat quarter of a quilting cotton with an orange branch print, for no reason other than I liked the design. I’d also bought a plain orange fat quarter to go with it. It’s not a 1930s print, but the colours are ideal for this project, and go well with the dress. Also in the stash I found a length of plain teal cotton (no idea where it came from!) which works wonderfully for the lining.

I drew the design onto a stashed piece of cream cotton, and thread-basted over the lines. Then I basted this onto a piece of the print fabric.

The bag outline and rays thread-basted in reverse

The rays were cut out from the plain orange with generous seam allowances, machined onto the print along one edge, then flipped into place and pressed. The excess fabric was trimmed off the seam.

Sewing on the rays

Then the other edge was folder under and pressed, and the excess trimmed off. This edge was hand sewn.

The rays completed

The back of the bag will just consist of the print fabric backed with the cream. However to hold the layers together, and to echo the design on the front, I machined them together using a mirror image of the sunray design.

The inside of the back, showing the complete design

It's barely visible on the right side, but holds everything together

Sewing the sunrays required more precision than I can manage on the treadle machine, so instead I used Maud, my 1917 hand-crank. Yesterday was a lovely sunny day, and as we will soon reach the time of year where the sun isn't high enough to come over the neighbouring house, I took advantage of my 'portable' machine (I use the word loosely!) to work where I could enjoy the direct sunlight.

Sewing in the sun

Once the outer parts were done, it was on to the lining. It consists of two layers of the teal cotton: one full size and one smaller, to create pockets.

The completed lining

As is obvious from the lining shape, the bag in going to have a flat base, and side panels. It is also going to have a zip along the top. I have several books which include instructions for making bags, but all of them are flat 'envelope' styes with just a front and a back. They also all have front flaps, which wouldn't really work with the sunray design I wanted. Hence the 'mystery project' title - I have most of the individual elements, but I now need to consider how I'm going to put them together. Gulp.

Sunday, 11 September 2022

Let’s start at the very beginning

When I was looking at fabrics in Vogue Pattern Books last week I spotted something which I hadn't noticed before - each issue has a number. Over the years, the pattern book has varied between four and six issues per year, but I calculated that issue one should have been Spring 1949.

This one

Of course, the publication existed long before 1949. My earliest copies are from the 1930s, when it appeared six times a year, attached to the then fortnightly Vogue magazine as a supplement.

The 16 May 1934 issue and its Pattern Book

In 1940 Vogue changed to publishing monthly to save paper, but the Pattern Book supplement remained.

November 1940 Vogue Pattern Book

At some point later in the war, however, it was absorbed into the main magazine.

September 1946 Vogue, "Includes Vogue Pattern Book" at bottom left. Image © Kerry Taylor Auctions

September 1946 Vogue, Pattern Book section. Image © Kerry Taylor Auctions

This was still the case in 1948, when Mrs Exeter appeared on the cover of the September issue.

September 1948 Vogue, again "Includes Vogue Pattern Book" at bottom left

I have a (slightly damaged) copy of the Spring 1949 Vogue Pattern Book, and had previously wondered from the editorial if it was the first issue of the standalone magazine.

Contents and editorial

Sure enough, when I looked at the small print, there it is.

"No 1" is right at the bottom, click to enlarge

The magazine is smaller than the old version (posssibly Vogue was smaller than the pre-war version, too) and had its own editor, Winifred Pegler. Audrey Withers, Vogue's then editor, frankly admitted that she had very little interest in fashion, so it would have made no sense for her to have edited a magazine devoted solely to making clothes.

Size comparison

The only full-colour printing is on the covers. The back cover and the inside covers are all given over to full-page advertisements for fabrics.

Inside front cover

Inside back cover

Back cover

There is some colour printing elsewhere, but it is limited to one or two colours.

Black and white illustration

Colour illustration

There are also photographs.

Full-page photograph for a couturier pattern

Mrs Exeter doesn't make an appearance, but there is a feature on items for a "young wardrobe".

"A red coat is a tonic to any young wardrobe"

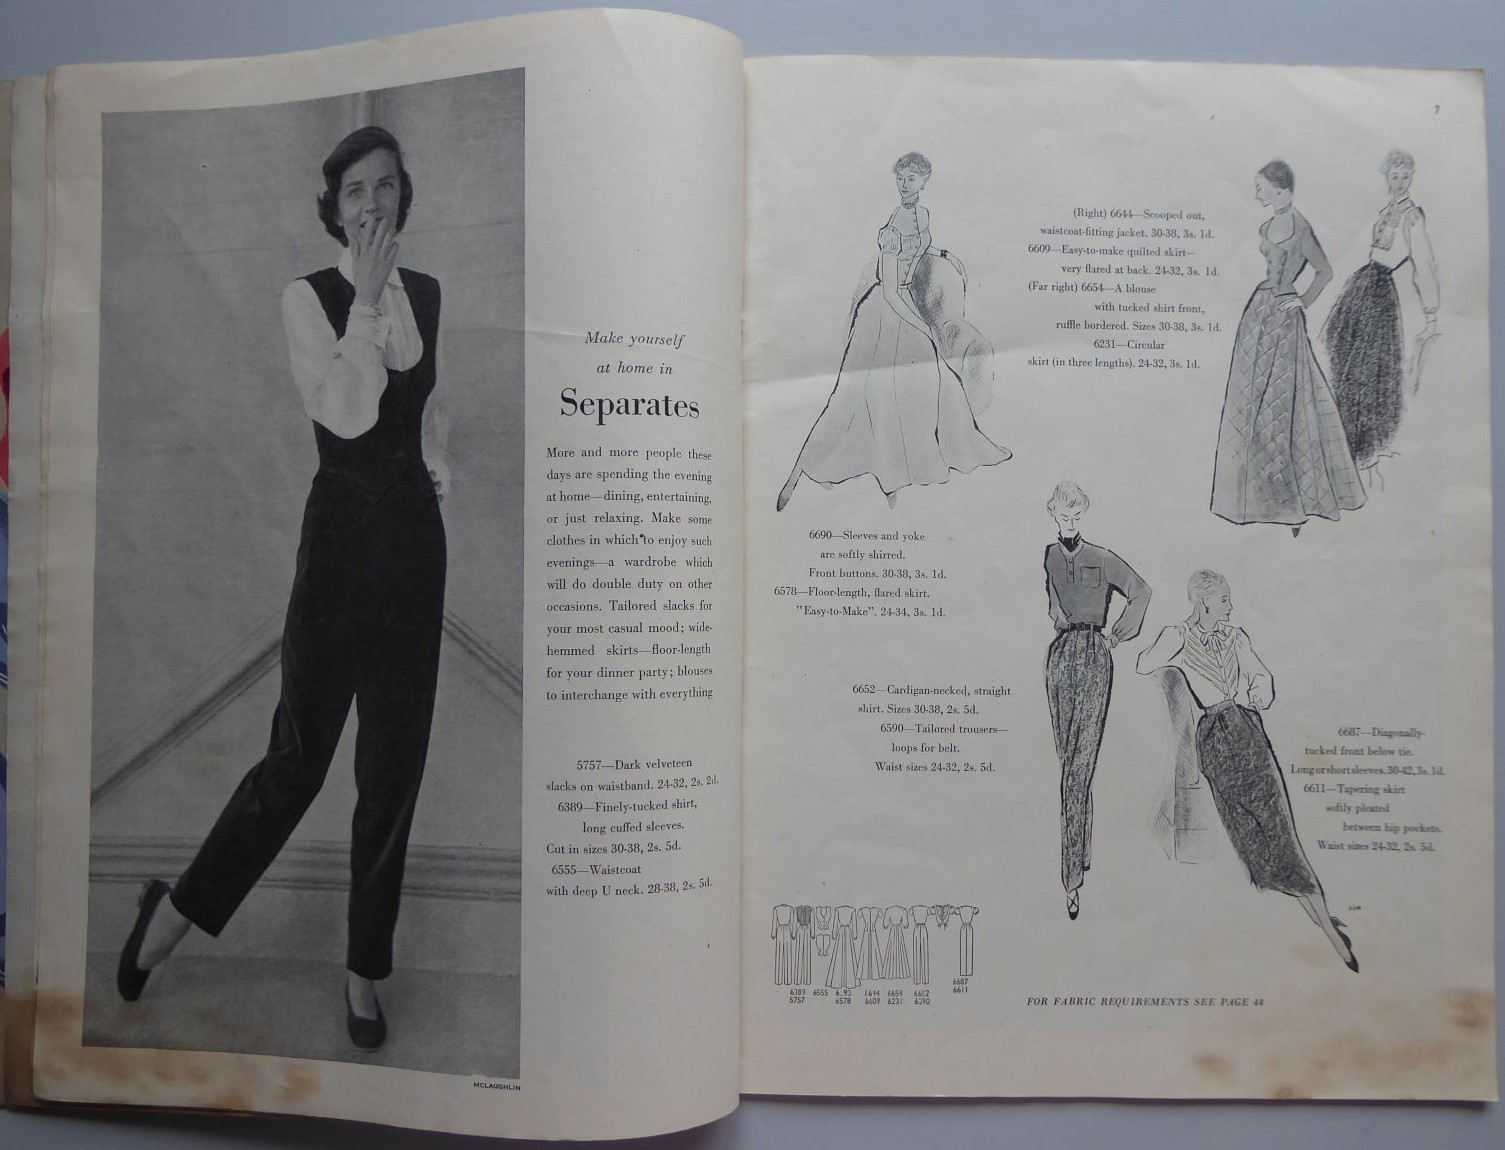
I was surprised to see trousers, well "tailored slacks", making an appearance so early.

Separates for evening

Velveteen slacks may have been suitable for evening entertaining at home, but not everything was so casual. The feature on making luxury lingerie to keep in your "sachet-scented drawers" made me feel very lax in my ways!

Slips, housecoats, nightdresses and negligées

The article on different types of material is a real history lesson, fabrics such are barathea, faille and moire are hardly ever heard of now.

Fabrics and their properties

The fabric adverts on the covers are the only advertising to appear in the entire issue, which makes me very curious about the financial model of this new venture: it's more like an extended sales pitch for Vogue Patterns than an actual magazine. I shall have to browse later issues to see how and when advertising starts to creep in, but that's a subject for a future post.

Sunday, 4 September 2022

Playing 'fabric detective'

My latest project is making another Style 1271, this time using the true vintage cotton fabric which I bought at the Festival of Vintage earlier in the year. I wrote at the time that the length should be enough for a late 50s/early 60s sheath dress and it is, just.

The print is a curious mix of yellow and pink 'jewels' in turquoise frames, plus turquoise 'blobs' and small coloured circles, on a dark mottled background.

The fabric, with a 6" ruler for scale

A closer look shows that there are draped ropes and tassels on the background as well. Also, the fabric has a slight but definite sheen to it.

Close-up

The cloth is in very good condition, but I was curious about just how old it is. It is only 36"/90cm wide, but then, so were quite a few fabrics when I started dressmaking in the 1970s. There is no information on the selvedges, the print goes right to the edges. The only method I could think of to date the design was to look at fabric advertisements in my copies of Vogue Pattern Book. I didn’t find the exact print, but the rich colours, 'brush stroke' effect and semi-abstract design all suggested the early 1960s.

Pattern Book feature on 'Dark shades'

Advertisement for Epatra fabrics

Advertisement for Ferguson's fabrics

The sheen to the fabric also helps to date it. In the summer 1962 issue, Helen Scarsdale provided a chart of the different cotton finishes available, what they were for, and how to launder them.

Useful information on caring for the finished dress

According to advertisements, both 'Everglaze' and 'Calpreta Permanent Sheen' were available on fabrics from a range of manufacturers, so I assume that they were either processes or a substance which was applied to the printed cloth. Either way, it seems probable that my fabric has one of these finishes.

Loganberry cottons used 'Everglaze'

While Marshall Fabrics favoured 'Calpreta'

This motif print is similar to my cotton

Style 1271 is, as far as I can tell, from the mid 1960s. So a fictional dressmaker would have had this length of cotton in her stash for a couple of years before getting round to making it up - which sounds about right for me!

More practical sewing

Vintage handbags. They're lovely, but they do tend to be small. It's hardly surprising. At that time few people, and certainly few women, would have had car keys. Purses only contained money, not a raft of plastic cards as well. And no-one carried a phone around with them!

If I'm using a vintage handbag, I usually end up with some sort of 'overflow bag' as well, such as this one from Moo and Boom. It's made from recycled plastics, and I love it, but there's no denying that small items tend to sink into the depths, never to be seen again. Also, I used it in the recent heatwave, and discovered that the woven handles were quite scratchy on my bare arms.

'Before' shot

The solution? Line it, and add pockets. (Actually, 'add pockets' is the solution to many dilemmas in my world!)

I found some plain cotton in my stash, slightly thicker than craft cotton and a good match for the grey in the bag, cut out a piece for the lining, and then ironed in creases where the 'corners' of the bag would be. This provided a background for deciding on pocket numbers and dimensions. After trying various ideas, I went for long pockets at each end for glasses and sunglasses, a single large pocket on one side, and four smaller ones for odds and ends on the other. These were all made up and attached while the fabric was flat.

Pockets, part one . . .

. . . and part two

The straps for the handles were narrow strips of cloth with the raw edges pressed in to the centre, like bias binding, but cut on the straight grain. There was also a strip of fabric sewn round the top of the lining, like a facing, to provide some stability and enclose the strap ends.

When it came to sewing the lining into the bag, of course I couldn't use pins to hold the two layers together. Instead, I used clothes pegs, and they worked very well.

Sewing in the pegged-on lining

And here is the finished, upgraded, bag. It turned out exactly as I had hoped, and I'm very pleased with the end result. Not the most exciting or glamorous project, but the sort of useful and satisfying fix which sewists have at their disposal.

Completed bag, with lined handles

Pocketses!

And another half meter added to the Stashometer - at this stage in the year every win, no matter how tiny, helps!

Ending the year in credit is looking very unlikely!