Showing posts with label Style '79. Show all posts

Sunday, 15 June 2025

Second time lucky

I'm pretty sure that this is a first, not just for the blog, but for my dressmaking in general. Since I started vintage dressmaking, I've made up several patterns from the late 1970s, and re-acquired a number of patterns from that era which I had disposed of in various clear-outs. But until now, I had never made up a pattern which I had made previously, when it was 'new'.

Step forward, Style 2703, from 1979.

I think I previously made this in the very early 80s

I made view 2 and it wasn't a success, which was entirely due to poor fabric choice. Unusually for me, I can't remember the exact fabric I used, but I do recall that it was a cotton, and too thick and stiff for the gathers and ties at the shoulder.

Despite this, when I saw the pattern on eBay, I snapped it up to add to my 'Style 1979' collection. I didn't have any immediate plans to make it up, but when I found the crinkle viscose just visible above in the remnant bin of my local fabric shop, I knew that it would be a perfect match.

Resizing the pattern was easy; there is no shaping, so I just had to make it wider and move the pockets up a little. The front and the back are identical apart from the necklines, which meant that I could draft the front only, and add an overlay for the back neckline.

The main pieces, and the all-important pocket

The pattern pieces are for view 1, and the 7cm/2¾" 'sleeves' are removed for view 1. However, I've found that I greatly prefer the longer shoulder seam of Vogue 2787 to sleeveless dresses which end on the shoulder, which view 2 of 2703 appears to do.

Vogue 2787's extended shoulders

My solution was to keep to view 1 at the top, but taper to view 2 at the side seam. This gives me extra length at the shoulder, without the gathers ending up looking meagre.

My pattern alteration

I also cut the dress out as long as I could make it, partly for preference and partly to get maximum use from the remnant. The shoulder ties were cut from the plain mustard section of the print.

After posting last week that I never found errors in the instructions of my vintage patterns, it was probably inevitable that I would find - well, not an error exactly, but something odd. The dress pieces have extensions at the bottom, which form the facings of the side vents. But these are just folded back and then hemmed; there is nothing to keep the top of the facing in place, in the way that you would secure the top of a skirt vent. So I hand sewed the top of the facing to the dress with small stitches, to ensure that it hangs properly.

Really?

I made a tie belt out of leftover fabric, and I have an off-white leather purchased belt which will work with the dress as well. But I had a vague memory of owning a belt with a scallop shell clasp in the late 70s/early 80s, and thought that something similar would look ideal on this dress. So I went online, and struck gold (well, gold plated). I found a belt clasp in exactly the style I wanted, by Mimi Di N jewellery. Even better, Mimi di Niscemi dated her pieces, and this one was from 1979! The belt is made from cotton twill tape, and perfectly matches my original idea.

One half of the dated clasp

The completed belt

I'm very pleased with the end result, and can see it becoming my go-to hot weather dress.

Much better than my first attempt

There's not a lot to show in the seated shot, except how windy it was when I was taking the photos!

#sewnshownseated

As I bought fabric specifically for this project, there's no reduction on the stashometer, either.

2.9m in, 2.9m out

However, a successful make from a pattern which didn't work out previously has got me thinking about other past failures, and how they might be fixed. Hmmm.

Sunday, 21 May 2023

Style 2911 completed

Something made in under two weeks, that doesn't happen often now. It's amazing the effect that an incentive can have - on Thursday I went to the preview of Photie Man: 50 Years of Tom Wood, and had decided that an exhibition which included photos from the 1970s and 1980s really needed a 1979 dress. I even managed to finish it the day before the event!

From cut out to completed in a week - no wonder I look pleased!

The method of making the ruched sleeves - sewing front and back together, gathering up some of the stitching, and then sewing the gathers onto a length of seam binding or tape - seemed a bit bulky to me, although it may just have been down to the thickness of the fabric.

The inside of the sleeve, showing the tape

The outside

The back pieces were joined, leaving a split at the bottom, and then the side seams, complete with pockets were sewn. The next job was to sew in the sleeves.

Sleeves pinned in

The front extensions were joined at the centre back, and then sewn across the top of the sleeves and the back to form the collar.

The double notches show where the collar is attached

Finally, the fronts were joined, and a facing added. I chose to apply interfacing to the facing to add structure, even though the pattern didn't call for it. None of the construction was difficult, but it was quite different from most dresses I've made. Like some Vintage Vogue reissues, there seemed to be a lot of sewing without much happening, and then suddenly there was an almost-complete dress.

I absolutely love the end result. It's very early 1980s (the pattern is actually late 1979, but was still on sale in at least October 1980) but then, that is one of my sartorial happy places*. It's got pockets, and it's comfortable to sit in.

Pocketses!

#sewnshownseated

Obviously, the buttons are considerably bigger than the ball buttons recommended, but I think that they work. They are certainly ideal, colour-wise. I might make a couple of tiny tweaks if I make it again, but it's definitely a candidate for a second version. And it's a stash-reduction project to boot.

Another 2.7m out


* - It may be an eighties dress, but that doesn't mean it needs eighties styling. Much as I enjoyed the exhibition, I did look at the hair and make-up in the 1980s photographs with a certain amount of horrified recognition, and was more glad than ever that almost all pictures of me from that era were lost in a house move! I stuck firmly to my everyday look for these shots.

Sunday, 3 October 2021

Acquisitions

No sewing this week (apart from the proper shoulder pads for my latest Vogue 2787, which is hardly exciting). My excuse is that I've been busy with other things but really, I'm putting off starting a project which I've wanted to do for a while, but which I know will be very challenging - possibly to the point of failure.

Probably a bad idea, for many reasons

So instead, here's a post about a few things which have arrived in the workroom recently.

I had a day out to Liverpool last week. Other than various hospitals, it's the furthest I've been for months - and a great deal more fun. It was the perfect combination of somewhere different, but also somewhere familiar. Although I was going to a museum, I just happened to pop into John Lewis en route. The fabric/knitting/haberdashery section has been banished to the top floor and is tiny, but somehow I still came out with a whopping seven metres of fabric!

How did this happen? Well, a couple of weeks ago, I fell in love with this dress in Fantouche Vintage.

You can take the girl out of the 80s, but . . . Images © Fantouche Vintage

I would prefer just below knee-length, but I really liked the clean lines and the way that the beading is in toning colours and just on the tops of the sleeves. Plus, the gunmetal colour is perfect for someone who Doesn't Wear Black. Unfortunately, it was a UK size 10, and I am not. However, I reasoned that I could frankenpattern the design, and I still have an extensive stash of beads from my days of making dance costumes. All I needed was fabric. (Oh, and a reason to wear the end result. All this rather overlooks the minor detail that I never go 'out' out these days, but never mind!) Amazingly, John Lewis's less-than-extensive collection of fabrics included a grey peachskin which looked like a possibility.

It turned out to be perfect. Shown with beads from my stash.

The lighting in the store was atrocious for checking colours, so I had to lug the bolt over to the prams section, which was the only part of the entire floor with a window. On the way back, I spotted the 'reduced' stand, and this fabric caught my eye.

With a well-disguised 6" ruler for scale

I've no idea what I'll use it for, and it's satin, which I'll doubtless live to regret, but I decided that I would regret not buying it even more.

I doubt if this is going to turn positive by 31 December

Thankfully for the state of The Stash, my other purchases have been patterns, not fabric.

It's been a while since my slip-making adventures at the start of the year, but I want to make more, especially from different periods. Which is how I came to buy this.

1930s slip pattern from Simplicity

The seller's description just said "1930s", so I looked it up on the Commercial Pattern Archive. It's from 1934 but oddly, there were two versions of it (image taken from Etsy).

Same pattern, same number, different illustration

The figures differ, but the slips remain pretty much the same. A second view has been added on my version, along with two extra pattern pieces.

The pattern pieces in my version

However, it looks as though this view could have been made from the original pattern, by following one of the sets of perforations on the pattern pieces.

The slip can be "cut straight across" - image from Etsy

Finally, from the sublime to the ridiculous. Two long-running themes on this blog are 1979 Style patterns, and "squirrel" projects. Which are perfectly combined in this.

Meta squirrel! Style 2778, from 1979

Yes, my workroom is going to look faintly bizarre with a furry squirrel in it, but I fear that at some point it has to be done!

Sunday, 31 January 2021

Style '79, again

A couple of months ago, I was able to indulge my love of 1979 Style patterns with a vengeance when I spotted this for sale.

Style counter catalogue, October 1980

Although it's from 1980, I reasoned that it would contain a lot of 1979 patterns, and it does. It's missing a number of pages at the front, but still provides some insights into home dressmaking history, and a whiff of nostalgia.

So, tackling the nostalgia-fest first. In October 1980 I was 16, and in 5th year at school (which in Scotland is the penultimate year of secondary school). We didn't have to wear uniform any longer, but were expected to 'dress smartly'. This was also when I really started making my own clothes. I don't recall making many dresses at the time; I made mostly separates as these were more useful for school.

I used this skirt pattern so often that the tissue fell apart at the tailor tack points!

3058, from 1980

This was such a favourite pattern that it survived various culls over the years. I never made the tie-neck version, but am tempted to give it a go sometime.

3095, from 1980

Clearly Style had a template for blouse pattern envelope illustrations! I owned and used both of these.

2580 from 1979, and 2408 from 1978

Finally, I also made this nightdress (the long-sleeved version, in cotton) at some point.

2533, from 1978. So. Much. Ironing.

The catalogue index lists 731 patterns in total. The earliest pattern in catalogue is 3734, which is from 1972 and is for a "nightdress and housecoat".

Eight year old pattern

The next-oldest patterns are for stuffed toys, items for babies and young children, dressing gowns, and smocked cushions. I was amazed that this last one was still available in 1980, as I tend to associate such cushions with the 1950s/60s. It would probably be popular now for retro decor!

4647, from 1974

These patterns are all for items which will not date quickly. The oldest patterns for clothes which are subject to fashion trends are these two.

4798 and 4909, both from 1974

Few of the patterns are quite that old, but nonetheless it's interesting to look through the catalogue and realize just what a transitional period this was. The photographs at the start of each tabbed section are very much of their time, as are many of the designs.

Hellooooooo, 1980s!

2936, from 1980 - it could not be from any other decade

But there are also patterns from just a couple of years before which, to me at least, have a very different, very 1970s aesthetic.

2520 and 2488, both from 1978

2087 from 1977, and 2440 from 1978

Sometimes the two decades exist side by side on a double-page spread.

2204 from 1978, contrasting with 2725 from 1979, and 2967 from 1980

The changeover isn't just limited to daywear. The batwing sleeves, looser shape and natural waistline of 2830 contrast with the slightly raised waist and more fitted form of 2077 - which to me is the archetypal '1970s sitcom evening dress'.

2830 from 1979, and 2077 from 1977

Bridal designs cover the two elements as well. The long, flowing sleeves of the mid-70s were clearly still popular - several patterns have them as an option. More contemporary styles, again with a natural waistline, were also available. It's also interesting to see that wedding dresses, even in 1980, still had a very covered-up look of long sleeves and high necks - possibly reflecting that most people still got married in church. Clearly the idea that wedding dresses Must Not Have Sleeves was still a long way off.

1204, from 1975

2890, from 1979

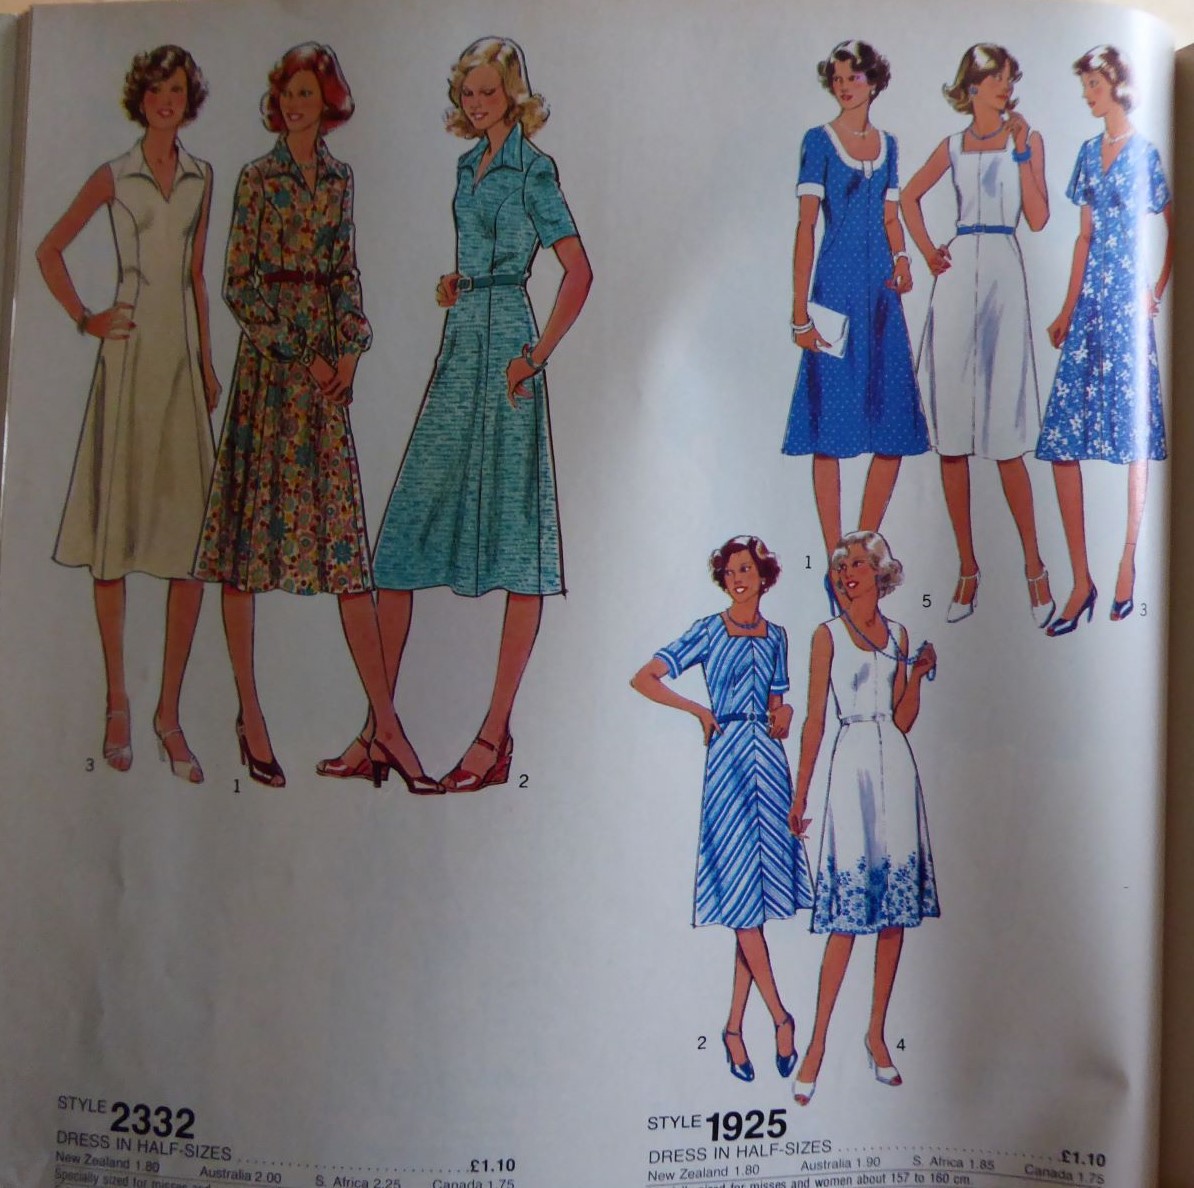
Meanwhile, half-size patterns were still clinging on, just. There are a handful in the catalogue, but none from 1980. 1979 appears to be the last year that Style created them, and although 2661 is available in half sizes, it is described as a "dress for shorter fittings", not a half-size.

2332 from 1978, and 1925 from 1977

2661, from 1979

Based on the patterns that I own, the number range for 1979 is 2562-2942. If you assume that all numbers were used, this equates to 381 patterns (some of the numbers in the range are © 1978). 143 of these numbers do not appear in the October 1980 catalogue, presumably the patterns had been discontinued by then. I have got information on 36 of them; either because they are in the Winter 1979/80 Style Pattern Book, or because I own them (and I must admit that, out of curiosity, I am now going out of my way to track down these apparently unpopular patterns).

There is no obvious trend that links them all, although a few are quite similar designs to other patterns which presumably sold better.

Discontinued patterns I own - perhaps V necks were unpopular

To be fair, I can't imagine many teens wanting to make these

Clearly Style did not hesitate to pull poorly-selling patterns; three eighths of the 1979 patterns were not in production by October 1980. Therefore, it seems reasonable to assume that the earlier patterns which were still in the catalogue were there because they were still in demand, even if they were not the most up-to-date designs.

2353 from 1978 and 2964 from 1980 - different, but both selling

In her History of the Paper Pattern Industry, Joy Spanabel Emery mentions that one of the reasons for the decline in home dressmaking was that patterns were regarded as lagging behind current fashions. In part this was true; it took several months to convert a style into a pattern. Looking through this catalogue, though, it struck me that the pattern companies' need to be all things to all people may have contributed to their decline.

When I did buy clothes in 1980, I bought from shops which catered to my age group. Even large stores such as C&A had by then created separate 'boutique' sections for younger fashions. The twinsets and tweed skirts favoured by the older ladies of Edinburgh might have been delivered in the night by pixies, for all I saw of them in the shops I visited, and the ladies may have thought the same about my clothes. Dress pattern sales had no such separation - all styles, for all ages, were in a single catalogue. Even if older patterns were tucked away at the end of a section I wonder if the continued presence of dated styles, there due to continuing customer demand, contributed to younger people perceiving patterns as being 'old fashioned'?

Sunday, 24 January 2021

Style 1462 completed

My 1970s slip is finished, and I'm really pleased with it.

Arty flatlay shot!

As expected, most of the work needed to complete it was in sewing on the scalloped lace - next time I shall use a lace with a straight edge! It looks lovely, but it was a lot of work. I started at the back, in the hope that by the time I got to the front I would have perfected my lace-attaching technique, and certainly my skills improved over time.

This was the method I used: 

First, I sewed the lace round the hem of the slip with a small running stitch along the upper edge.

The stitches are just visible

Next, I pinned through the lace and fabric on the right side at key points on the motif.

Marking the points of the motif

Working on the wrong side, I used the pin positions as a guide to roughly cut away the fabric.

First trimming

I took the pins out, and used my Carrickmacross lace scissors to cut the fabric away from the three 'bumps' in the motif.

The bump on the scissor blade stops you from cutting the lace

Then I used my curved blade scissors to remove any remaining bits of fabric which showed through the lace.

The cutting away fine-tuned

I had to keep flipping the slip over to the right side to check it.

Making sure no fabric shows through the net ground

Once I was happy with the fabric shape, I overcast the raw edge onto the lace - and started all over again with the next motif!

The raw edge neatened

I had a little bit of lace left over, which was too small to use for much else, so I decided to trim the neckline as well. This involved sewing tiny pleats into the lace to give it a slight 'V' shape.

Pleating either side of the centre bow

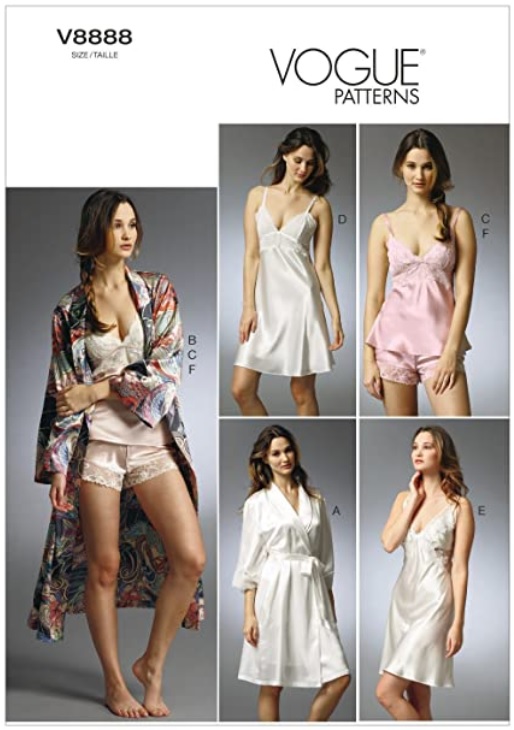
The various slip patterns which I own use different methods for neatening the top edge. Some tell you to sew a very narrow hem, and some use bias binding. This instructions for this pattern are to cut a long bias strip, fold it wrong sides together, sew it onto the wrong side of the slip with a narrow hem, then fold it over and slip-stitch to the right side. I assumed that this was an old technique which had been superseded, but it is used on the armholes of my peacock dress, and also appears in Vogue 8888, the most modern lingerie pattern that I own.

The only lingerie pattern I own that's still in print

It was difficult not to stretch the bias strip as I was attaching it, which of course would make it narrower. I must confess that I rarely tack anything when I'm sewing, preferring the approach of a forest of pins and a lot of hope, but I made an exception for this.

Pinning and tacking the binding to the top edge

The straps are made from ribbon, and I folded the ends over to encase the raw edges of the lace.

The neckline and straps

Posting photographs of myself in my underwear is not my thing (I have absolutely no objection to other people doing it if they want to, it's just not for me), so Nancy was called upon to do the job. It turns out that most of the walls in my house are a similar colour to the slip, so I had to position her in front of some curtains in order for it to show up.

Nancy modelling the finished article

I had expected that making lingerie would be fiddly: the fabric would slide everywhere, and there would be a lot of hand sewing. All of this was true, but what I hadn't expected was how much I would enjoy it. A second slip, from a different pattern, has already been cut out, and I have acquired a couple more patterns. I have even managed to combine my new-found interest with my long-established love of 1979 Style patterns!

Any excuse to acquire more patterns!

Of course, a slip doesn't exactly make a huge impact on the Stashometer, but it's a start.

Only 1.2m, but better than nothing