Showing posts with label New Look 6594. Show all posts

Sunday, 21 August 2022

Curiosity

It's known for being a bad idea for cats, but what about dressmakers?

New Look 6594. I altered the pattern over and above my usual adjustments while I was making it, and then last week I altered the finished dress some more. I'm much happier with the sleeve position now, but moving the sleeve up the shoulder means that its hem is now far from level. And the bodice is still a bit too long. Plus, the very wonky fabric printing meant that I had to make all sorts of compromises when cutting the dress out.

In short, I wondered what the dress would look like if it were made properly.

Having another go

Redrafting the bodice to have a shorter, slightly dropped, shoulder and a shorter bodice overall was quite an exercise, especially as the pattern has no shoulder seam - the back comes over the shoulder to form a faux yoke. And the front is in two pieces. But happily, everything came together, and all the seams matched. I kept the sleeves the same length at the underarm seam, but lengthened them at the centre.

For fabric, I used a floral viscose which had been banished to the naughty bin because it was so thin that the pattern showed through anywhere where there were two layers of fabric. To get round this, I decided to use plain fabric for the facings and midriff lining. I had no plain viscose however, and all of my cottons seemed too stiff. Fortunately, I found an old toile from my dance-costume-making days, which had been made from an old and by now very soft bedsheet - re-recycling! It also had the advantage of adding a tiny bit of extra body to the midriff section.
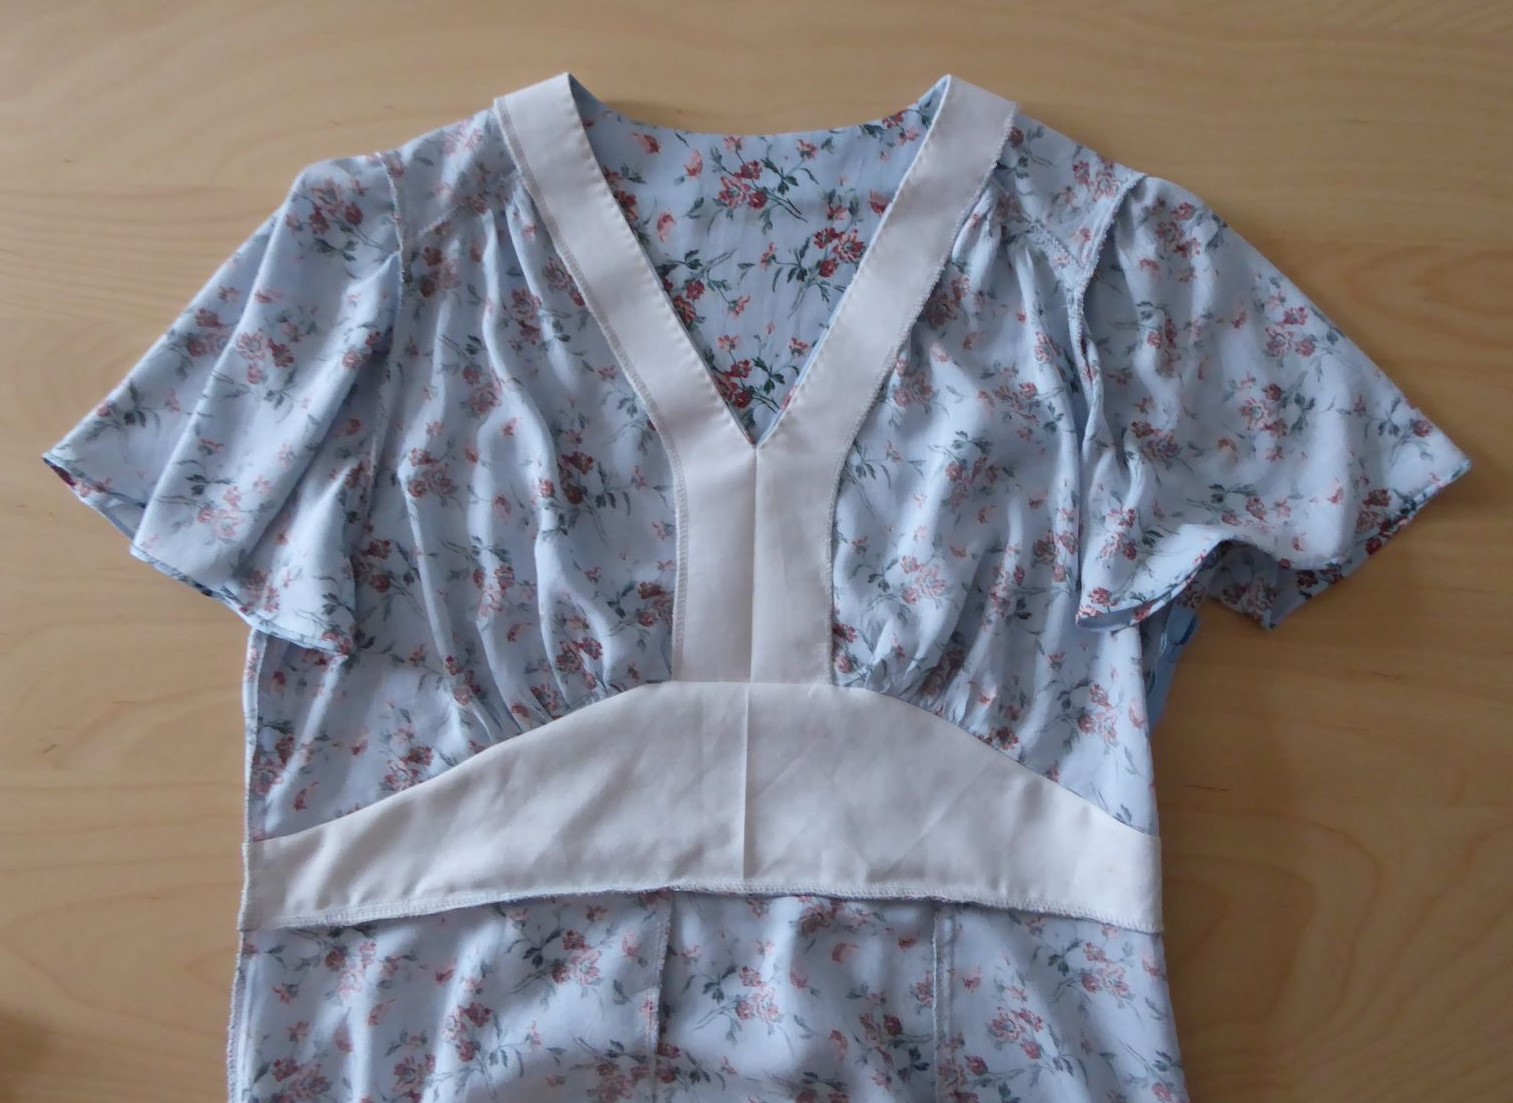
Interior

There's not a lot to say about the construction, except that I managed to sew the skirt pleat the wrong way round, despite having the first version of the dress right next to me for reference! Sigh. I hand sewed small rolled hems on the sleeves to keep them drapey. As with the first version, I went for a length between views A and C.

Version two

Also as with the first version, I didn't sew down the front skirt pleat. The result is a skirt which doesn't bunch up when I'm sitting, but isn't hugely full, either.

#sewnshownseated

In terms of look, I see it as 'vintage adjacent'. It's a bit of a mix; the midriff section is very 1940s, while the sleeves (of this view at least) are more 1930s. The neckline is ideal for showcasing this 1930s necklace which belonged to my maternal grandmother, while the dark and light greens in the print go nicely with these shoes which I rarely get a chance to wear.

The necklace fits nicely

Showing off the shoes

I must admit though that I'm still not entirely happy with this dress. The right sleeve seems to hang slightly oddly, and the whole thing is a teensy bit baggy. Possibly a waist tie at the back might help? I see a strong possibility of more tinkering ahead! On the plus side, it has used up some more stash fabric, which is always good.

Still a long way to go - part two

Sunday, 12 September 2021

New Look 6594 completed

Well, that went better than expected. Way back when I was cutting this dress out, I was resigned to the end result being a semi-wearable toile, for at-home use only. In fact, I've got a wearable dress that I'm very happy with. (Admittedly, I'm not too happy with the photos, but the weather has been dismal here today - hence the washed-out look.)

Done at last!

Not that it was Happy Ever After once the cutting out was complete. The front sections didn't pattern match, probably because one of them was cut close to the selvedge, where the fabric had less stretch than the centre part. (I did take a photo, but then accidentally deleted it while writing this post - typical of the entire project!) Fortunately, I had enough spare fabric to cut a replacement, and made sure that the pattern would match all the way up before I took scissors to cloth .

I finished the sleeves with a narrow hand-sewn hem, to keep them as drapey as possible. Because the fabric frayed a bit, I actually did most of this before setting the sleeves in.

The completed view C sleeve

As ever, I hand-picked the zip. I find that this works particularly well for side zips, as it makes it easier to accommodate all the curves involved. I know that some reviewers of the pattern disliked the side zip but I had no problem with it, probably because I am used to them from using so many vintage patterns. I used a zip 5cm/2" longer than was recommended, because I already had one of that length and the right colour in my stash, and this makes the dress very easy to get on and off.

It's not immediately obvious from the illustration, but there is a deep pleat on the left side of the skirt front. The instructions are to sew this closed for part of the seam, but I left it open from the waistband.

Trying to show the pleat on the left

I'm not sure if the pleat is actually necessary - the skirt is quite full even without it - but by leaving it open the skirt does not bunch across your lap when you sit down.

#sewnshownseated

It turns out that I could have made waist tighter, and I did consider adjusting the side seams to do so, but decided that a snugger waist would emphasize my hips more than I wanted.

I went for a mid-calf length, as anything shorter looked a bit shrunk-in-the-wash. I then allowed a 4cm/1½" hem, to add a bit of weight, so was glad that I'd made my skirt pieces longer than view C of the pattern. Even though it's a modern pattern, it has a distinctly retro look, and I'll certainly be using it again. In fact, it's sufficiently retro for me to consider it my first contribution to #sewvintageseptember.

It's also another length of fabric out of the stash, and therefore another win on the #fabrichoardchallenge . . .

Getting closer to stash-neutral

. . . and another of my UseNine2021 fabrics used (although given that it's only the second one, and it's now September, I need to get a move on with the others!).

Less than a third complete - action is needed

The completed dress has a few odd pulls, and slight asymmetry in places, due to the way I had to cut out the badly-printed fabric, but overall it turned out surprisingly well for a project which initially seemed to have 'disaster' written through it like a stick of rock. And for extra amusement, I decided that my fabric choice and shoes allowed me for once to #poselikethepatternmodel!

It had to be done!

Sunday, 5 September 2021

New Look 6594 - midriff section

I'm giving this topic its own blog post, rather than including it in a longer post about making the dress, in the hope that it will be easier to find for anyone else struggling with the pattern. Only one of the online reviews I could find for New Look 6594 mentioned having trouble with this section, and that was written by a self-confessed beginner. My guess is that all the other reviewers were, like me, experienced dressmakers and so, like me, had known what to do without reading the instructions. But when I did look at the instruction sheet, it seemed to me that part of the instructions for attaching the midriff sections to the bodice isn't very clear, and the illustration doesn't provide much help. I'm not surprised a beginner found it confusing.

There are two, identical, midriff sections for the dress, and these are the instructions for attaching them to the bodice.

New Look 6594 instuctions, steps 12 and 13

Step 12 states to pin one midriff section to the outside of the bodice, pull up the bodice gathering to fit, and then baste the two together. The two pieces should be pinned right sides together.

My dress, with step 12 completed

Step 13 is to pin the midriff facing to the midriff, right sides together, with the bodice in between the two midriff sections, and sew the three pieces together. However, you really have to look closely at the illustration to see both midriff sections in it, and it probably helps if you know what you're looking for.

The midriff facing is only just visible

At first glance, the illustration just looks like the same part of the dress as shown in step 12, shown right way out instead of inside out.

This is what the step 13 illustration looks like to me

My explanation of step 13 would be to lay the right side of the midriff facing onto the wrong side of the bodice pin the three layers together matching centres and notches, and stitch. I also think it would be better if the illustration of step 13 showed the wrong side of the bodice, not the right side, to make it clearer what step 13 achieves. I have tried to show it in the photograph below. Unfortunately, the right and wrong sides of my fabric are quite similar, so I have labelled each part.

What step 13 actually looks like, when pinned together

I always find it far easier to follow instructions if they include a picture of the end result, so I can see what I'm aiming for (especially useful when I'm trying to follow a recipe!). So, for anyone whose mind works the same way as mine, here are pictures of the completed bodice and midriff, from the outside and the inside. (Note: I only thought to take these photos after I had attached the sleeves - I use the commercial construction method of attaching the sleeves first, and then sewing the sleeve and side seams in a single step.)

Completed bodice and midriff - the outside

Completed bodice and midriff - the inside

I hope this is helpful to anyone puzzling over the pattern instructions. As ever, if you need any more information, please add a comment below and I will do my best to help.

Sunday, 1 August 2021

New Look 6594 - battling on

I've not had much time for sewing this week, and what little I have had has not been a soothing experience. New Look 6594 still feels like the dress that doesn't want to be made. I took the bodice toile for a second opinion, and Mum confirmed my suspicion that the shoulder seam needed to be shortened by about ½". Very odd, given that the sleeves of New Look 6093 (which I was wearing at the time, to show Mum the finished article) are fine, and I assume that both patterns are from the same sloper. Anyway, I redrew the upper armscye, and lengthened the sleeve head to compensate.

Shoulder-fitting mysteries of New Look!

Then it was on to the dreaded skirt. I left the front as it was, but at the back I added some extra width and a second set of waist darts, to accommodate my sway back. And . . . it worked! The end result might be over-generous if I make the pattern up in a stiff cotton, but in the drapey viscose I'm using for this version, it should be fine. Another possibility would be to not sew the darts at all, but leave them as soft pleats instead. New Look patterns are always short on me (or possibly, just designed for people who wear their skirts shorter than I do), so I ended up with a skirt length somewhere between views A and C.

Going between floor length and New Look's idea of knee length

I machine-basted a spare zip into the toile, so that I could check how easily I could get the thing on and off. The zip I used was slightly longer than the one recommended on the pattern (40cm/16" instead of 35cm/14") and this definitely made things easier, and did away with the need to add a front opening.

It's been a battle to get a pattern I'm happy with, but worth the effort. I also felt much better once I discovered that I wasn't alone in my struggles; other people have come close to giving up with this design as well.

Nancy modelling toile number two

The fabric I planned to use was one of my UseNine2021 choices, and had been bought as a remnant. It turned out to be 133cm/52" wide which, along with my between-views skirt length, meant that I had to devise my own cutting layout. Not a problem, I thought, I do this all the time. Then I took a close look at the fabric.

Rude words were said

It had obviously warped during the printing process, and the horizontal element of the design is off-grain. The photograph shows one of the worst areas, but the sloping effect is not consistent across the full width of the fabric - and in one place it even briefly slopes in the opposite direction! Because it's such a drapey fabric, I decided to risk ignoring the crosswise grain, and work with the pattern instead. I cut across the full width following a line of the motifs, and laid it out on my cutting table, ready to start pinning on the pattern pieces.

More rude words were said

Those weird bubbles won't go away, no matter how much I try to smooth them down. It's some sort of manufacturing fault, and as a result it is impossible to keep the rows of the design horizontal, even across a single pattern piece. This clearly explains why it was being sold as a remnant - a case of 'buyer beware'!

Wisely or not, I've decided to carry on. I do really like the pattern, and am already thinking about versions I could make with other fabrics in my stash. So I'm treating this version as a wearable (albeit only at home) toile, and using it as a way to fully test the design, and to liberate some problematic fabric from my stash at the same time.

Sunday, 25 July 2021

Toiles and trouble

New Look 6594 feels like the dress that doesn't want to be made. It has been 'next on my list' twice, and was knocked back by this and this. And right now, I'm wishing that something else would come along to make it third time unlucky.

It all looks so simple . . .

Even though I use New Look patterns a lot, I knew that I had to make a toile for at least the bodice for this one - with the V neck and two-part bodice front there was just too much that could go wrong. I decided to go back to basics and make the toile direct from the pattern, without my usual short torso adjustments.

The bodice pieces

As expected, it was too long, and also as expected, the amount varied - 5cm/2" at the centre back and 2.5cm/1" at the centre front. The neckline was fine, though. I had intended to just shorten the back and midriff pieces (2 and 3), but there seemed to be some odd excess at side of bodice top, so I also shortened that a little by adjusting the curve.

The first toile, modelled by Nancy

Bodice adjustment

I made a second toile with these adjustments, plus a little extra width in gathered section of the bodice. It also seemed like a good idea to add a sleeve on one side, to check what if this had any effect on the bodice.

The second version mostly worked. There is still a slight pouffe in the bodice top, but it turns out that it's necessary if I want to be able to raise my arms!

The sleeve sticks out a lot, mostly because the fabric I used is quite stiff. However, this did make me wonder if the shoulder seam is too long, as the sleeve head seems to be off my shoulder. The usual solution will be sought - a trip to my mum's for a second opinion!

Sleeve and shoulder

I've decided that I also need to toile the skirt. After the (still unresolved) fit issues I had with my 1930s/1970s mashup skirt, this is necessary, but not appealing.

Once the skirt is added, there's one more thing to consider. 6594 has a 1940s feel and this extends beyond just the 'look'. Unusually for a modern pattern, it has a side zip, and no centre back seam. This makes it, like Vogue 9546 (a true 1940s pattern), a bit of a fight to get on and (especially) off. So, do I resign myself to the struggle, or do I tweak the pattern even more and add some sort of front opening to the bodice section?

Do I replace faux buttons with real ones?

All in all, this project is starting to feel like a lot of work. I've always had to alter patterns to fit me, but previously it was just a case of making the bodice 2" shorter all round, and I was good to go. I found I was really starting to begrudge the time it’s taking to fit this pattern, and that got me thinking about why I make clothes.

I have plenty already, so I don't really need more except to replace actual worn-out items. I make clothes because I enjoy sewing, and I take pleasure in creating things which fit properly. I've known for over a year that I need to devote some time to understanding how to fit to my changed shape, and have been putting it off as 'too hard' and just tinkering round the edges instead. So, rather than resenting the time it's taking to get this pattern right, I really ought to be looking at it as learning new skills - skills which I'll then use for everything I will make subsequently.

I'm still not looking forward to fitting the skirt, though!