Sunday, 25 June 2017

The Big Stitch

If you’re reading this blog, there’s a pretty good chance that you know how to sew on a button. But according to a recent poll of over 2,000 Brits, almost a quarter of the population do not. This was one of a number of sewing-related statistics recently revealed by the British Heart Foundation at the launch of its Big Stitch campaign.


You can read more about the campaign here, but the quite simply the idea is this: you buy a garment from one of the British Heart Foundation’s charity shops (and so help fund research into heart disease), and then during July make it your own by customizing it. You can upload your 'before' and 'after' pictures on social media with the hashtag #TheBigStitch, and there is a competition as well. A good friend of mine recently lost his dad to heart disease, so I've decided to see what I can make.

Now much as I love making my own clothes, the one thing I miss out on is clothing made from fabric printed for a specific item. All the fabric I use is either plain, or an overall pattern. Apart from border prints, there aren’t many other options available for the home dressmaker. So for this project I thought I’d look for something with a distinctive, non-overall print. In the event I bought two items, both dresses.

Exhibit A

First up is this cotton sundress from Bay, an entirely new name to me. This cost all of £4.49 ($5.69). It has a flared skirt with a design of large black and yellow flowers. The bodice is plain white with narrow adjustable straps, there is a side zip, and the back is shaped with a shirred panel. Clearly it once had a belt, because there are loops on the sides, but this was lost by the time I bought the dress.

Bodice back

Like all regular ready-to-wear clothing, the bodice is too long for me; so it bunches up around the waist. Overall, the dress is also a bit small. The bodice style isn’t something which I’d usually wear, but I think that I can do something with the skirt.

Exhibit B

This maxi dress is from Dorothy Perkins and cost £6.99 ($8.86). It is made from 100% polyester; not a fabric I’d usually use, but it has a lovely soft drape. The dress has an integral tie belt, and like the sundress there is some shirring at the back. This one is a bit too big for me, and this combined with the wide neckline means that I don’t actually need the button fasten at the back to get it on and off. Again, the bodice is too long.

Back view (with label still attached!)

Natural waistline on the left, bodice shown full length on the right

I love the fabric, but I really have no idea what to do with this one. And that for me is the point of this project. I really can’t stress enough just how far this is out of my comfort zone. Back in the days of The Great British Sewing Bee, the 'alterations' challenge of was always a complete mystery to me; I could never imagine how anyone could take a piece of clothing and make it into something entirely different. And now I’m going to try it myself. Twice. Wish me luck!

More to the point, if you’re inspired to have a go yourself, please let me know in the comments. I’d love to see what you do.

Sunday, 18 June 2017

1950s straw hat

(My 300th post, how did that happen?!)

Following on from the 1940s make-do-and-mend hat, the next millinery course at Hat Works moved on to 1950s styles.This time we had a choice of techniques; we could make either a small silk headpiece on a buckram base, or a wide-brimmed straw hat. I chose the latter option, as I've never worked with straw before.

The straw hoods

Unlike the 1940s felt hats, this time we started with the brim. There were a number of brim blocks which we could use, but the tutors Sue and Marie had also brought along some alternatives; assorted shallow wooden bowls!

Hat blocks, and bowls from IKEA

As ever, there were also lots of pictures to provide inspiration.

Hats by, among others, Dior and Balenciaga

The brim block I chose looks at first glance to be the same shape all round, but in fact is wider at the sides.

Brim block, crown block, straw hood, and all-important cup of tea!

The straw didn't need nearly as much steaming as a felt hood. It was pinned to the block round the edges, and the centre loosely bunched up and tied. Then the hood was ironed to smooth down any loose fibres!

Blocking the brim

Once the hood was dry, it was taken off the brim block and stretched over the crown block to create the 'stand' - the vertical section onto which the crown would be sewn.

Tied round the base of the crown block

Then came the scary part, cutting off the top section. I always dither for ages at this stage; it's the point of no return. The cut off part was then blocked to make the crown. I chose to use the flat underside of the crown block for this. The blocked crown was also ironed.

Blocking the crown - this really shows the weave of the straw hood

While the crown was drying, we sewed a petersham band to the inside of the brim stand to stop it from stretching. Obviously with a felt hood there is no danger of the cut edge fraying, but cut straw comes apart very easily, so has to be handled carefully.

The other edge of the hood was pressed down along the folded edge of the block, almost like folding a hem. Then brim wire was pressed against the fold, and sewn into place.

Underside, showing the petersham band and the finished edge

Next it was time to join the crown and brim. The two were basted together, and then sewn together with back stitch. Just to be on the safe side, I then sealed the cut edges of the straw with a dab of PVA glue.

Starting to look like a hat, with the yellow basting just visible

For the trimming I decided to keep it simple; a plain navy petersham band, with a small bow at the back.

Classic petersham trim

And that was it. Yet another completed hat! I'm absolutely thrilled with the end result. Please excuse the entirely non-period clothing; I was on the 1960s course this weekend (a Jackie-O style pillbox, details coming once I've completed it), and didn't have a lot of time to take pictures.

I can see this getting a lot of wear

Sunday, 11 June 2017

Dressing Mrs Exeter

My as-yet-unblogged August/September 1957 Vogue Pattern Book (see here and here for the two I have written about so far) contains several references to 'Mrs Exeter', such as the suggestion that "Mrs Exeter might choose a rich brown flannel" for suit pattern 9078.

Suit suggestion for Mrs Exeter, with added fur wrap

The name meant nothing to me until I read Fashion and Age by Julia Twigg, which includes a section on Mrs Exeter.

The character was introduced into British Vogue in the late 1940s, and in 1949 was described as, "approaching 60 … a fact she accepts with perfect good humour and reasonableness". She appeared on the cover twice; the first time in the very glamorous image by Cecil Beaton.

Mrs Exeter in 1948

Mrs Exeter featured in Vogue throughout the 1950s and early 1960s. At the time Condé Nast still owned the Vogue pattern company as well as Vogue magazine, so it was only natural that she should appear in the pattern publication.

In an article on international couturier designs, this pattern is described as being "a particularly suitable choice for someone of Mrs Exeter's age group" because of its "slimming diagonal lines and air of graceful sophistication".

959, a "willowy dress . . . for afternoon or early evening"

There is also an article, "Mrs Exeter's Agenda for Autumn", which begins;
"Once again Mrs. Exeter has shown her connoisseur's judgement in choosing these five elegant patterns: all have a classical touch yet contemporary appeal."
I haven't been able to find an image for 9207, another suit pattern, but here are the other four suggestions.

"Easy-to-wear dress . . . with scarved neckline"

"Perfect for meetings and lunches"

"A dress to carry you right through an afternoon to cocktails"

"simple elegance"

Personally, I can't see anything about these patterns which identifies them as more suitable for a older woman than many other patterns in the same book. Certainly none of the illustrations suggest this. Perhaps there are subtle differences which were obvious then but are now not apparent.

For more on Mrs Exeter, and the model who came to personify her, click here and here.

Update 21/04/2019 - I had always assumed that Mrs Exeter was a British creation, but it turns out I was wrong. For more on her American counterpart, I thoroughly recommend the articles in American Age Fashion, such as this one on Mrs Exeter's sewing skills.

Sunday, 4 June 2017

'Making do' on the hat front - part 2, the hat

So, having made our hat blocks on the 1940s course at Hat Works, it was time to use them. There was a selection of hoods for us to choose from - I went for one in a dark olive green, to go with my 1938 suit (when I finally make it).

The block was covered in cling film, as usual, then taped to a board to hold it in place. Because the hoods were unstiffened, they were quite easy to shape over the blocks. I used a twist of calico to hold the centre fold down, and a strip of wide elastic to hold the hood round the block. The excess felt was folded up out of the way while the hoods dried.

The blocked hood drying in the window

Unlike the brimmed hat I made, the brim was made as one with the crown. When the hat was taken off the block, the first thing I did was sew a petersham band inside, to stop the crown from stretching out of shape. Then I could manipulate and trim the rest of the felt to form the brim. I loved this 1940s hat by Danish milliner Aage Thaarup, so used that as my inspiration.

"Rosewood felt" with a sequin trim, 1941
Perhaps it was the green, but in its untrimmed form, my hat leaned rather more towards the Errol Flynn look!

Feared by the bad! Loved by the good!

We experimented with trims on the course, including making feather pads, and some people actually got as far as completing their hats. I had an idea of what I wanted to do, but decided to leave it until I got home and had the space and time to do it properly.

Trim idea - pleated silk

I cut bias strips from the two silks, pleated them, and joined them at what would become the back. I angled the join slightly so that the band would sit better against the sloped crown.

The silk strips joined together

Sequins definitely felt like overdoing it for the trim on the side, so I used two vintage buttons from my stash as the basis for a figure-8-shaped cockade. The petersham ribbon I was planning to use turned out to be too stiff, so I used grosgrain instead.

The button and ribbon trim

And here's the end result!

Another completed hat!

Bizarrely, when I came to photograph the completed hat, it was actually too bright outside for me to take pictures. (For non-UK readers, I should explain that where I live in the north-west of England, this is as improbable as the Antarctic being too warm, or the Sahara being insufficiently sandy.) So I was forced to wander round the house for a bit, trying to find a suitably plain background.

Plain side


Cockade side - I need to do my hair better when I wear this!

Back view

Initially I though that I might trim some more off the brim, but looking at the photos I'm happy with it as it is. All in all, a definite success!

Happy!

Sunday, 28 May 2017

Simplicity 1587, aka The Dress of Frump

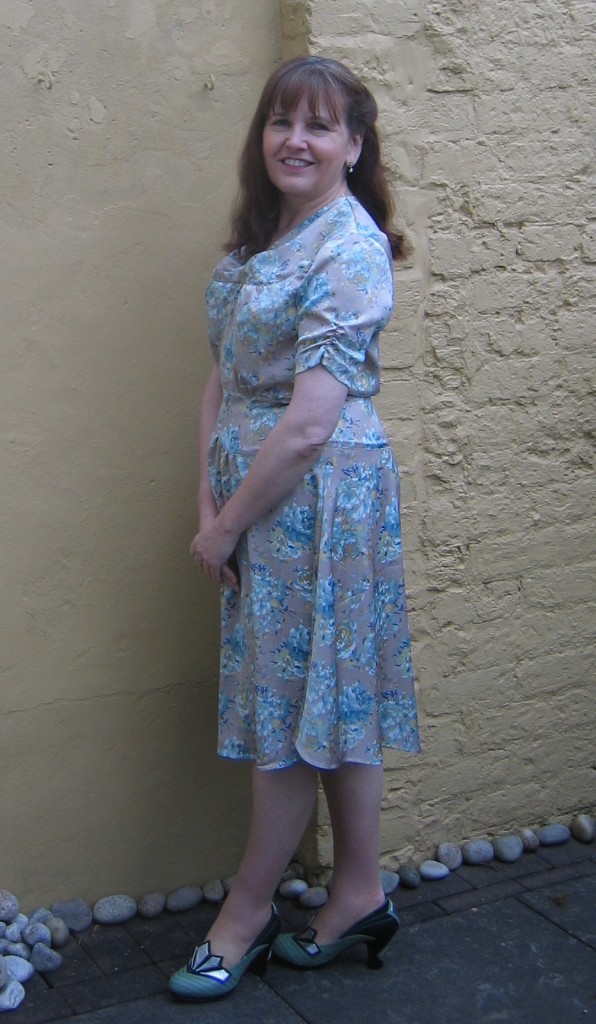
Simplicity 1587 is probably the least flattering garment I have ever made. This is a bold claim, as there’s been some stiff competition over the years (late 1980s/early 1990s fashion, I’m looking at you), but still it - well my version at least - takes the biscuit.

If only

What makes this especially annoying is that it's a pattern I've wanted to make for a while. I've seen lots of great versions of it, such as this one by Kaitlyn of Simply Vintage. Esther of Dolly Creates loves it so much that she's made it five times! So when I found a poly charmeuse with a suitably retro floral print, it seemed like the perfect reason to step away from the craft cottons and try something different.

I made my standard bodice length alterations, which had worked perfectly on Simplicity 1777, and lengthened the skirt. Because the fabric was 150cm / 54" wide, I cut the skirt back as a single piece rather than have a centre back seam (the dress has a side opening). I forgot to make any alterations for shoulder pads, but I've noticed that a lot of my 1950s patterns have optional shoulder pads and no alterations to accommodate them, so decided that this wouldn't matter.

The front yoke has three pleats in each side, and getting them remotely symmetrical was a challenge. It didn't help that the fabric wasn't on the straight grain, an no amount of washing, stretching and pressing would fix this.

The pleats in progress

The bodice front and back are made up and joined at the shoulders, the skirt front and back are attached to their respective yokes, and then the bodice and skirts are put together. As with Simplicity 1777, I top-stitched the yokes in place, rather than use the modern method of placing right sides together, matching the raw edges and sewing the seam. This may not have helped.

The instructions are to sew the side seams and then set in the sleeves, but I decided to attach the sleeves first.

All made up apart from the side seams and zip

At this point, it wasn't looking promising. I hoped that it was one of those dresses which looks like a limp rag on the hanger, but fabulous when worn. So I sewed up the sides and tried it on - and it still looked like a limp rag. The front yoke lies weirdly and the pleats stick out, possibly due to the off-grain problem. There seem to be gathers in all sorts of odd and unflattering places, and the skirt yoke looks dreadful. The skirt is quite full, so there's a lot of hem, and I was tempted not to even bother. I did hem it in the end, but I can't say that I bothered too much about getting it level.

All in all it is so bad that I almost didn’t photograph the end result. Then I remembered the various discussions I've read in posts and forums over the years about the false image we all give online by only showing our successes and not our failures. So here it is in all its, ahem, 'glory'.

This is the best shot - it's downhill from here!

I think that part of the problem is that the bodice yoke should be shorter; the join to the main bodice is too low, which makes the gathered sections look peculiar.

All sorts of unflattering things going on round the bust!

Even though I lengthened the skirt pieces, there was still only enough fabric for a tiny hem.

There is so much wrong here, I can't even begin to say

Part of me really wants to redraft this and Get It Right, but part of me feels that life's too short. It's definitely one just to wear around the house. Ah well.

Sunday, 21 May 2017

'Making do' on the hat front - part 1, the block

I've got very behind on blogging about my hat making activities; since posting about the Gatsby cloche I've been on not one but two more courses at Hat Works! Time to catch up a bit. The second course was this weekend, and while it was as much fun as ever it was also tiring, so this will be a shortish post.

Way back at the end of April, I went on a course to make a 1940s hat. But in true-make-do-and-mend style, we made our own hat blocks as well!

(Almost) Everything you need to make hat blocks - paper, card, masking tape and a glue stick

First we made a head-shaped block from the paper. The sheets were folded double, then taped together to form a cylinder which fitted to your head - a bit like making a chef's hat out of paper. Next we cut down from the top, but not all the way. Here my dressmaking habits came to the fore, and as a result I made my cuts longer, and closer together, than was necessary.

The paper base cut into strips

Because I'd made the cuts so deep, mine would not stand up

Next we worked in pairs, folding the strips over each other's head, taping them down, and trying not to tape hair in at the same time. The end result was a head-shaped dome.

Dome-shaped block in progress

This was then covered with more (lots more) masking tape to make it more rigid, then packed with scrunched up newspaper, and taped across the bottom to hold the paper in place.

The other method of block making we tried was to make a shape using card. Sue and Marie, the tutors, had brought along a fabulous hat which they had made on a cardboard block.

Love!

They had also brought the template for the block, so I decided to use this rather than make my own.

Unfortunately all of the photographs I took of the block-making process on the course were with the flash on, which has blotted out the details. So I took some of the completed block at home. This at least gives an idea of how well it stood up to being used.

The block is slightly asymmetrical, and consists of two top sections and a side. I made my block slightly less tall than the template. First the top pieces were taped together, then the side was taped into a tube shape, and finally the two were taped together.

Making the cardboard block

Then as with the dome block, lots more tape was added. The shape was packed with newspaper, paying particular attention to stuffing the edges of the top, and yet more tape was added round and under the block.

The completed block

Showing the asymmetrical shape

Careful packing keeps the shape of the top crisp

The underside, with the paper packed and taped in

The block could be covered with a thin layer of papier maché and varnished, to make it more durable, but it worked perfectly well as it was. But the hat itself is a topic for another post.