Sunday, 13 March 2016

A sneak peek at 'A History of Fashion'

I'm just back from my annual trip to Somerset for the wonderful Majma dance festival. As I often do, I stayed down there for the rest of the week, and one day went over to Bath.

Unfortunately the next exhibition at the Fashion Museum Bath, A History of Fashion in 100 Objects, doesn't open until 19th March. But I walked up to the Assembly Rooms anyway, thinking that I could at least look round the other rooms, and perhaps indulge in tea and cake in the café. However both rooms and café were closed for a private function. Feeling Very Grumpy Indeed, I went to reception to ask how much of the museum was open, and discovered that I could actually go round the exhibition, as it was being set up, for free! All grumpiness dissolved immediately, and off I set.


As the name suggests, the exhibition consists of 100 star objects from the Fashion Museum Bath’s collection, creating a history of fashion from 1600 to the present day. As the museum's collection contains 100,000 objects, whittling it down to just 100 must have been quite a task.

Before I launch into the photographs (and there's a lot of them), a couple of observations.

Firstly, the exhibition when I saw it was incomplete. This meant that there wasn't information on every exhibit, and that some sections weren't properly lit yet, so I couldn't take photographs. The other problem was the opposite; too much light. The information panels are illuminated rather than just printed onto card, so this led to some serious issues with reflections on the glass cases. Some reflections I was able to block by holding my coat out, and in one case I borrowed a total (and slightly bemused) stranger to stand in the way, but in some sections it was impossible to get pictures of a good enough quality to post here.

The exhibition starts with a smock decorated with bands of blackwork, followed by this amazing embroidered jacket.

Jacket, 1610s, possibly owned by Lady Alice L'Estrange

From embroidered Stuart clothing, it moves on to Georgian robes.

From 1610s to 1740s

The thistles quilted onto this petticoat suggest a Scottish link, and perhaps even Jacobite loyalties?

Quilted petticoat, 1740s

It isn't just about the clothes themselves; this stomacher is included to highlight the importance of pins in dress before buttons became more common.

Embroidered stomacher, 1740s

The next case moves on to later Georgian fashions.
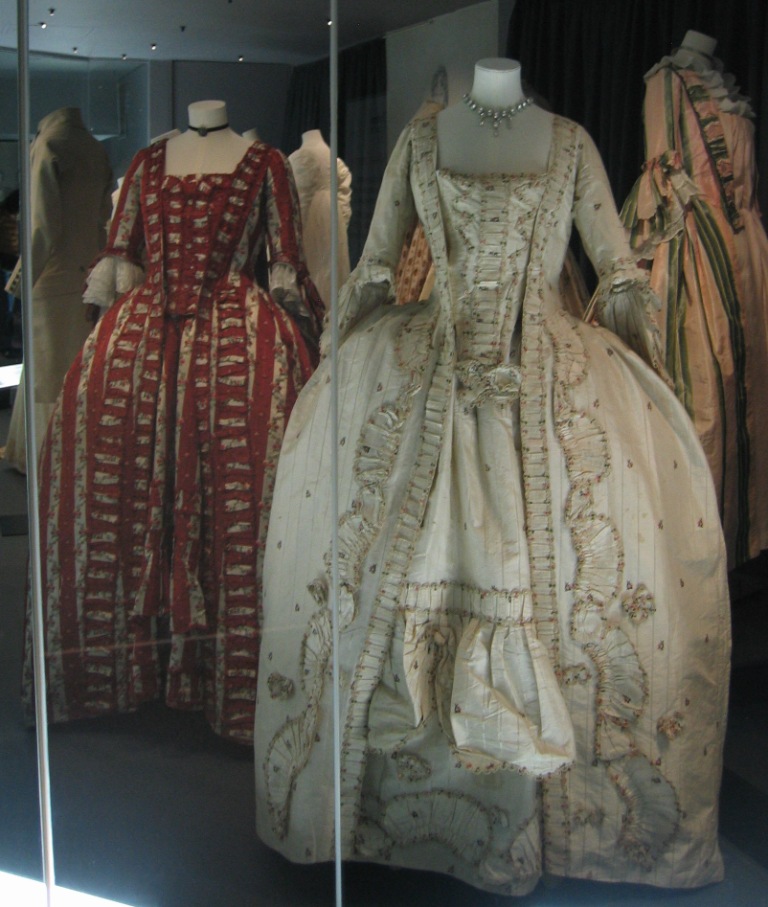
1770s dresses

Although most of the exhibits are women's clothes, there is some male attire, such as this embroidered Macaroni jacket and waistcoat.

Man's embroidered suit, 1780s

As ever with exhibitions at the Fashion Museum, the exhibits are arranged so that you can see the back of at least some of the garments.

Display of fans, and back views of some of the dresses

From the brightly coloured dresses, it's a big change to the whiteness of the Regency era.

Regency dresses (and a rogue reflection)

Silk gauze and satin frock, 1817

I cannot lie, I struggle to feel any love for 1830s fashions. They're just so, well, droopy, somehow. But even I quite liked these examples.

1830s dresses, and Ayrshire work collar

Then round the corner were two alcoves in the process of being set up (hence the sheet on the floor in the next photograph. In the first alcove was this.

1860s dress

The fabric is very light and gauzy. There was no information, so I don't know if it is painted or printed, but here's the bodice in more detail.

Bodice close-up

Anyone who shares The Dreamstress's views on fringe might want to avert their eyes while passing the next alcove! Unfortunately this was barely lit, so I have had to tweak the image to make it more visible - hence the slightly odd colours. Again, there was no information on dates etc.

Fringed paisley dolman

Dotted around the exhibition are collections of accessories; the fan collection was visible in an earlier photograph. There is also a collection of nineteenth century of boots and shoes. According to a quote displayed nearby, by the 1850s coloured shoes were considered, "exceedingly vulgar", and, "white satin, black satin or kid and bronze kid are neater and more elegant".

Neat and elegant white shoes

What the writer would have made of the decoration on this pair, I can't imagine.

Bronze kid shoes with everything-but-the-kitchen-sink trim

The next case was clearly only just beginning to be set up. The emptiness gave it a wonderful 'hall of mirrors' effect.

1880s Aesthetic dressing gown

Opposite, in every way, is this corset. It has a 54cm / 21½" waist.

Corset, 1890s

In this side view you can clearly see the grommets, showing that it is nowhere near laced closed on the mannequin.

Side view

Just along from the corset was this long green jacket with southache trim. Ooh, what does this remind me of? (Yes Gina, I am going to keep mentioning this from time to time, until you finally finish your beautiful Boarding Suit!!)

Jacket with soutache trim

According to Women in the First World War, nurses' aprons were not issued with a red cross on them, so VADs had to attach their own. This would explain the slightly haphazard stitching on this example.

VAD apron

I've included this photograph of one of the display boards, because it was too dark to get a decent picture of the jumper itself.

Display panel

On a similar theme, in the next case is dress made by the donor's mother from specially printed fabric, worn on the day of Queen Elizabeth's coronation.

1953 coronation dress

1950s fashion

Also in this case is this amazing crochet blouse, made from a pattern issued by yarn manufacturer Coats.

Crochet blouse

The small figure in the front of the case is Miss Virginia Lachasse, a fashion doll made in 1954 by the House of Lachasse, a London couture house. A complete wardrobe was created for her, and while I've seen some of the outfits in the V&A, I'd never seen the actual doll. I must admit, I found it slightly creepy.

Outfit for Miss Virginia Lachasse

And the lady herself

The arrangements of the last few cases made it very difficult to take decent photographs. I was however able to get this image of a 1974 Jean Muir yellow rayon jersey dress and a circa 1982 Emmanuel ballgown. I did make something in a very similar shape to the latter, but shorter, a few years later - oh, the shame!

Late twentieth century fashion

The exhibition finishes with some of the Dresses of the Year, and this blue woollen Roland Mouret dress.

2015 'Galaxy' dress

This is the biggest exhibition I've even seen at the Fashion Museum; it takes up almost the entire museum space. It runs until 1 January 2018, so if this has whetted your appetite, there's plenty of time to see it. You can also see far better pictures of some of the exhibits in the online gallery here.

Sunday, 6 March 2016

Self-drafted skirt

Well, I never thought that the day would come when this blog would reference Britney Spears, but in the words of the former Mouseketeer, “Oops, I did it again”. Yes despite having a stash which can be seen from space, I have bought more fabric.

It all started when I fell in love with a long jumper in a gorgeous shade of orange. I bought it, but then realized that the only skirt I could wear with it was black. As long-time readers of this blog will know, I try to avoid wearing black. Then a friend bought me a lovely dark blue cardigan for my birthday, which wouldn't go with said black skirt. So all in all, I needed a new skirt.

Possibly because I still stick to the quaint, old-fashioned notion that a waistband should sit at the narrowest part of my body, I really struggle to get off-the-peg skirts which fit. Laurie of Teacups in the Garden had the same problem with jeans, and very impressively got round it by making her own! Making a skirt seemed far easier. However as a lot of skirt patterns now seem to have waistbands below the natural waist, I decided to take no chances and draft my own pattern.

I found this material in my local fabric shop. Although it's got a black background, there's plenty of orange in it, and blue as well. Ideal!

Front view

The fabric is quite a strange construction, neither woven nor knitted. It consists of weft threads of a yarn similar to the woolly nylon used for overlocking knits, with a 'warp' of undulating lines of chain stitch. The cream, orange and blue bouclé threads are somehow laid on the top.

Back view, showing the chain stitch lines which hold the weft threads together

I decided that I wanted a straighter skirt than the style in Hilary Campbell's Designing Patterns, so instead I used the basic block design from Metric Pattern Cutting for Women's Wear by Winifred Aldrich, and added a back vent. Because the fabric isn't very stable, I included a lining to give the skirt some structure.

In my stash I found an off-black button with a rippled effect which went perfectly with the material. The buttonhole is hand sewn because a) I don't think my machine could cope with such a thick fabric and b) I'm on a hand sewn buttonholes roll at present!

Somewhere in there is a waistband overlap and a zip opening

And here's the end result. It's actually turned out quite retro; I made lots of skirts like this for work in (coughs) the 1980s. I am really pleased with this one; it fits beautifully (so much so that it was super-comfortable to wear for a five hour drive), and I suspect I may be making plenty more.

The finished skirt

Sunday, 28 February 2016

Tucks and Pleating

Eek! It's the end of February, time to get another Historical Sew Monthly submission done. The challenge is Tucks and Pleating; "Make a garment that features tucks and pleating for the shape or decoration", and you can see the other entries here.

Because I was so late finishing January's Procrastination challenge, there was no way I could complete my planned project for February in time. Fortunately it fits into a later challenge, so won't get lost altogether. I needed something quick and easy for this month however, and inspiration came from last month's entry.

I decided to try on my new 1909 princess line slip with the Edwardian chemise I made last year but when I did so, I didn't like the end result one bit. When I made the chemise I'd had to take it up at the shoulder seams to get the bottom of the yoke in the right place. However it was only when I wore the chemise and slip together that I realized how ludicrously high this had made the top of the yoke.

The original, woefully high, yoke

Then I had a brainwave. When I was researching different styles of Edwardian petticoat, I'd read somewhere that tucks around the hem were an easy way of altering length for different wearers. I could do the same with the yoke!

I carefully unpicked the side seams.

Ready to start pintucking

Then I worked out what size I wanted the altered yoke to be, and how many tucks this would need. Experiments with machine-sewn tucks on some leftover cotton weren't a success, so I hand sewed then instead. Then I sewed the shortened yoke back in place.

Much better (dimensions-wise, at least)

This made the overall shape of the chemise much better, but I must admit that I'm not entirely happy with it. Quite simply, I learned so much making the slip, that this now feels really clunky. Plus, it's just Far Too White; it's so obviously modern bleached cotton. Still, one of the goals of the Historical Sew Monthly is, "to improve our standards of historical accuracy, and to expand our historical sewing skills", and comparing my January 2015 project to my January 2016 project, I'm definitely achieving that!

The small print:
The Challenge: Tucks and Pleating
Fabric: Cotton
Pattern: None, just altering an existing garment
Notions: None
How historically accurate is it? Using a period-appropriate technique, so I'd say 100% for this one
Hours to complete: About 3, mainly because when I sew something, it takes a lot of unpicking!
First worn: Not yet
Total cost: None

Sunday, 21 February 2016

Procrastination - part 2, making up

I’ve really taken this theme to heart, in as much as it’s almost the end of February, and I’ve only just finished January’s challenge!

Four weeks ago, I had finished drafting the pattern for a 1909 princess line slip from Frances Grimble’s Edwardian Modiste. You can read about the drafting process here. One thing which confused me was that the pattern pieces came out as full length, but the slip has a 36” / 91.5cm deep frill around the bottom. Should the frill be sewn on top of the slip, rather than joined on at the bottom, as a frill would be nowadays?

The ensuing Google search turned up this similar slip, which clearly has something white behind the lace on the frill.

c1910 cotton and lace princess petticoat, found on Antique Dress

Even better, those lovely people at Antique Dress had added detailed close-ups. This one clearly shows the edge of the main petticoat beneath the bottom lace of the frill, and that the fabric above the ribbon is more sheer because it's only a single layer.

Close-up of the frill

So that was one problem solved, but there was another. The frill on the slip is a whopping 6 yards / 5.5 metres long, but I’m making it to go under slightly later clothing, which would have a narrower skirt. I fetched some of my costuming books and pored over patterns. By my calculations the Laurel Dress in Janet Arnold’s 'Patterns of Fashion' has a skirt width of about 72” / 1.82m, while the c1910 tub dress in Norah Waugh’s 'Cut of Women’s Clothes' (actually given as 1912 on the V&A website) is 65” / 1.65m wide at the hem. Clearly I needed a straighter slip, and these two examples from the Met suggested that in the next few years frills on petticoats became either less generous, or vanished altogether.

French petticoats, 1909-11 (l) and 1910-16 (r), images © the Met

I had found this lovely embroidered cotton/linen blend in my local fabric shop. It's less glaringly white that the flash on my camera has made out. The embroidery is only along one side, the rest of the width is plain. While the material is wide, it’s not wide enough to cut the pattern pieces across the grain. So I decided to shorten the pattern, cut it out along the grain on the plain fabric, and leave decisions about the frill until the rest of the slip was made up.

The embroidered edge of the fabric

I fitted the tissue pattern onto Nancy, and was happy with most of the fit apart from the back princess seam. There seemed to be too much fabric, so I redrafted the side back piece from the waist up. Then I sewed all the slip up, wrong sides together as I was doing felled seams.

When I tried it on the fit was fine apart from, guess what, the back. It was perfectly acceptable, so long as I didn’t want to move my arms (which was why it fitted the armless Nancy perfectly well). I’m actually quite fond of being able to move my arms, and fortunately I’d taken Frances Grimble’s advice of adding a generous seam allowance to the pieces, so was able to let the back out again. Lesson learned – a dressform is a valuable tool, but not the be-all and end-all of fitting!

The completed back, showing the seams in question

Then it was time to fell the seams. I have a deep-seated and fervent dislike of doing felled seams. Irrational too, as they’re hardly complex. This added greatly to the overall procrastination, as I found any excuse possible to put the job off.

Frances Grimble does mention in her notes that the hip measurements tend to err on the generous side, and so it proved. I know my hips are wide relative to my waist, but not this wide!

That's a big hip curve

Eventually I decided that there was just too much fabric, in the wrong places, and that the side seams needed to be unpicked and smoothed out a little. Naturally I didn't decide this until after I'd finished the seams, so I got some extra felling practice. Thrills.

The next job was to add facings to the centre front, and add the buttons and buttonholes. I discovered that my buttonhole sewing has somehow improved immensely since my Armistice blouse attempts, which cheered me up no end.

Just showing off my buttonholes!

I used The Dreamstress’s method of attaching the trim around the armholes and neck, and it worked a treat. I put a few small pleats in the neckline first, so that the ribbon doesn’t have to do too much gathering work.

Front neckline

Then it was time to make and add the frill. The bottom edge of the slip was 2.4m / 94 ½”, so I made the frill 3m / 118”, which allowed for a small gather. Again I sewed the wrong sides together and covered the seam allowance with more trim, so the inside of the slip is perfectly smooth.

And here, at last, is the finished article.

Front view

Side

Back

Seam felling aside, I'm really pleased with the end result. Plus having cut my teeth on this, I'm tempted to have a go at some of the other patterns in The Edwardian Modiste. So all in all, well worth the wait!

The small print:
The Challenge: Procrastination
Fabric: embroidered cotton/linen blend
Pattern: Princess Slip from The Edwardian Modiste by Frances Grimble
Year: 1909, but my alterations make it slightly later
Notions: Beading lace, ribbon, buttons
How historically accurate is it? I’m not sure if machine-emboidered broderie anglais existed by 1909, but apart from that I think it’s pretty accurate, so 95%
Hours to complete: Not that much actual sewing time, but lots of procrastination time, mostly trying to ignore the seam felling!
First worn: Not yet
Total cost: Fabric £17.28 (yay for the 50% off sale preview evening!), trim £6.06, buttons from stash, so £23.34

Monday, 15 February 2016

The Button Box

If you sew, you will almost certainly have a box (or more likely for some reason, tin) of buttons. Ideally it will be augmented with choice items from your mum's and your grannies' collections - or is that just me?

Possibly not, as author Lynn Knight has used her own assortment of three generations-worth of fastenings as the starting point for her latest book. "The Button Box" looks at women's lives in the last century or so through the clothes they wore; you can read a review here.


The book isn't out yet, so I haven't had a chance to look at it, but a couple of references in the review certainly struck a chord with me.

Firstly, her reference to embroidered name tapes coming in quantities too large to be used up in a lifetime. When I was a member of Ya Raqs, eight women storing identical costumes in limited space at an event was a recipe for confusion, but for the two of us whose mothers had kept our remaining name tapes (and more importantly, had remembered where they'd kept them), life was much easier!

Secondly, this splendid headline from the Derbyshire Times in 1948 may go some way to explaining why my enthusiasm for dressmaking in general, and vintage dressmaking in particular, has come from the Cheshire side of my family rather than the Derbyshire side:“The ‘New Look’: Chesterfield Women ‘Just Not Interested’”.


Update: Having now read the book, I can thoroughly recommend it. From the 'jet' (more likely, glass) buttons of Victorian mourning to the plastics of the Swinging Sixties, and even on to the recent interest in vintage clothing, Lynn Knight combines family stories with social history to paint a fascinating portrait of women's lives.

Sunday, 14 February 2016

The University Chapel Project - February 2016 update

The latest meeting of the Chapel Stitchers took place on Friday 5 February. Since we last met, I had completed one final blue hand, also with a flower theme, and sent it to Christine.

Silk twill hand with felt flowers and beads

Christine brought the frontal to the meeting, with the hand arrangement tidied up and pinned in place. It will need a few alterations to include the remaining few hands which were brought along on the day.

Discussing the layout

Ros and Claire showed us the design for the kneelers. Because these will be used for confirmations and the installation of new Chaplains as well as for weddings, the rings have been removed from the design and substituted with an olive branch.

We then discussed the communion sets. These will be made from cotton poplin, with interlining added to give the stoles and veils more body. We agreed that the cross and hands design will be used on stole and lectern fall, and just the cross (in the shape of the Amber Peace Cross) on the communion veil and burse.

The hands will be cut out from heavy Vilene or other non-frayable fabric, and we will paint them with fabric dye at the next meeting. Once painted, they can be distributed for embroidering. The other end of the stole will consist of appliquéd bands of colour, with embroidery over the top; Fiona has offered to stitch the coloured bands for all of the stoles.

Once we had completed planning the communion sets, we took the frontal down to the chapel. Even though there are still decisions to be made about the background, it was wonderful to see it 'in situ', and really get a feel for the project coming together.

In the chapel

The next meeting is on Friday 18 March, at noon, in the usual room in Senate House.

Monday, 8 February 2016

Hats Amazing

I've finally been to see Hats Amazing, that latest exhibition at Hat Works. The exhibition allows various seldom-seen items from the museum's collection to have their moment of glory, as every exhibit was chosen from the museum stores, by the staff. It's not just hats, but all sorts of hatting artefacts as well.

One of the first things I spotted was a sewing pattern.

Early 1960s hat pattern

Alongside it were a couple of hats from the era. Although the green one looks as though it could have been made from the pattern, it is actually by Dior.

1950s and 1960s hats, 1970s headscarf on right

Also in the case were some amazing combs.

Combs from the 1800s to the 1930s

The next section contained information about various hatmakers.

Hats and advertising materials

Advertisement for Comach hats

At the bottom was one of my favourite items in the exhibition; a scrapbook assembled by a member of the Comach family, containing newspaper cuttings of various well-known people wearing Comach hats.

The Pinterest of its day!

Exhibits ranged from the large to the relatively small (although some would say, not small enough!). This circa 1950 painting was one of three depicting hatmaking-related jobs; the other two were 'Blocking' and 'Stitching'.

'Blockmakers' by Amy Browning

Nearby was a display of hatpins. In order to secure massive Edwardian hats, hatpins could be up to 30cm / 12" long; which made them both handy weapons if the need arose, and accidentally lethal.

Hatpins and press reports

There were also plenty of hats in the exhibition; from traditional felted hats . . .

Hats from the 1940s to the 1960s

. . . to more unusual styles.

1940s crocheted hat with snood attached

This collection of hats as part of uniforms included a pith helmet with its own metal hatbox, and reels of the chequered trim used on police hats.

Hats for officialdom

This item features on the exhibition poster, and is a measuring device for made-to-measure hats.

Weird and wonderful

Hats Amazing continues until 19 March 2017, and is well worth a visit.