Sunday, 25 June 2023

A UFO completed

And it's not even my UnFinished Object! I've completed my latest squirrel project - making a dress out of a part-made skirt which I acquired in an auction lot.

The bodice pattern I was using had been drafted with a centre back zip, but the skirt consists of two panels sewn together at the sides. I didn't want to cut into the back panel to make an opening, so instead I moved the zip to the side. This involved opening up one side seam of the skirt enough to accommodate the lower part of a 30cm/12" zip once it was attached to the bodice.

Unfortunately, even though I unpicked the overlocked edge to retain all of the seam allowance, it was still too narrow to support a zip. Rather than make the skirt narrower, I increased the seam allowance by adding strips of the deadstock cotton for the top underneath and overcasting the seam allowance onto them. The neat selvedge of the cotton came in very handy, as it acted like seam tape, and the raw edge of the strip was tucked into the fold.

Widening the seam allowance with fabric strips

The top was very easy to make, as it is only three pieces plus the facing. Even though I had changed to a side opening, I could not cut the back on the fold as it is not cut on the straight grain. I included an opening at the back neck, but as I have since taken the completed dress off without remembering to undo the buttons (from my button box) first, I think that this was probably unnecessary!

The back, with superfluous opening

Once the top was complete, I pleated the skirt to fit it. Purely by chance, the patched area ended up hidden inside an inverted pleat - yay! My local fabric shop had run out of white zips of the length I needed so rather than wait for a new delivery, and in line with the general make-do ethos of this project, I used a longer zip from my stash and cut it to length.

When I was cutting the top out, I had been careful to place the pieces on the fabric in a way which left a long section down one side intact, and I used this to make a long sash. Finally, I attached the three remaining buttons to the front to add interest.

And here is the end result. It isn't especially vintage (although 1990s and 2000s are now classed as 'vintage', and I think that the skirt is older than that), but I've styled it here with vintage accessories.

Not bad for deadstock and leftovers!

It's nothing special, but I think that it's going to be a real everyday workhorse dress. My two maxi dresses (the same design, in two different colourways) are about the only RTW items which I still regularly wear, so it's great to have a me-made replacement for them. The skirt is a very lightweight cotton - as is apparent from this photo taken in a slight breeze - so it should be cool while providing some sun protection.

Even a slight breeze catches the skirt

And I really love this neckline. I may add some lingerie straps because it is so wide, but my favourite What Katie Did bra works fairly well with it. Plus, the grown-on sleeves provide a bit of cover without the hassle of fitting a separate sleeve. I can see a lot of iterations of this bodice appearing on this blog in the future.

#sewnshownseated shows off the neckline

And for once, that new fabric on the Stashometer has gone straight back out again.
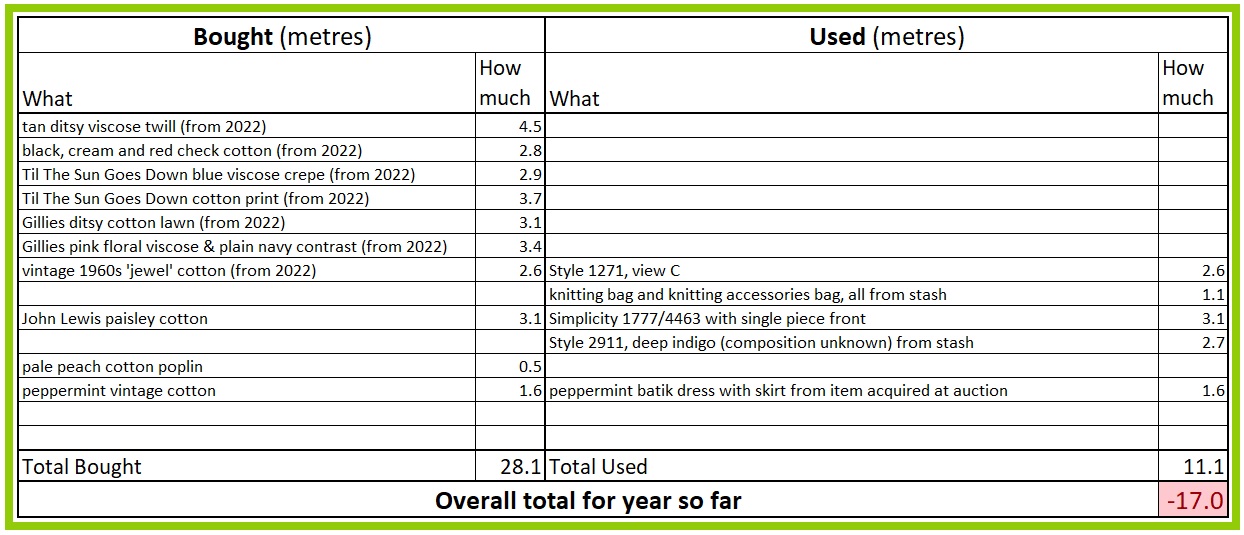
Back down to a mere 17m deficit!

Sunday, 18 June 2023

Whoops

Yes, again.

"At the Sign of the Three Squirrels" - Goslings Bank *

At least it gives me a chance to use this photograph I took last time I was in London. (And yes, we have reached the stage where I take photos of squirrel-related things when I see them, because I know they will at some point be useful for this blog!)

This is what I should have been working on.

Exhibit A

And this is what I am working on.

Exhibit B

The two are actually related. When I am making a bodice toile, I always struggle to get the length right. What seems fine initially can change completely once a skirt is attached. To get round this problem with the bodice of the pineapple dress, I decided to use a skirt which I had acquired in a box of sewing stuff bought at an auction. It appeared to be part made - two panels of batik fabric sewn together at the sides and hemmed, with what I'm guessing was a very haphazard channel for a drawstring at the top but no drawstring. I had unpicked the top, closed up the misaligned drawstring holes with tape, pressed under the top edge to a uniform length, and got no further.

Drawstring holes (I assume) from right side and wrong side

It has been folded up in my workroom ever since, until I had the idea of using it as a 'mock skirt' by pleating it roughly to size and basting it in place.

Attached to the bodice mock-up

It worked very well for checking the bodice, but you can guess what happened - it looked so good that I immediately wanted to make it up as a dress. To speed things up, I decided to use the bodice pattern I had just drafted but with the neckline of Simplicity 3662. Unfortunately, despite having lots of plain blue cotton in various shades, none of them really worked with the skirt fabric. So it was back to the fabric shop to look at yet more plain blues. While I was there, I spotted a roll labelled "original vintage cotton". The staff couldn’t tell my anything about it, but the fact that it is only 90cm/36" wide, has a proper woven selvedge instead of a modern fluffy one, and also has some discoloration along said selvedge makes me think that it is indeed vintage deadstock. Either way, the colours blend perfectly with the skirt.

Such neat selvedges!

So now I have not one but two dresses on the go, and more fabric.

Another 1.6m


* - Goslings Bank was a very old bank on Fleet Street, which eventually became part of Barclays. While geese might seem more appropriate for the sign, squirrels were chosen for their thrifty habit of storing nuts for the winter. Sadly all of this history did not protect the branch from the onslaught of online banking, and Barclays closed the branch in May this year. I wonder what has become of the sign?

Sunday, 11 June 2023

I bought some fabric!

I've been trying very hard not to buy any 'new' fabric this year (vintage or other second-hand fabric is acceptable), and have mostly succeeded. The only yardage I have bought was for a specific project, and has been made up. Unfortunately, I can't claim that this was down to iron-willed restraint - I just don't allow myself to go into fabric shops!

No!

I have even created what I call the 'Stash Shop' - images of fabrics in my stash, alongside possible pattern choices. These have been printed out and pinned to a noticeboard in my workroom. I find this approach less restrictive than my old MakeNine/UseNine attempts, but when I'm thinking about a new project it acts as a useful reminder that I have plenty of choice already without going out and buying anything.

Part of the Stash Shop

My next project from the Stash Shop is to finally use a length of cotton which has featured several times on this blog, but has never got as far as being used. According to the invoice I found folded inside, it was bought in February 2020. After a lot of thought, I had settled on making Butterick 5556, but was never really happy with this choice so nothing happened.

Not entirely what I wanted

Looking at it again, I decided that I wanted something with a fitted bodice, but a wider neckline and much shorter sleeves. After considering and rejecting various patterns I have made already, I decided that Butterick 5748 was the best match - but it needed more shoulder coverage.

Closer, but still not right

I had recently bought Simplicity 3662, and decided that the grown-on sleeves were exactly what I want for this dress.

Getting there

Yes, I could have just used 3662, but I would have had to redraft it to fit me, which seemed silly when I already had a very similar bodice pattern which fits perfectly. Then I remembered that Tasha of Tasha Could Make That had a video on merging patterns like these two - the link is here, and the video is excellent.

I started with the back piece, as this was easier. The two fitted together perfectly, but there was one issue. 5748 is cut on the straight grain, but 3662 is not.

Note the grainline on 3662

I assume that there's a good reason for this, presumably to do with fit. Tasha mentioned in her video that she always matches the grain, so I decided that the simplest solution was to mark the grainline on my new piece to match 3662.

The front pieces are more complex, but again matched well. Even the bust darts were almost the same size - note the word 'almost'!

The two fronts

I used the neckline of 3662 but made it higher at the front, for reasons which will become apparent later in the making process, and started on a toile. This was when I discovered that the front side seam was shorter than the back. Luckily I was able to fix the problem by reducing the bust dart to, ooh, about the size of 3662's dart!

In line with my ongoing sewing goals, I want to do something a bit more complicated than just make up a mash-up dress in this cotton, and this is where the purchase comes in. I wanted some plain fabric in a toning colour, but was expecting to have to concoct it myself using white cotton and fabric paint. But to my amazement, when I went to the fabric shop to buy paint, I found a cotton poplin in a very similar colour to the background of the printed cotton (the brown stippling over the top makes it look darker), and a similar weight to boot. Half a metre was actually cheaper than a jar of fabric paint which was a less good match - it would have been silly not to buy some!

I could hardly believe my luck

Half a metre in will hopefully lead to far more out

The next stage is drafting the extra details for the dress.

Sunday, 4 June 2023

Making a beautiful shape

Only a very short post this week, as I've been unwell for most of it, and still don't feel tip-top now.

Yesterday's Guardian newspaper included a cartoon based on Edward Hopper's Nighthawks (the link is here) and seeing it got me thinking that I have never explained my profile picture on this blog. It's based on another, far less well known, Hopper painting.

Girl at Sewing Machine, Edward Hopper, 1921

Hopper's paintings of solitary figures are often regarded as representing themes of loneliness and isolation, but as a sewist I always feel that this one looks like absolute bliss. The décor of the interior suggests a comfortable domestic environment rather than someone forced to sew to earn a meagre living, and the position of the treadle machine provides excellent light to work by. Clearly the girl is not expecting to be disturbed, as she is working in her undergarments - both cooler, and much easier for doing fittings of the item she is making. To my mind, all the ingredients for a pleasant afternoon's sewing are there (well, apart from a cup of tea!). The painting is in the Thyssen-Bornemisza Museum in Madrid and one day, when I have fewer commitments which limit my travelling, I shall go and see it.

My treadle is in my workroom, but I do sometimes use my handcrank on a table in my sitting room, especially if I'm working on something fiddly which needs good light. So when I had the machine set up last autumn, I decided to don my Edwardian slip and create my own version of the image.

My version, 2022

Finally, the title of this post is taken from this poem by Mary Leader, which was also inspired by the girl absorbed in her sewing.

Sunday, 28 May 2023

Vogue evening and graduation dresses, 1940

The latest series of The Great British Sewing Bee started this week, and the made-to-measure challenge was a dress with cut-outs. Sadly, no-one chose to make Vogue 8884!

Proving that there is nothing new under the sun

This is the first pattern in the 'evening and graduation' section of my 1940 Vogue counter catalogue.

The front page of the section

The patterns available in larger sizes

Although this is mainly dresses, there are a few patterns for outer layers as well, such as Special Design 4264.

I must admit that this looks like a very upmarket dressing gown to me!

Most of the dresses have the straight skirts which I associate with 1930s styles, and ruching features heavily.

8837 (dress) and 8839 (jacket)

However as with the Couturier patterns, some have much fuller skirts.

8825 has a circular skirt

Several come with 'extras' such as a shawl or in one case, a guimpe.

8757 (top) and 8712 (bottom)

Some patterns, such as 8371, look to me oddly casual for an evening dress. In fact, all of the designs on this page can be made short or long.

8371 is here styled to look like a blouse and skirt

This option seems to be omitted for some patterns, however. Special Design 4206, for example, is only shown full length.

Left to right - 4206 and 4213

But it also appears in the 'daytime dresses' section, where it is shown full length as well.

4206 short version, and 4210

Although the front page for the section only states 'evening and graduation', the side tab expands this to 'evening, bridal, graduation'. Unlike nowadays, none of the dresses are shown as bridal only. For example, S-4250 is shown as an evening dress.

Showing a hint of back, and the dark colour obscures the cut of the front

And then on the facing page, with the addition of a train and more buttons up the back, as a wedding dress.

The bridal version

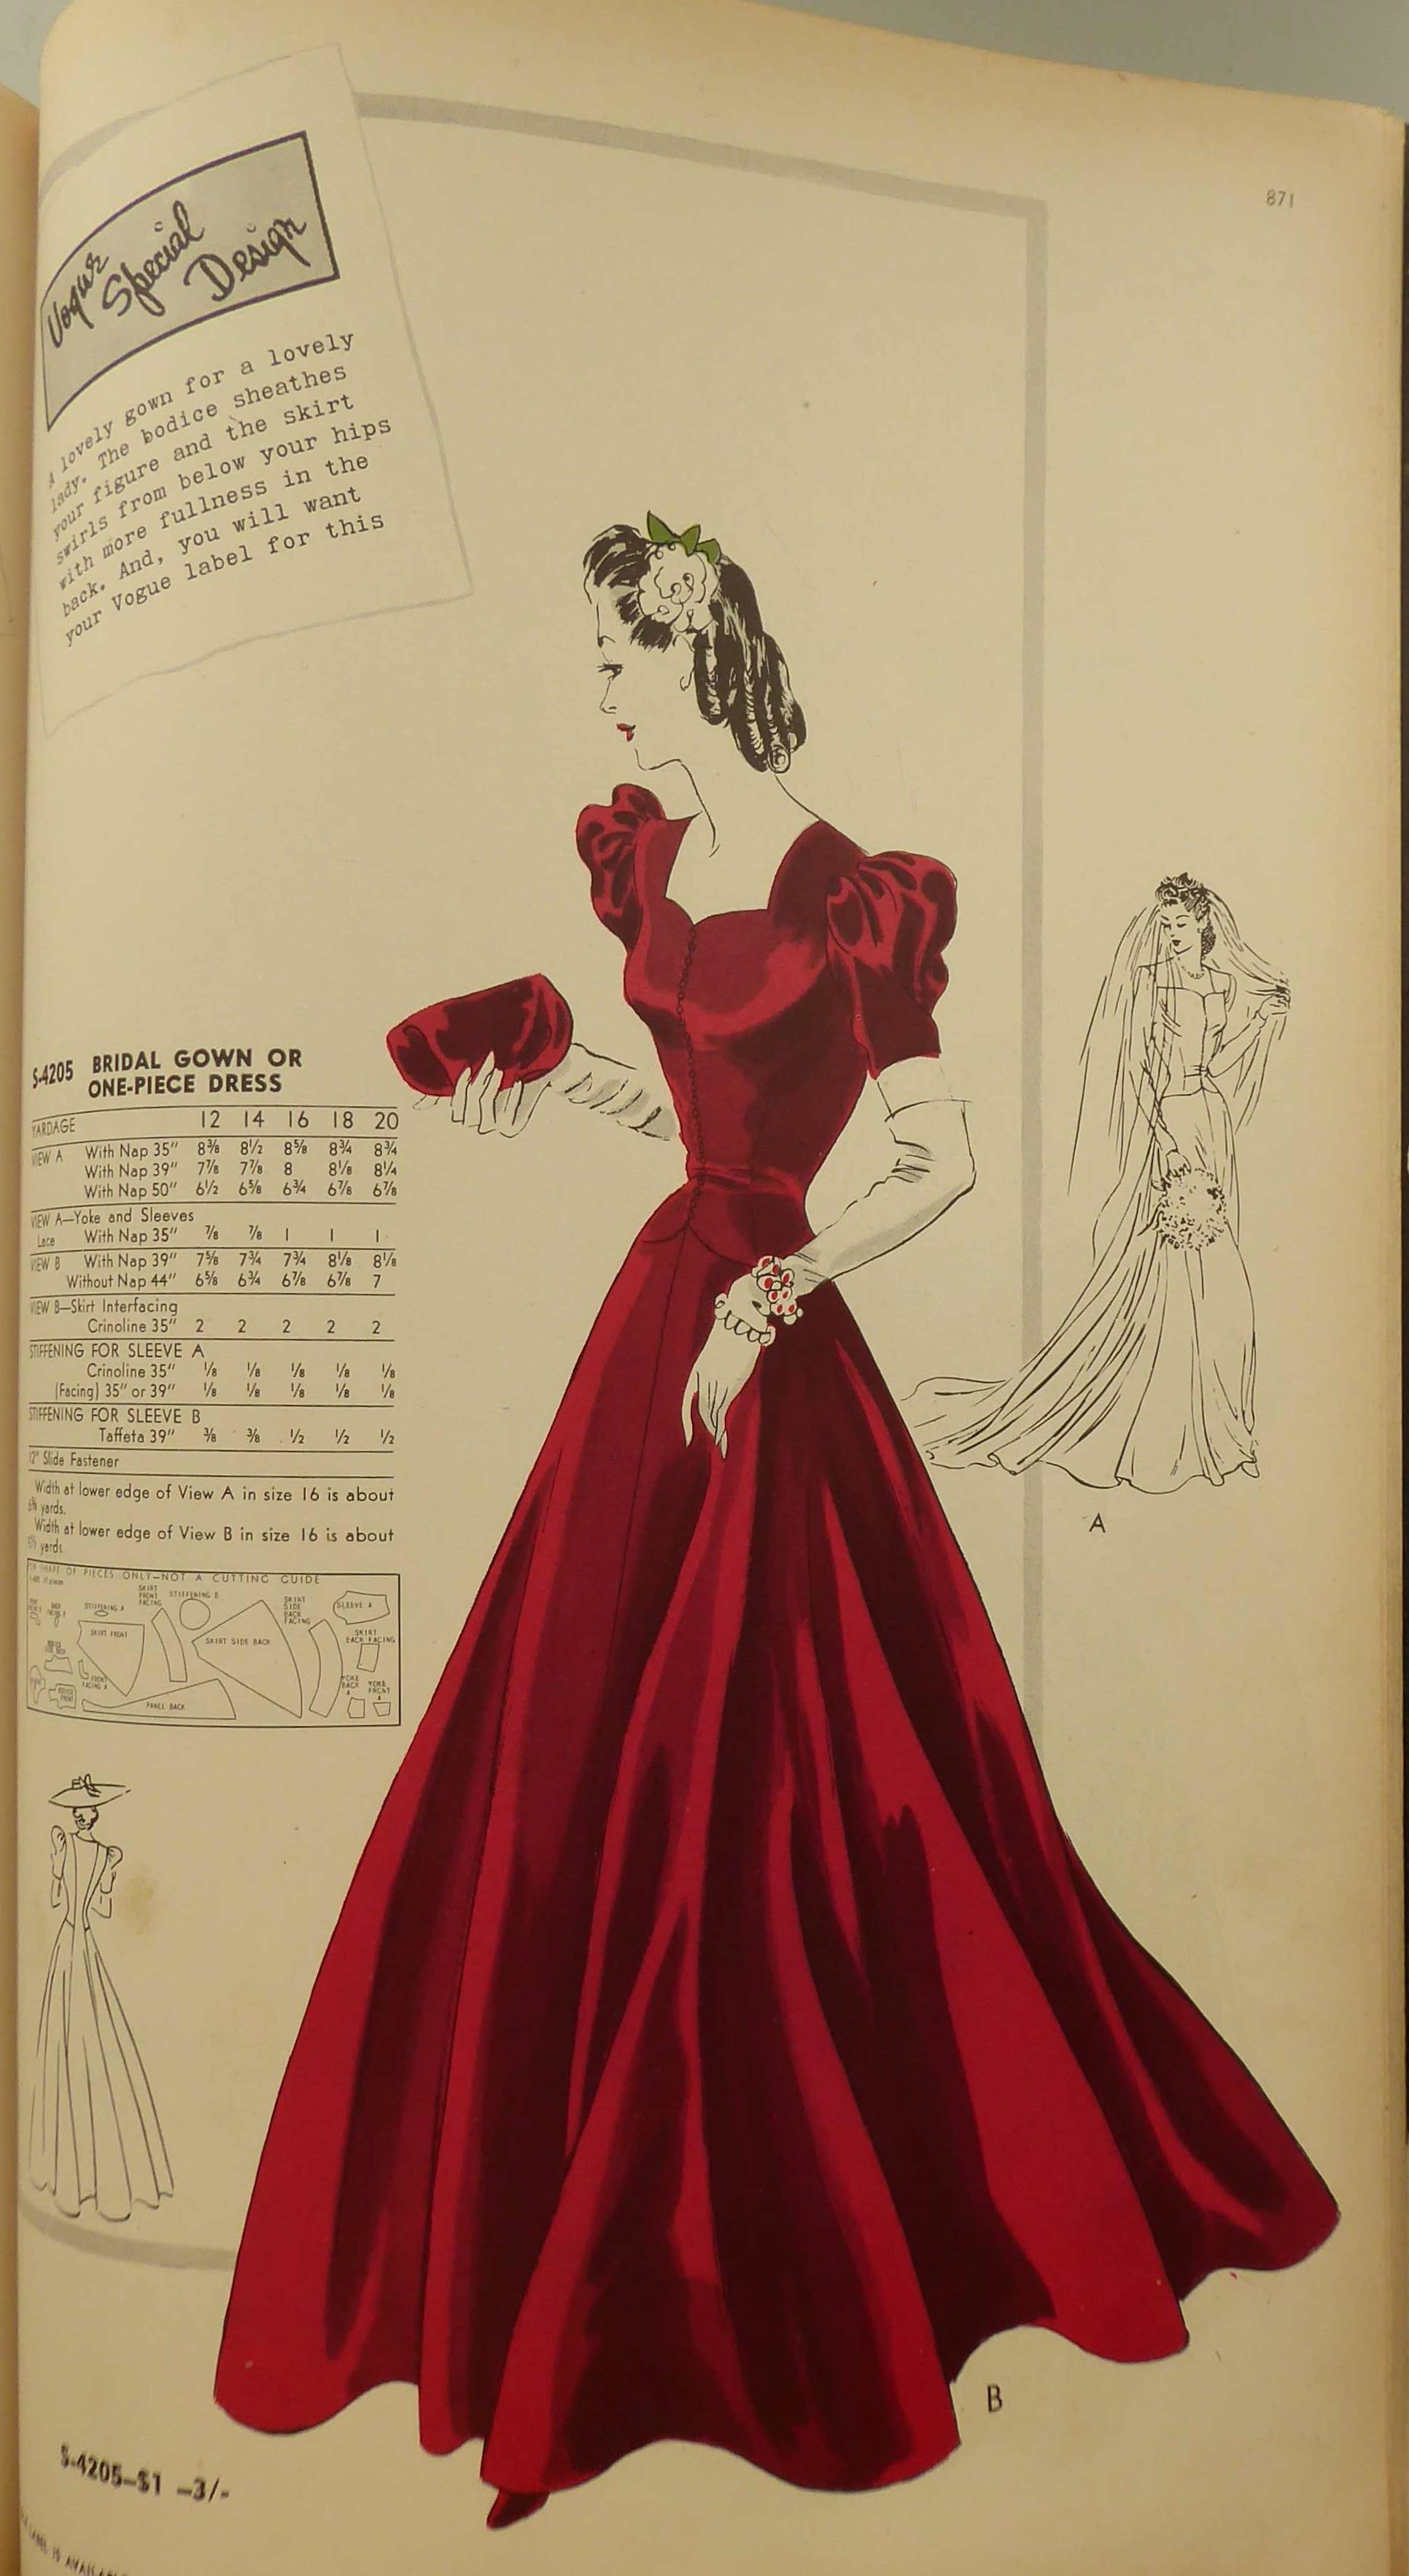
S-4205 gets even more extensive treatment, running to three pages. First of all, it's shown as an evening dress - albeit with a bridal line drawing.

As an evening gown

Several pages later, it too gets the full bridal treatment. Complete with suggestions for maid of honour, bridesmaid, and flower girl dresses.

With short puffy sleeves and long gloves

With long slim sleeves and a train

Judging from the pink outfit in the first picture, dressing your bridesmaid like a 1930s crinoline lady was a thing in 1940!

Bridesmaid inspiration from the Good Needlework Gift Book

As with the Couturier patterns, I suspect that rationing was soon to make wedding dresses with long trains a thing of the past for most people. But I'll finish as I started, with a dress with what look like cut outs on the shoulders - even if the back view shows that they are not.

S-4164, actually a V back and a tie neck

Sunday, 21 May 2023

Style 2911 completed

Something made in under two weeks, that doesn't happen often now. It's amazing the effect that an incentive can have - on Thursday I went to the preview of Photie Man: 50 Years of Tom Wood, and had decided that an exhibition which included photos from the 1970s and 1980s really needed a 1979 dress. I even managed to finish it the day before the event!

From cut out to completed in a week - no wonder I look pleased!

The method of making the ruched sleeves - sewing front and back together, gathering up some of the stitching, and then sewing the gathers onto a length of seam binding or tape - seemed a bit bulky to me, although it may just have been down to the thickness of the fabric.

The inside of the sleeve, showing the tape

The outside

The back pieces were joined, leaving a split at the bottom, and then the side seams, complete with pockets were sewn. The next job was to sew in the sleeves.

Sleeves pinned in

The front extensions were joined at the centre back, and then sewn across the top of the sleeves and the back to form the collar.

The double notches show where the collar is attached

Finally, the fronts were joined, and a facing added. I chose to apply interfacing to the facing to add structure, even though the pattern didn't call for it. None of the construction was difficult, but it was quite different from most dresses I've made. Like some Vintage Vogue reissues, there seemed to be a lot of sewing without much happening, and then suddenly there was an almost-complete dress.

I absolutely love the end result. It's very early 1980s (the pattern is actually late 1979, but was still on sale in at least October 1980) but then, that is one of my sartorial happy places*. It's got pockets, and it's comfortable to sit in.

Pocketses!

#sewnshownseated

Obviously, the buttons are considerably bigger than the ball buttons recommended, but I think that they work. They are certainly ideal, colour-wise. I might make a couple of tiny tweaks if I make it again, but it's definitely a candidate for a second version. And it's a stash-reduction project to boot.

Another 2.7m out


* - It may be an eighties dress, but that doesn't mean it needs eighties styling. Much as I enjoyed the exhibition, I did look at the hair and make-up in the 1980s photographs with a certain amount of horrified recognition, and was more glad than ever that almost all pictures of me from that era were lost in a house move! I stuck firmly to my everyday look for these shots.

Sunday, 14 May 2023

This and that

It's been busy week, with not much free time, so I don't have much to show for it sewing-wise. I have started a couple of projects, though.

First up, a new dress. I'm using another of my 1979-with-a-whiff-of-the-1940s Style patterns.

Style 2911 - I'm making view 1

Like so many patterns of that era, it has no waist seam.

The main pattern pieces, and the all-important pocket

The ruched sleeves have an interesting construction. Modern patterns, such as my well-used New Look 6093, achieve the effect with a strip of elastic sewn onto the sleeve - which pulls the sleeve hem up a little. This one is made from two separate, curved pieces, sewn together and then gathered up the seam.

Sleeve pieces

The fabric is a mystery item unearthed from my stash a few weeks ago. Try as I might to remember, I have no recollection of buying it. It's a strange combination of very fine, black, warp threads, and a thicker dark purple weft, with occasional weft threads of the same fine black.

Showing the fabric construction

I suspect that it will fray - a lot. The difference between right and wrong sides is hard to spot (and even harder to photograph), but great enough to make any mistakes obvious, so I will have to clearly mark the wrong sides with chalk.

The right side is more textured

Judging from the pre-wash, the finished dress will have to be laundered separately.


That's a lot of dye run!

The pattern calls for two ball buttons, but when I spotted these at the Festival of Vintage, I thought that they would be perfect with the fabric.

Purple and black - perfect

Meanwhile, my other project. The other week, I went over to Liverpool, to see all the build-up for Eurovision before the city got completely manic. I loved the Soloveiko Songbird Trail - 12 nightingales (the national bird of Ukraine) decorated with designs from 12 different regions of the country.

Songbirds and Liver Birds

Somehow, while I was out and about being cultural, I also managed to acquire yarn for a second Wondrella cardigan! It's another DK, and a mix of wool and lyocell, in a pale green. Judging from the swatch, the end result should be a more lightweight and summery cardigan. I had better get on with it for the summer, then.

All swatched up and ready to go