
The bodice pattern I was using had been drafted with a centre back zip, but the skirt consists of two panels sewn together at the sides. I didn't want to cut into the back panel to make an opening, so instead I moved the zip to the side. This involved opening up one side seam of the skirt enough to accommodate the lower part of a 30cm/12" zip once it was attached to the bodice.
Unfortunately, even though I unpicked the overlocked edge to retain all of the seam allowance, it was still too narrow to support a zip. Rather than make the skirt narrower, I increased the seam allowance by adding strips of the deadstock cotton for the top underneath and overcasting the seam allowance onto them. The neat selvedge of the cotton came in very handy, as it acted like seam tape, and the raw edge of the strip was tucked into the fold.
 |
| Widening the seam allowance with fabric strips |
The top was very easy to make, as it is only three pieces plus the facing. Even though I had changed to a side opening, I could not cut the back on the fold as it is not cut on the straight grain. I included an opening at the back neck, but as I have since taken the completed dress off without remembering to undo the buttons (from my button box) first, I think that this was probably unnecessary!
 |
| The back, with superfluous opening |
Once the top was complete, I pleated the skirt to fit it. Purely by chance, the patched area ended up hidden inside an inverted pleat - yay! My local fabric shop had run out of white zips of the length I needed so rather than wait for a new delivery, and in line with the general make-do ethos of this project, I used a longer zip from my stash and cut it to length.
When I was cutting the top out, I had been careful to place the pieces on the fabric in a way which left a long section down one side intact, and I used this to make a long sash. Finally, I attached the three remaining buttons to the front to add interest.
And here is the end result. It isn't especially vintage (although 1990s and 2000s are now classed as 'vintage', and I think that the skirt is older than that), but I've styled it here with vintage accessories.
 |
| Not bad for deadstock and leftovers! |
It's nothing special, but I think that it's going to be a real everyday workhorse dress. My two maxi dresses (the same design, in two different colourways) are about the only RTW items which I still regularly wear, so it's great to have a me-made replacement for them. The skirt is a very lightweight cotton - as is apparent from this photo taken in a slight breeze - so it should be cool while providing some sun protection.
 |
| Even a slight breeze catches the skirt |
And I really love this neckline. I may add some lingerie straps because it is so wide, but my favourite What Katie Did bra works fairly well with it. Plus, the grown-on sleeves provide a bit of cover without the hassle of fitting a separate sleeve. I can see a lot of iterations of this bodice appearing on this blog in the future.
 |
| #sewnshownseated shows off the neckline |
And for once, that new fabric on the Stashometer has gone straight back out again.
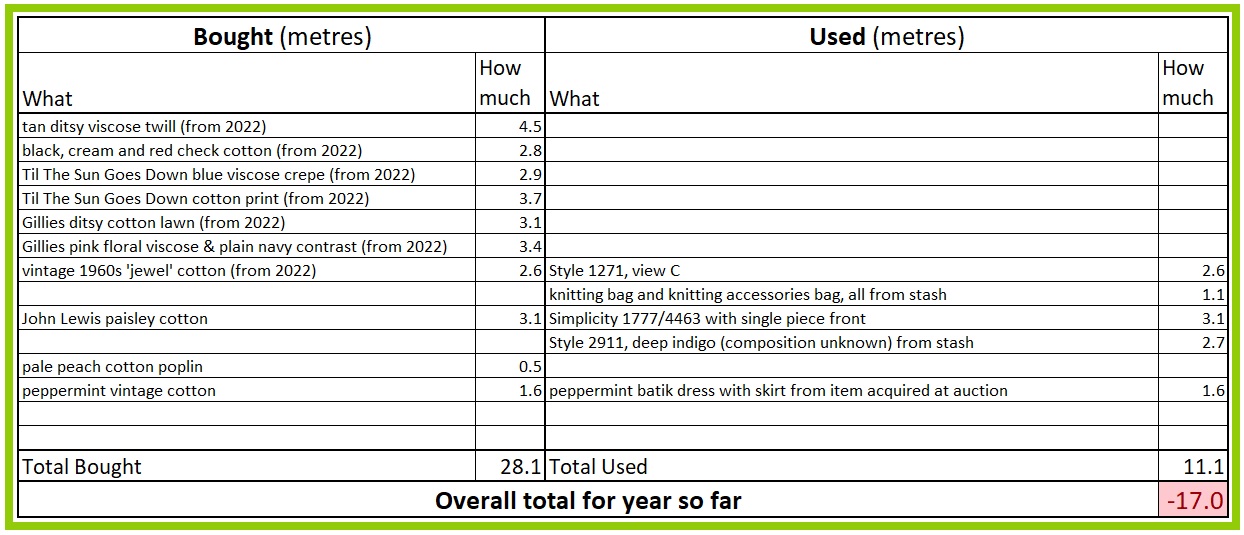 |
| Back down to a mere 17m deficit! |
No comments:
Post a Comment