After some thought, I decided to redraft the back with a centre back seam. The back could have had a slashed opening, like Simplicity 4463, but the trim treatment that I want to add to the dress would work better with a proper seam. Somehow, I forgot to take the back opening into account when I cut out the back facings and had to redo them, but at least I realised before I had sewn the facings together.
 |
| Duh! Original and correct facings |
My plan for the trim is inspired by this dress from Carnivale Vintage in Edinburgh. It was posted on their Instagram account ages ago, and I loved it. Unfortunately, as well as the usual problem that ready-to-wear bodices are too long for me, there was also the minor issue that it was a size 8 and I, categorically, am not! As usual when I spot something I like, I had kept all the images in my (now rather full) inspiration/ideas folder for reference.
 |
| 1930s dress, front and back, images from Carnivale Vintage |
Because I wanted to recreate this trimming method, I chose a crepe-back satin for the dress. The dress itself is made crepe side out, the trim will be made satin side out. This saves the hassle of trying to find one matte and one shiny fabric in the same shade of black, which is harder than you might think.
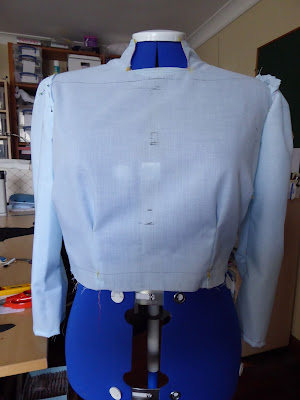
I experimented with laying tape across the toile, and marked the rough centre positions with a Frixion pen. Unfortunately, it's not just a case of extending these marked points across the pattern pieces. I know from this dress that working out pleasing lines on a three-dimensional body can only be done when wearing the dress.
 |
| Rough positions marked on the toile |
This gives me a chicken-and-egg problem. I can only position the trim, and match it across front, sleeves and back, when I have a complete dress. However, I can only sew the seams to complete the dress once the trim is in position! My plan is to sew the shoulder seams and partially attach the facing, then baste the other seams. By a combination of putting the dress on Nancy and wearing it myself, I can (hopefully) position and pin the trim.
This is going to involve lots of handling and taking on and off a dress made from a fabric which frays quite easily. I may even need to overlock all the raw edges it gets too bad. Therefore I decided to thread trace the seam allowances on the bodice and sleeve pieces before I start, so that I don't lose track of where the seams should be. I did this by marking the seam lines in chalk, and then going over them with tacking thread. I'll baste the dress together with a different colour of thread, so that I know what I'm unpicking if/when I need to do so.
 |
| Thread tracing on a sleeve |
The trim on the Carnivale dress looks like some sort of braid, sewn on in rows of three.
 |
| Close up of the trim, image from Carnivale Vintage |
For the sake of my sanity, I am planning to use a single wide strip of satin with the raw edges turned under, and machined twice to roughly replicate the three rows. I have made a sample piece from scraps, following the pocket treatment of multiple rows close together, and I'm happy with it.
 |
| Trim sample, I may need to sew down the edges |
I will need to be very careful to keep the rows of stitching straight and evenly spaced - thank goodness for the speed contol of a non-electric machine. I'm planning to do the pockets and belt first, as they should be simpler, and then move onto the bodice. Partly to get some practice, and partly to put off the tricky bit!
* - As an aside, this dress was in the 'Passion for Fashion' auction held by Kerry Taylor Auctions this week. Although it has no label, it was thought to be by Pierre Balmain, circa 1955. There were lots of interior shots in the online catalogue, and I was delighted to discover that most of my guesswork on the construction of my Holly Dress had actually been correct. My current project is really making me wonder if I've bitten off more than I can chew, so this was a welcome confidence boost.
 |
| Image © Kerry Taylor Auctions |
(And no, I'm not thinking about recreating this. Not even a tiny bit. OK, so I may have saved all the images and details but oh no, definitely not....)

No comments:
Post a Comment