Sunday, 26 March 2023

Not exactly Simplicity 1777

I've made Simplicity reissue 1777 (originally Simplicity 4463) three times. Each time, I've made various adjustments to make the dress more 1940s. The first time, I added length and shoulder pads, and attached the centre front bodice panel using a lapped seam. Subsequently, I changed from a centre back opening to a side opening (placket or zip) with a buttoned front neckline and added waist ties. But I've never tackled the really big difference - the shape and construction of the dress front. Until now.

In 1777 the bodice and skirt fronts are separate pieces, with the skirt cut on the fold and heavily pleated. In 4463 they are one piece, with a centre front skirt seam, and the skirt is flared - slightly at the front and more at the sides. There is a small amount of gathering around notch number 4, but no pleats.

Different approaches to the front

This is how the skirt pieces compare. The mauve tissue is 1777, cut to the same size as 4463.

Similar at the hem, but very different at the waist

The grainline of the bodice is significantly different in the original.

Both pieces laid along the grainline on my cutting board

Given the designers of 1777 only had the original illustration to work from, it's not hard to see where the confusion arose.

That skirt looks suspiciously well-gathered, all things considered

I was curious to see how these differences would work in practice, but as I have already made all the fit adjustments I need to my version of 1777, I didn't want to start again with 4463. Instead, I drafted a new front from my existing pattern pieces. I started off by laying the bodice and skirt pieces of 1777 together along the red lines.

All the pleating is in the centre section

Then I used the 4463 front piece to draft the skirt. Because I wasn't sure how well this would work, I went for the vintage approach of extra seam allowance in the side seams, making them 1" wide.

My pattern piece, ready to cut out

This is how the two completed fronts compare.

My first version of 1777

The current version - the gathering around the point is barely visible

Because the print is so busy, the skirt seam and the directional change on the bodice aren't at all obvious. I'll have to wait until the dress is completed to see what, if any, differences there are when the dress is worn rather than laid flat.

Sunday, 19 March 2023

Sportswear, 1940s style

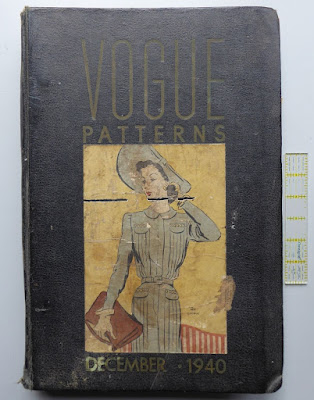
The knitting is progressing nicely but is not yet worth another post, so this week I'm looking at something I've had for a while but forgot to blog about - a Vogue Patterns counter catalogue from December 1940.

With a 6" ruler for scale

I've no idea what other brands' catalogues looked like at the time, but this is a substantial volume with board covers, and the pages held together with long metal pins.

It's over 1000 pages

Showing the pins which hold it all together

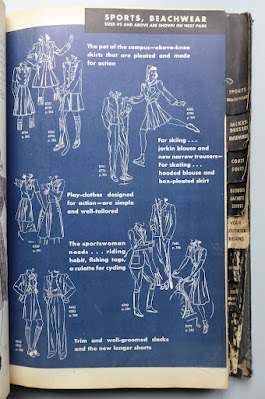
Like all pattern catalogues, it is split into sections. For this post, I'm looking at Sports and Beachwear.

Showing some of the new patterns

Each section has a page indicating which patterns are available in larger sizes. They seem to lean more towards the 'spectator' sports than the 'active'.

Fishing and bathing are the only sports referenced

Regular size patterns exist for a wide variety of sports. Skating was especially popular at the time, judging from the number of patterns for different outfits.

Skating and skiing

Golf and hockey? (Sport is not my strong point!)

Cycling and 'exercise'

More exercise, this time with an impractically large bow

Bathing

I suspect that only Vogue would carry a pattern for a riding habit! I'm intrigued by the fact that there is no hem allowance on the breeches - it's the only trouser pattern with this information given.

Riding

No hems on the breeches

It's not all outfits for specific activities, though. There are some clothes more suitable for spectators.

Athleisure, but make it forties

By the time this catalogue was issued, Britain had been at war for over 12 months. Not that you would know it from these pages. Pattern prices are given in both cents and shillings and pence, and there is a reference to Vogue Pattern Service being based in Greenwich Connecticut, so it seems likely that the same catalogue was used in both the US and the UK. But the next year would bring the start of clothes rationing in Britain, and making dresses purely for ice skating would become a thing of the past. Certainly fabric-hungry items such as these skirts would be harder to make - if the patterns even remained for sale.

The skirts take up to five yards of fabric

There is however one pattern in this section which would certainly remain in use, and which subtly indicates the differing experiences of Britain and America at the time. It is described in the catalogue as a "coverall or pyjamas", but Vogue 8852 had appeared in the previous month's UK edition of Vogue Pattern Book under the name by which it would come to be widely known, a "shelter suit".

To wear "on the way to your refuge"

At some point I will write about other sections of the catalogue. For a 1940s fan like me, there is much to drool over - especially the dresses.

Sunday, 12 March 2023

Wondrella progress report

Writing an update post about a knitting project feels very different from writing about sewing, but here goes. These are very much the thoughts of a knitting newbie, so this may be a rather basic post for experienced knitters.

In a week, I've gone from this . . .

. . . to this (admittedly, I've not done much else)

The first thing to say is that for a newbie, especially one who is used to sewing patterns, a knitting pattern looks terrifying. All those letters and numbers! No diagrams! With sewing patterns I like to read through the whole thing before I even cut out, so I know what I'm doing. However no amount of reading this pattern though was going to make it any clearer; if anything, it was more likely to put me off even starting. So instead I decided that as I know how to cast on and do ribbing, I would do those, work until I got stuck, then learn the next technique I needed, and carry on. And I've continued in that vein ever since. I did follow Tasha’s advice of highlighting the relevant number for the size I'm knitting, which seemed vital for avoiding mistakes.

After the ribbing came the row increases to shape the body of the cardigan. The first thing I needed to do was consider by how much to shorten the lower body. Using the pattern schematic, Tasha's helpful YouTube video, and a shop-bought cardigan which is a similar shape, I calculated that my standard 2"/5cm reduction would do the trick. Then I worked out how to remove 14 rows (approx. 2" of knitting) from the pattern while still ending up with the same number of stitches at the end, and wrote my own, very detailed, chart.

Possibly information overkill - part of my chart

Actually for me, this was one of the easiest bits (what can I say, I'm a maths nerd!). Then I had to learn how to do left and right stitch increases. For that, I turned to this book.

I've found this so helpful

I’ve got a couple of 'how to knit' books but for me, this is the best one. I find the instructions, and especially the illustrations, easy to follow. And I like that there's also a clear photo of actual knitting.

Different methods of decreasing

Close-up of a diagram and photograph

The instructions on joining a new ball of yarn recommend keeping any leftovers handy in case they are needed for mending - which is a touch that I appreciated. There is also a page on how to do this.

How to keep your knitwear in use

Because I was doing the stitch increase over relatively few rows, the effect is quite marked.

The increases laid flat

How the cardigan will look

Initially I miscalculated and did the bind offs for the underarms in wrong places - which gave me more unpicking practice! The back and front right sections were then put onto holding pins while I worked the left front.

The fronts were quite easy and relatively quick to do. The rows were reasonably short, and there were various changes to keep it interesting - reducing stitches for the armhole, a narrow ribbed edge for the neckline opening (which, remembering the Butterick 5997 episode, I made slightly shallower), and shaping the neckline.

Part of the right front

The back, however, I have found very boring to do (So. Much. Stocking stitch). Fortunately, it's nearly done, and then come all sorts of interesing new things; knitting the shoulder seams, adding button and neck bands, knitting the narrow neck ties, and finally the sleeves.

Not much more to go - thank goodness

I must admit that I'm finding it very odd not having anything to try on as I go along, unlike sewing. Even when I've completed the shoulder seams, the high degree of curl in the fronts will make it hard to really tell what the completed cardigan will look like. Currently it looks alarmingly small, but I have checked the gauge and it is all fine, so I am relying on blocking to make it the right size and shape. The crucial thing is that I'm still enjoying doing something entirely new.

Sunday, 5 March 2023

Singer for your every sewing need

A short post this week. I'm continuing to work away at my knitting, and I have a new dressmaking project started, but neither are well enough progressed to be worth a blog post. So instead, here's a little leaflet from Singer which I came across recently. I think that it dates from the mid 1950s.

It's only four pages, a single sheet folded in half, and it provides details of the services available from Singer shops. These seem to have existed in most towns: this leaflet comes from the Liverpool shop, my buttonholer was originally bought from the Chester shop, my mother remembers there being one in Crewe, and her sewing machine came from the shop in Golders Green (a north London suburb).

Unfortunately, by the time I realised that the first photo was blurred, it was too late to go back and retake it. I've added the two sections of text below.

Learn to sew with Singer

"Topsy Turvy was my label when it came to home dressmaking and home was written all over it. Could a novice like myself become a proficient needlewoman? To my surprise the Singer Sewing Centre said "Yes" and proved it! After eight lessons of their expert tuition, I had made a dress - which certainly did not go unnoticed. Yes, it's all sew easy from now on!"

SINGER SERVICE . . . This little folder is presented to you to acquaint you with the many Singer Services. Firstly SINGER SEWING CENTRES where, in eight easy lessons from experienced instructresses, you can make yourself a dress as you learn home dressmaking . . . Then there is

The reference to the new dress not going unnoticed reminded me of something I read when I was studying for my Masters; "The Sewing Machine as Magic Wand" by Eileen Margerum in The Culture of Sewing. This looked at how Singer advertised its Teen-Age [sic] Sewing Course in the post-war years with the basic premise of 'make a new dress and get a boy'. While the language of this leaflet is less teen-oriented, the message is similar.

Things don't improve greatly on the second page.

Get your machine repaired or serviced

Having inherited her grandmother's machine, the narrator apparently needed her husband to suggest that it should be serviced. I was intrigued, though, that at this time Singer were describing their older machines as "first class" and worth keeping, rather than pushing the idea of a trade-in for a newer model. Admittedly, in terms of features there is not a lot of difference between my 1930s treadles and Mum's 1953 machine, so perhaps at that time the focus was on persuading customers to electrify. Which brings us on to page three.

Convert to electric sewing

The emphasis on having both hands free rather overlooks the fact that this advantage was already available to treadle owners, but never mind!

Finally, page four reverts to the fairy tale theme with a vengeance, complete with a fairy godmother with a magic wand.

Oh, to have a local button and belt making service now!

One of the things which I want to look at in my study of Vogue Pattern Books is sewing machine advertising, and it will be interesting to see how Singer advertisements in particular compare to this leaflet.