Sunday, 28 August 2016

Simplicity 1777 - pattern alterations (and gripes)

It's been years since I've used a modern Simplicity pattern. In fact, when I came to write this I thought I'd try to work out just how many years. This is the last non-vintage Simplicity pattern I used, and it's dated 1993.

So old, it qualifies for the Vintage Pledge!

I know that I used it more recently than 1993, but sadly I also know that I'm (ahem) not exactly the shape I was then. I'm also a lot fussier about fit. In short, I needed a more recent pattern which I could use to work out fitting alterations. 2146 was already in my pattern stash, and an ideal shape.

2011, so in the stash for a mere five years

I made up the plainest version of the dress in my favourite toile fabric frost fleece, drew on the bust, waist and hip lines, and tried it on. As with Vogue and Style patterns, I need to shorten the bodice at both the waist and bust to get it to fit properly.

Once I'd got the fitting alterations sorted out, I could start on the actual pattern.

Circa 1943, according to the Simplicity website

I must admit I'm a bit bemused by Simplicity's 'Retro' patterns. On the plus side, they've clearly gone to a lot of trouble with the envelope artwork. In most cases they've included photographs so that you get a better idea of what the finished dress will look like. Plus the photographs have been styled with at least a nod to period shoes and hair. And in a nice touch, either the artwork has been re-coloured to match the fabric or fabric has been specially printed to match the original illustration.

1940s - much better length

1950s - not quite sure why this is 'Vintage' rather than 'Retro'

1960s - apart from the hairstyles

I'm even prepared to forgive the fact that the dresses on 1777 are a bit short for the 1940s, especially the red one. I assume that this is to make it look more appealing to a modern audience, although I'm not sure why the same rule wasn't applied to 1587.

But. . . For a start, it really bugs me that unlike Vogue, Butterick and McCalls reissues, there is no date on the patterns, just a decade. Surely Simplicity must know the issue dates of their own patterns? Just labelling a pattern '1940s' is a bit vague. After all, both of these photographs are from the 1940s, but are very different looks.

Fashions from 1942 and 1947

On top of that, reading the instructions it's obvious that the dress is constructed using entirely modern techniques. Now I appreciate that I'm a sewing nerd, and that Simplicity are aiming to appeal to a broader market than just sewing nerds, but if on the vintage section of your website you claim that, "You can produce garments that look exactly as they would have done if they were made decades ago", then it would be nice for the instructions to include at least a few period methods as well as modern ones.

Anyway, rant over. I'm going to make a mix of the two styles shown, with the round neck and ¾ length sleeves. I've lengthened the skirt, and redrafted the pattern to fit me; hopefully I've got the proportions of the gathered bits right. So now I'm going to try making it up using techniques I've learned from some of my vintage patterns, for a truly 'retro' look. Details coming soon!

Sunday, 21 August 2016

#VintagePledge - Butterick 6582 completed

Butterick 6582 done!

One thing which I forgot to mention in my post about making the bodice was the fitting alterations. I had read somewhere that the Butterick sloper (the basic shape from which all the patterns are made) is the same as the Vogue one apart from the sleeve length, so I took a chance and just applied the changes I'd make to a Vogue pattern - and this worked out fine.

The skirt was perfectly straightforward; just back and side seams, gather, and attach. The only unusual thing is that the centre front section isn't gathered, which gives the skirt a less bouffant look than something like Vogue 8789. Naturally, I added pockets in the side seams.

The centre front of the skirt isn't gathered

The only other alteration I made was to raise the V neck at the back, unnecessarily as it turned out, because I was worried that it would be too low. This then meant that I needed a longer zip.

Ah, the zip. It ages since I've made a dress with a standard, centre-back zip; either I've used an invisible zip or it's been a vintage pattern with a side opening. So to make it less obvious, I decided to hand-pick the zip. Then I had the genius idea of matching the thread to the fabric, so used brown, blue, orange and white threads. Halfway up the first side this idea was beginning to feel a lot less genius-like, but I persevered, and I think the end result was worth it.

Hand-picked zip and hand-sewn belt loops (and slightly off-centre front V!)

Then, because I just couldn't bring myself not to, I hemmed that enormously full skirt in four colours as well! Obsessive? Me?

The pattern includes instructions for a belt (without a prong or eyelets), and I decided to use one of my vintage buckles. I had quite a few of suitable colours to choose from.

Brown and blue buckles

I chose the one on the bottom right, because I liked the size and the shape.

The belt is made out of what my local fabric shop sells as 'buckram'. This isn't the same as the buckram I use for hatmaking; instead it's a tightly woven fabric, coated with stiffener/heat-activated adhesive.

Roll of belt buckram, and hat base of millinery buckram

I used the professionally made belt of the Rosalind dress to get an idea of how stiff a belt should be. In true Goldilocks fashion, one layer of buckram seemed too flimsy, while three fused together was too stiff once it had cooled (it's deceptively pliable immediately after it's been ironed), but two layers was just right. Because the buckram has adhesive on both sides it was impossible to iron the pieces together without also attaching the iron and ironing board, so I tightly wrapped the strips in a length of white cotton, and trimmed off the excess. Then I cut the end to a point and covered the belt with dress fabric, sewing it onto the cotton base along the centre back.

The belt covered in white cotton and then in dress fabric

And there you have it. Another Vintage Pledge make, and my first Vintage Sew-Along contribution (there's another one planned). I have Brocade Goddess at The Modern Mantua-Maker to thank for the neat interior; her dresses are always so beautifully finished that it's really encouraged me to up my own game.

Interior shot

To photograph the finished dress I paired it with my white net petticoat to give the skirt maximum pouf.

Big skirt, shades, and non-period-appropriate shoes

I suspect that the days for wearing sleeveless summer dresses are numbered, so my next project is more suited to autumn wear. But first I'll have to work out what fit alterations I need to make to Simplicity patterns.

Back to the 1940s with Simplicity 1777


Sunday, 14 August 2016

Making Do, and a mystery project

My friend F (of whom more in a future post) volunteers in a charity bookshop in town on Friday mornings, and if I'm around I usually pop in to see her. This must be doing wonders for Oxfam's coffers, as she has developed a sneaky habit of mentioning books she has found in new stock which I just 'might' be interested in (and she's usually right).

This is a recent example of her killer sales technique.

"I saw this, and thought of you" - gets me every time!

This was reissued as a small book by the Imperial War Museum some years ago, but I had never seen an original before. It is a 32-page booklet, with a soft cover of thicker paper. Although the paper is thin, it's far better quality than the paper used for the instruction sheets in some of my 1940s patterns.

The drawing on the next page is just visible at the top

The Make Do and Mend campaign started in 1942, and the booklet was first published the next year. Clearly although the intention was to encourage the public to get as much wear as possible out of their clothes, the information wasn't free; the 3d cover price is 53p / 68 cents in today's money.

Clothing care, mending, laundry, re-use and knitting are all covered

I'm not sure how useful some of the renovation hints actually were. There are a couple of suggestions for re-using garments which are 'worn in front', which in my experience isn't an area which actually gets worn out. In fact, one of the tips for remodelling blouses confirms this.

When the front is the only unworn part

Nowadays there is often an assumption that all women in the past could sew, but the fact that the booklet was published at all suggests that this wasn't the case. I do wonder who it was aimed at; a number of the 'hints' given are things which my grandmothers did as a matter of course. Similarly, the fact that the chapter on washing and ironing hints has to include the advice, 'Never iron stockings', suggests that some women were a little vague on laundry matters. Perhaps they had lost their domestic help to munitions work.

The owner of this booklet seems to have taken its instructions to heart, though. When I'm sewing I often jot down measurements or alterations notes on whatever scrap of paper comes to hand (and then, all too often, lose it), and clearly I'm not alone in this habit. The back cover has been used for planning out some sort of skirt-related project, but sadly I've not been able to work out exactly what. Any ideas?

Waist and hip measurements, and something to do with diagonal folds

Some sort of skirt diagram

Sunday, 7 August 2016

Butterick 6582, the bodice

The perfect fabric for a 1960 pattern

I saw this fabric in a shop in Goldhawk Road, and knew straight away that it would be perfect for a late fifties/early sixties dress like the full-skirted version of Butterick 6582. Unfortunately I had no idea how much fabric the pattern needed, so I bought three metres, and hoped for the best.

My size actually requires 3.5 metres, but I was confident that with careful cutting out from a single layer of cloth - more work, but always an impressive fabric-saver - I could make it work.

Then I discovered that the fabric was actually 103cm / 40½" wide, not the usual 115cm / 45". Very strange (not quite the words I used when I made this discovery).

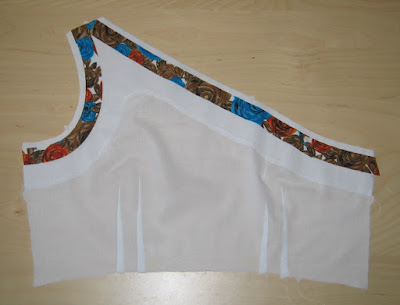
There was no way I could eke this out to cut the entire dress. Also, it's another very fine cotton, and I was worried that facings would show through. So I decided to miss out the facings altogether and line the bodice in white voile. As with the Blackbird Dress I wanted to make sure that the white wouldn't show at the edges. Unlike the Blackbird Dress, I didn't have enough fabric to cut even super-narrow facings, so I used bias strips instead.

Unusually, the skirt is cut side out sideways rather than lengthways. Fortunately the rose design is busy enough that this won't be obvious.

Cutting layout. Note the word 'sew-in' interfacing

I made the skirt a little narrower, and managed to cut out everything I needed. There was even enough spare for two pocket backs.

Showing the bodice shape

The bodice construction is unlike anything I've come across before. First, you make up the left front section. The shoulder is gathered, and the front is sewn to the facing along the full length of the front, and the bottom part of the armhole. Then the piece is turned right way out.

The armhole is stitched up to the green arrow

The left front is then basted onto the main front.

Ready to baste together

The facing is attached next, which should encase the raw edge of the seam across the front. The facing is much shorter than the bodice front, and narrower at the right shoulder because it isn't gathered. I had to frankenpattern my front lining out of the the facing and bodice front pieces. I then decided that iron-on interfacing would work much better than sew-in with the full length lining. I also spent ages carefully shaping the bias strips around the neckline and armhole, and basting them into place.

Can you tell what has gone wrong here?

This was when I discovered that, it being August, my brain had decided to go on holiday without me. I had diligently constructed the lining the wrong way round, and because I had used iron-on interfacing I couldn't simply unpick it. Gah.

So, I made lining number two. Turns out that my frankenpatterning was a bit off, and it's a slightly too short in the centre. Fortunately I just happen to have a spare lining piece, so I can add a strip from that to pad it out!

Close, but not quite right

The completed front section

The backs are made the same way, and because they are symmetrical, even with my brain away sunning itself on a beach somewhere I couldn't go wrong.

Back section, front and lining

Now comes the clever bit. You open out the shoulder section of the front and back, and sew them together. Right across the main dress and the lining.

Shoulder seam sewn together

Then you fold in the raw edges, and slip stitch the remaining section of the armhole.

With the armhole finished

Sew up the side seams, again sewing the dress and the lining in one continuous line of stitching. And then you have a beautifully neat bodice.

Bodice complete