Sunday, 29 September 2013

Wood, Metal Bone (and straw)

Aaargh! I can’t believe how long this challenge is taking. One week late already, and it’s still not finished.

The challenge is Wood, Metal, Bone. As The Dreamstress explains;
"Cloth may be the most obvious material in historic costuming, but wood, metal, and bone are just as important to creating the right look and silhouette. They are often, literally, the foundations of a period garment, with shoes made from wood; skirt supports made from wood, metal or bone; and bodies and bodices shaped with the same. Wood, metal and bone provided the finishing touches to garments too, in metal jewellery, wood and bone fan sticks, and straw hats. For this challenge, make anything that incorporates wood, metal, or bone."
The challenge allows a generous interpretation of the categories; so ‘bone’ includes any of the types of plastic boning used in place of whalebone, and ‘wood’ includes rayon and other wood/cellulose based fibres, and also cane and straw.

It was the final one which did it for me, as this finally provided the impetus to do something with a hank of straw plait which I’ve had in my stash for ages.

Unused hank of Japanese straw plait

I’d bought it ages ago, with the wild idea of making a bonnet. When I was a student (years ago) I had read about the Orkney straw bonnet industry, which flourished in the early nineteenth century. Allegedly the industry declined rapidly when Queen Victoria, upon being presented with a fine Orcadian straw bonnet, "laughed derisively and put it on the head of her pet dog". More probably the decline was due to the combination of changes in fashion and cheap imports.

Straw bonnet, 1860, Victoria and Albert Museum

Eventually common sense prevailed, and I realised that making a bonnet with no previous experience of working with straw plait was just a little over-ambitious, so the straw remained unused. Then, when this challenge was announced just as I finished the Mikko dress, I had An Idea.

I had a vague memory of having seen 1930s bags made of straw plait, with raffia decoration. A trawl of the internet turned up something very similar to what I had in mind.

1930s straw bag, sold by Steptoes Dog

Finally, a use for the straw. One of the things which makes straw plait so simple to work with is that it can easily be manipulated from straight to curved, but remains flat.

Plait straight and curved

This works because in a plait, unlike a woven strip, each thread is in turn on both the outer and the inner edges. Even though the outer edge requires a longer strand, the inner edge is a shorter strand, so the whole thing evens up.

Straight and curved plait examples

All very good in theory, so I started to stretch the plait along one edge, formed it into a small circle, then continued to work in a spiral, stitching the edges together as I went along. It would have turned out perfectly, if I’d been making a hat like this.

Dior, New Look, 1947

Unfortunately, I wasn't. Try as I might, I just couldn’t get the straw plait circle to lie flat. On top of this it didn’t feel very strong, certainly not strong enough to stand up to use as a bag. I decided that the only solution was to sew the straw onto a strong backing piece. In the 1930s this may well have been buckram, but I cheated and used the modern equivalent of heavy pelmet Vilene.

This worked perfectly for keeping the straw flat, and would be far sturdier. However before I made the circle too big, I had to consider handles. The only circular handles I could find in my local fabric shop were plastic, and about 12.5cm / 5" in diameter, which was too big for the size of bag I wanted to make. As an alternative I did consider using a pair of bangles, but at 7.5cm / 3", they were too small.

Handles too big and too small

Fortunately on a trip to Liverpool I had a look in the much larger branch of the shop and found, not handles, but these.

10cm / 4" embroidery hoops - problem solved

The perfect size, and wooden as well. A double fit for the challenge! For this bag I used the inner rings, but some time I’ll file down the metal pieces on the outer rings, so that I can use them for another bag.

Now that I had the handle size, I could cut the Vilene to shape.

Bag outline, with the completed straw circle sewn on

I continued to add lengths of straw plait, working out from the centre. However one detail of the original inspiration bag which I really like is the strip of contrasting plait that runs in a circle just below the handle. So for my bag I sewed a length of the original plait around the outer edge, and then worked in from there. Where the inner and outer sections met, I added a length of another plait; a slightly different colour, and shinier.

First side done, complete with contrast strip

Then I started all over again, for the other side of the bag. By the time I was adding the outer strips of the second side, I had just about got my technique perfected. And I was very, very glad that I’d finally learned to sew with a thimble!

Sunday, 22 September 2013

Practical Needlework

Today I should be posting about my piece for the latest Historical Sew Fortnightly challenge; Wood, Metal, Bone. Unfortunately however I'm a long way behind on it. I have been busy sewing, but the results aren't very thrilling.

Mr Tulip is not well at present, and hasn't been for a while. He has problems with his hands and arms, which are making any dextrous movements very tricky. We are partway though all sorts of tests and visits to specialists, but while these go on I'm busy with practical things for him.

One of the things he struggles with is doing up shirt buttons, so I'm replacing them with press studs (snaps/poppers). Here's how.

Remove the button, and put it to one side. Sew one half of the press stud in its place. I use the side with the stud on it, because the back is flatter.


Next, sew up the buttonhole on the wrong side, trying not to let the stitches show on the right side of the shirt. Sew the other half of the press stud over the buttonhole. I take the stitches through to the right side, so that the stud is attached securely, but I try to keep the stitches on the front as small as possible.


Finally, sew the button onto the right side of the shirt, over the buttonhole. When the shirt is done up, it just looks as though it is buttoned as normal.


Most of Mr Tulip's shirts have zip pockets, which are awkward to open and close. So I've added loops to each zip pull. These are just a loop of four strands of sewing thread, covered in buttonhole stitch. Not very exciting, but they do the job.


So that's been my week. Mr Tulip has a fair number of shirts for me to get through. In an odd sort of way it's quite satisfying though. There's nothing I can do on the medical side, or to speed up the process of tests and analysis, but it is good to have a skill which I can use to make life easier for him.

Sunday, 15 September 2013

Vogue 2787 - completed

I was happy with the toile, but I wanted to make one final check before I took scissors to fabric. The pattern calls for shoulder pads, so I needed to try the toile out with those in place. I could have used modern pads, but the pattern includes instructions for making them, 1948-style, so I decided to have a go.

Each pad is made out of four pieces of cotton batting, stacked together and covered with an oval of lining fabric.

Cotton batting pieces and the fabric cover

The pieces of batting are stitched together; I used a herringbone stitch. Then the seam allowance of the lining is turned under, holding the batting in place. The pattern suggests turning the lining under all the way round, but I only did the section around the batting.


Then the lining is folded in half and pinned over the batting.


This was the point where I turned the remaining raw edge in. The edges are pinned together, then overcast with small stitches.


Finally the darts are pinned to make the shoulder pad curve.


And slip-stitched along the pinned pleats.

The completed shoulder pads

The most complicated part of the dress is the front, and it is quite complicated. There are a lot of different markings on the pattern; small circles, large circles, squares and triangles, and you do need all of them. If you are using tailor tacks as I do, I really recommend using a different colour of tacking thread for each symbol, otherwise you have to keep referring back to the tissue pattern pieces to tell which marking is which (ask me how I know). If you can’t get coloured tacking thread, the soft thread used for overlockers (sergers) will do.

Making up the dress starts with the right front. Part of the centre curve is stay stitched, and then the seam allowance is pressed under. The bust dart is a bit tricky because the two sides are different lengths. The lower edge should be stretched to fit the upper edge, but I found it helpful to go along the upper edge with long machine stitches just inside the sewing line: this had the effect of gathering the upper edge ever so slightly.

Dart made, and edge pressed under completed

The skirt is then attached to the right front, and a gathering stitch run from the end of the turned-under section to a notch on the skirt top.

Skirt attached

Next the left front is made up, also with a dart, a section turned under, and gathering.

Left front completed

The two sections are then lapped together. In the picture below, the tailor tacks at the centre show where the pieces join. Above the green-headed pin, the fabric section to the left is on top. Below it the fabric section to the right is on top.

Joining the two pieces

The gathers are then drawn up until the two pieces fit together. Gathering the skirt and right bodice to fit the left bodice is a very long job. In retrospect it would have been easier to do two separate sections of gathering, one either side of the right bodice/skirt seam.

It took a lot of pins to hold the two sections together. Here I need to confess to an Awful Sewing Secret: I almost never tack (baste) things when I’m sewing. Normally I go straight from pinning to machining. However I made an exception for this. The two pieces are joined not with a normal seam, but by topstitching as close to the folded edges as possible. It would be impossible to get a smooth line of stitching if I had to stop each time I reached a pin, so tacking it was. In fact because the fabric was so tightly gathered I did a second row of tacking, to stop the gathered fabric from dragging and getting distorted as I sewed.

45 pins hold the pieces together

Once the front was complete, the rest of the dress was fairly straightforward. The backs are sewn together and the darts put in, the shoulder and side seams done, the zip put in, the facing added (slightly tricky) and the skirt and sleeves hemmed. Because I’m left-handed, I swapped the zip to the right side of the dress to make it easier to use. I also added an in-seam pocket on the left side. I may take the pocket out however, as it doesn’t lie entirely smoothly.

So the dress is done, and it was an interesting and absorbing challenge to make it. There’s just one problem…

Well, two actually. The first one is the buttons at the back neck opening. I decided to make covered buttons, with the fabric cut out so that each button had a red flower in the centre. Unfortunately my local fabric shop doesn’t stock the brand of self-cover buttons I usually use, but I assumed that one type would be much the same as another. Ha!

I carefully cut out six circles of fabric, two each of three motifs, to the 11mm button dimensions given on the template provided. Then I gathered one up, and discovered that it was nowhere near big enough to cover the button form. Thanks, Hemline.

Fabric, buttons, template, and in the middle - dismal failure!

So, I carefully cut out six circles of fabric, two each of three motifs, to the 15mm button dimensions given on the template provided, and these were just the right size. However when I came to attach the buttons to the dress, a whole new problem appeared.

The brand I usually use (Prym, since you ask) make up into quite flat buttons, with a small shank.

Nice flat covered buttons

The Hemline buttons have a much longer shank, and stick out from the dress like brightly coloured mushrooms with long stalks. Or they stick out at a strange, off-kilter angle.

Horrid, stalk-y, wonky buttons

So, I need to track down some a supplier of Prym buttons, and cut out a further six circles of fabric, and make six more buttons.

This is annoying, but can be fixed. Unfortunately the other problem is a bit more awkward. I just don’t like the finished dress. At all.

When I was researching last week’s post on re-use and recyling I came across a post on the Wearing History blog about feed sack dresses, something I’d never heard of before. Trying this dress on, even though I did take it in a bit at the waist, I immediately thought ‘feed sack dress’. Just without the ‘dress’ bit. Or the ‘feed’ bit, either.

The finished "feed sack dress"

There is a solution, of sorts. I know from long experience that when I’ve been working on something for some time, all I can see in the finished article is the flaws. As I’m typing this, I can hear the wind outside, and there’s rain on the window. According to the BBC News weather website, “A spell of gale force westerly winds is expected to continue during rest of Sunday and through Monday across much of the north west of the UK”. It is the autumn equinox in less than a week. In short, I won’t have a need for a short sleeved/sleeveless cotton dress for some time. So I intend to fix the buttons, and then put it in the back of the wardrobe, and hope that by the time spring comes round it will look slightly less sack-like.

Oh well, onward and upward!

Sunday, 8 September 2013

Re-make, Re-use, Re-fashion

Bother! Having completed the toile, I was looking forward to starting work on Vogue 2787 this weekend, once we got back from a short holiday. Unfortunately while on said holiday I was bitten on the leg by something nasty (I’ve no idea what), which led to inflammation, blistering, a trip to the Minor Injuries Unit of the local hospital, antibiotics, a trip to my own doctor when I got home, more blistering, and stronger antibiotics!

Six days after the bite it’s not a lot better, and I have got to keep my leg elevated as much as possible, which makes cutting out a dress a complete non-starter.

So, what to do instead? The latest Historical Sew Fortnightly challenge is Re-make, Re-use, Re-fashion. I haven’t made anything for this challenge, and normally when that is the case I post a short piece on the day that the challenge is due, with links to the things which other challengers have made.

However my enforced rest has got me thinking about the whole idea of this particular challenge. This gave me an excuse to look through some of my books and magazines for examples, so the time wasn’t entirely wasted!

The Dreamstress explains that
"There are numerous examples of gowns made from 18th century fabric that were re-made a number of times in the 18th century, and then re-made again in the mid-19th century, a hundred years after the fabric was first woven"
but the earliest example of re-use which I have seen recently is much earlier than that.

Among the various stunning pieces I saw in the Staffordshire Hoard is a pair of sword pyramids which included pieces of re-used Roman glass in their tips.

Side view

Close-up of the glass tip

Despite this, I still tend to associate remaking and re-use with clothing. The earliest example my browsing turned up is a jacket from the Snowshill Manor collection, found in Patterns of Fashion 1.

Jacket for 'undress' wear, c. 1720-40

Janet Arnold’s notes describe how the fabric dates from c. 1711-15, the cut appears c. 1730-50, and the white gauze trimming was added later, probably c. 1770-80, to renovate the jacket. The sleeves have also been lengthened from elbow and made narrower from the top, possibly as part of the same renovations.

Image © The National Trust

A common candidate for remaking of a dress seems to have been the wedding dress. The idea of a wedding dress being worn for one day only is a recent phenomenon. Before that, a wedding dress was frequently worn as a best dress for some time afterwards, and as such was often remodelled to reflect current fashions and so extend its life.

One such example is this lovely 1899 wedding dress. Made by the bride, who was a lady’s maid before her marriage and clearly a skilled needlewoman, she later narrowed the skirt to create a more fashionable line, and added the silk braid to the front, possibly so that it could be worn separately with a blouse.

Image © Victorian and Albert Museum, London

The dress features in the book The Wedding Dress which I have had on my bookshelf for a while and have now finally read, thanks to my imposed inactivity.

Over the years I’ve managed to collect a few issues of Le Petit Echo de la Mode, and my 17 September 1922 copy, the Special Fashion Number for the year, contains an article titled “How to Follow Fashion - How to transform our old outfits ourselves”.

The complete article

“Always anxious to render service to our loyal readers” Le Petit Echo shows before and after drawings of a coat and a dress, plus instructions, and diagrams showing how the new pieces are cut from the unpicked old garment.

The dress, before and after

The coat requires extra “Tissue Écossais” (Scottish fabric, i.e. tartan), but the dress can be made entirely from the old garment.

Cutting layout for the dress - easy!

Unfortunately my French isn’t good enough to decipher all the instructions, but it seems that readers could send off for either a plan and explanation for 1 franc 50, or a full pattern on strong paper, available in three sizes, for 9 francs for the dress and 7 francs for the coat.

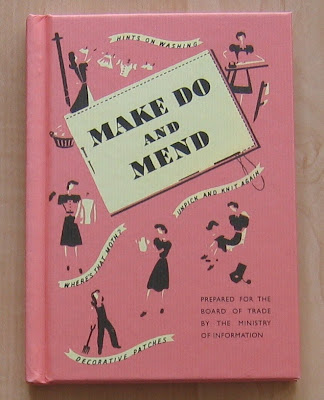
Here in Britain, the concept of re-make, re-use, re-fashion is most likely to bring to mind the Second World War, and the idea of “Make Do and Mend”. Clothing was rationed from June 1941, with an initial ration for adults of 66 coupons per year. The next year this dropped to 60 coupons, which had to last for 13 months instead of 12. Eventually the ration dropped to 48 coupons per year.

The Board of Trade launched the Make Do and Mend campaign, and in 1943 the Ministry of Information published a leaflet of handy hints to enable people to get as much use as possible out or their clothes. This has been reissued as a small book by the Imperial War Museum.


The leaflet contains sections on taking care of clothes (including dealing with the “moth menace”), laundering, mending and re-using wool, but it is the “Turn Out and Renovate” section which I found most entertaining. There are all manner of suggestions, with illustrations, for renovating blouses, coats and dresses.

Replace worn under-arms (1 & 2) and lengthen a too-short blouse (3)

Two coats into one (1) and a coat into a coat-frock (2)

I particularly like the suggestion for renovating a dark woollen dress which is worn in front and/or too tight by inserting a panel of contrasting fabric down the front which will apparently, “give the effect of a Redingote worn over a dress”. I'm not sure how many readers in 1943 would have had the faintest idea what a Redingote was.

The "Redingote" effect

I couldn’t help but wonder how many people actually did make a new dress out of two old ones, so like a good historian I turned to a primary source, and asked my mum. She confirmed that this was common and indeed necessary, as coupons did not stretch very far. For example, a lined coat required 14 coupons, a non-wool dress seven, and a pair of shoes five. Mum had made blouses from old 1920s dresses belonging to her mum (with permission, of course!), including one from a particularly nice heavy satin. She also remodelled an outgrown coat and a pleated skirt to make a new outfit. This involved unpicking the skirt and pressing out the pleats, then cutting a new slimmer and more fashionable skirt from the fabric. The coat was cut down to form a jacket, and strips of the remaining skirt fabric added to lengthen the sleeves and widen the front.

Although clothes rationing reduced after the end of the war, and finally ended in March 1949, the idea of remodelling clothes did not go away. This 1952 book is another of my charity shop finds, and although mostly about drafting patterns and modelling clothes on a dress stand (with some entertaining advice on styles for different types of figure) it does include a chapter on renovations and remodelling.


Renovation is defined as restoring or refreshing worn and faded parts of a garment, whereas remodelling involves taking a garment to pieces, washing all the parts, and remaking in a different style. The authors stress that
“To remodel a garment will take more time, and be a greater strain on the zeal of the worker, than the making of a garment from new material. But the joy of possessing a new garment for the sake of effort and patience is its own reward.”

Just for good measure they later add
“The result of skilful remodelling gives one a very real sense of triumph and achievement.”

To me, these sentiments sound as though they are desperately trying to convince the reader, rather than a statement of fact. Perhaps with the war years over and a new era of prosperity dawning, the ideas of re-make, re-use and re-fashion had finally gone. For the time being, at least.

Sunday, 1 September 2013

Fitting Vogue 2787

As expected, drafting the bodice pieces of this pattern to fit was a multi-step process.

First I drew lines across the printed pattern front pieces to mark the two sections which I needed to remove to shorten them.

Bodice right front with the four shortening lines marked

Then I traced off the top section to line one, moved the tracing down the grain line to line two, traced off the darts and the middle section to line three, moved the tracing down again to line four, and finally traced off the bottom section. Once I’d done this for both fronts I smoothed the lines where I had joined the sections, making sure that the curves on the centre front matched.

With hindsight, I think that I made things harder for myself by avoiding shortening the area of the pattern with the darts in, especially because they are quite large darts. It would have been easier to omit the darts, shorten each piece, and add the darts afterwards. Oh well, you live and learn.

The back piece was shortened in line with the fronts. This was much more straightforward. I have finally given up up fighting my swayback* however, and instead curved the centre back seam out to accommodate it.

(* - Well,I like to think that it's a swayback, but it might just be a large derriere!

I made a toile of the altered bodice from an old sheet, as I felt that the frost fleece would be too stiff to gather properly. I must admit that I was very pleased with the result, as the waist and bust markings lie in exactly the right places on me, and in the side view the redrafted back lies smoothly. (I've discovered the hard way that I need to use a tripod when photographing myself, as otherwise the degree of camera shake makes the images unusable!)

The bodice toile. With a few alterations, this would make a nice pattern for a top.

Perfect fitting at the back - at last

Unfortunately I had a ‘moment’ when constructing the toile, and sewed the darts on the wrong side. Duh! I then had to then sew them flat onto the bodice, as having them sticking out like fins was far too distracting.

Darts on the wrong side are so last season - honestly!

Fortunately the fabric I’m going to use has a clear right and wrong side.

The fabric - I won't make the same mistake again

The dress has a side opening and a small back opening at the neckline. The side can be fastened with either a zip, or with snaps on a placket for a period finish (the pattern dates from 1948). The back opening can be a zip, or buttons with thread loops. I’m going for a compromise of side zip and back buttons. For the toile however I just pinned it together.

Although the bodice length is perfect, there are still a couple of fitting considerations. Several reviews of the pattern mention that it has a very high neckline, and they are not joking. When I first put the toile on, it felt uncomfortably tight, and I did consider redrafting the neckline. It does seem to lie more comfortably after a few minutes’ wear though. Also, I have only made up the bodice; hopefully the weight of the skirt will pull it down a bit more.

The neckline is very high indeed

There is also the matter of the looseness, or otherwise, of the fit. The pattern is described as, “loose-fitting through bust and hip, semi-fitted at waist”. From the definitions in Vogue Sewing, this should give an ease of 13 - 20.5 cm or 5⅛ - 8” at the bust and hip, and an ease of 10.4 - 12.5cm or 4⅛ - 5” at the waist. However neither the envelope illustration nor the photographs on the Vogue patterns website show a dress that loose.

Nope, that doesn't look like "semi-fitted" ease to me

I’m tempted to take the bodice in a bit at the waist, but leave the bust and hip unchanged. I’m using an (entirely period-inauthentic) invisible zip though, so I’ll have to make that decision quite early on.