Pages

Sunday, 24 April 2022

A hat and a hack

Yes. Again.

Guess who has been distracted from her MakeNine2022 goals?

This all started a couple of weeks ago, when I went to an event at Maggie Mae's Vintage in Shrewsbury. (An actual event!! With people! Woot!) It was the first time I'd been there, but it won't be the last - the shop has a wonderful selection of true vintage and reproduction pieces, and stocks lots of vintage-style brands such as House of Foxy, Fatale Cosmetics and What Katie Did.

I had a great day and met some lovely people, and bought a hat! (Being short-waisted means that most RTW clothing doesn't fit me, but hats of course are an entirely different matter.) It's a fabulous black felt number trimmed with a veil, and black felt decorations on scarlet barbs which I think are meant to be wheat stalks.

Hat goodness

Of course, such a hat needs a suitable dress to go with it. It looks very late 1930s/early 1940s, so I wanted something from that era and fairly plain - mainly so as not to distract from the hat, but also because frills are on the list of Things I Do Not Wear. View A of this pattern fits the bill nicely.

Butterick 7598, 1937

The pattern has variable seam allowances - ¾" for seams which might need letting out, and ⅜" everywhere else. As usual, I traced off a copy to work with, and decided to simplify things with ⅝" allowances all round. Trying to simultaneously do this, shorten the bodice, increase the whole thing by one size and add a full bust adjustment, it's not surprising that it took me a while to notice that the neckline looked nothing like the one on the pattern envelope.

Spot the difference(s)

Clearly at some point the previous owner decided to alter the pattern to have a neckline more like the one on my Autumn Roses dress but without a front opening.
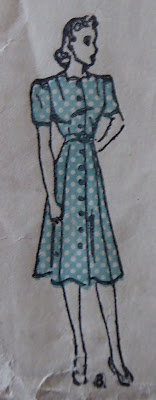
Detail from Advance 2229, 1939

Fortunately, the pattern still has its front and back facings, unaltered. By laying these over the main pieces, it was possible to see what the pattern pieces should look like.
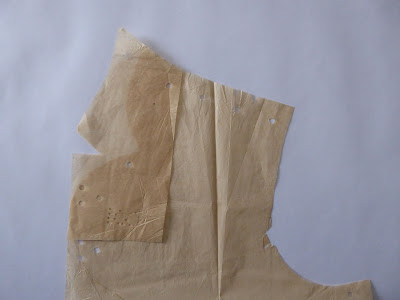
What the bodice front originally looked like

The back neckline was cut down to match

After all this, I decided that the easiest approach was to work step-by-step rather than try to do everything at once. So, I have drawn up the correct bodice front and back pieces without any seam allowances or alterations. The next job is to attach them to Nancy to see where changes need to be made.

Sunday, 17 April 2022

Spring has sprung

Q. What is wrong with this picture?

I do apologise. That is probably the worst pun ever to appear on this blog in 10 years of writing. But I just couldn't resist.

Unusually for me, I'm not really in the mood for sewing right now. I've come to the conclusion that Butterick 6866 doesn't really do me any favours (it may be the colour), and this combined with The Great Embroidery Disaster, has left me at a bit of a loose end.

Readers with long memories may recall my plans last autumn to restore a 1903 Singer 48K sewing machine. Unfortunately, this got put on hold for a bizarre reason. There is a strong smell whenever I take the case off, and it's not of sewing machine oil - it's more like heavy engineering oil! Whatever inappropriate substance was generously applied, for me it's a migraine waiting to happen. So the 48K, now christened Deltic Elsie in honour of her pungent whiff, will have to wait until I can work on her outdoors.

Be grateful that it's not possible to attach smells to blog posts!

In the meantime, I have been reading up online about restoring old sewing machines, and remembered that the tension on Maud, my original vintage machine, wasn't great. So, as a new sewing project wasn't on the agenda, I fetched her out to have a look.

Maud, a 99K hand crank from 1917

The tension on Maud . . .

Sure enough, at first glance she appeared to be missing a tension disc and the check spring. For comparison, here is the tension on Tilda.

. . . and on Tilda

When I unscrewed the tension nut, I discovered that there was a spring in there after all. Or at least, part of one. The hook end is broken off, and the whole thing is a mess.

Eep!

While looking online for a replacement spring and information on how to remove the original one, I discovered that 1. the spindle on which all the parts rest has a slight crack and 2. while most Singer 99s might look the same, this doesn't mean that they are. I can't comment on other areas, but I now know that the tension mechanism underwent lots of changes in the decades that the 99 was being produced. Some were readily apparent; for example Maud does actually have two tension discs, they are just different sizes from different eras! Others were more subtle - as I found when I bought what looked like a replacement spindle only a couple of years newer.

Yes, I do keep a vernier scale in my workbox - doesn't everyone?!

There was also the discovery of just how grubby the machine is. I had given it what I thought was a reasonable clean when I bought it, but hadn't tried to dismantle anything. Armed with more knowledge, and a lot of YouTube videos, I'm now taking things apart to do a more thorough job.

The bobbin winder in particular needs work

A lot of work

At some point the stopper on the end of the hank crank needs to be replaced, too! A big thank you to Kate for recommending Helen Howes - thanks to her considerable knowledge this, and everything else, is now in hand.

Genuine 1917 sellotape. Or not

But most importantly, I find I'm enjoying all of this. It's fascinating to look properly at something I've used, pretty much unthinkingly, for about 50 years, and get a better idea of how it all works. I'm also amazed that I managed to make a dress and a top on a machine with a barely-functional tension - testament to what workhorses the old Singers were. Anyone who has read this blog for a while will know my views on the throwaway society, and being able to restore a 105-year-old machine fits right in with them.

There is a lot of information about 99s and 66s out there, and lots of parts available. This is hardly surprising; according to the ISMACS database, over 13 million were made worldwide. By contrast, there were only half a million 48Ks made (it may even have been fewer, those were the production numbers allocated). So, I think that cutting my restoration teeth on an 'easy' model before attempting something relatively obscure has turned out to be a wise move - for once, my squirrel tendencies have been useful!

Sunday, 10 April 2022

A hard lesson learned

The problem

First, a bit of background. I'm a natural homebird, and more comfortable in my own company than is probably wise. So some years ago I made a conscious decision that simply not fancying going to an event was no excuse - I would always say yes to any invitation which came along. After all, if it was really terrible, I could always discreetly leave (and a few times, I have had to!).

This more or less worked until staying at home became a government decree. Even when restrictions were eased, I remained cautious, possibly overly so (having elderly parents to consider just added to my natural tendencies). Again, I eventually realised that mentally this was doing me more harm than good, and that I really did need to get out more. The embroidery I've been working on for the last few weeks was intended as an aide memoire to this.

A few weeks ago I saw a news report about it being the centenary of the novel Ulysses, and this prompted a memory of a play which Mr Tulip and I saw years ago. When my parents still lived near Edinburgh, we always went to stay with them for a week or so to go to the Fringe, and one of the many, many shows we went to over the years was an amazing one-woman performance based on Molly Bloom’s soliloquy. It struck me that the final words, "and yes I said yes I will Yes", were exactly what I needed as a reminder of my former approach to life.

This was my initial idea.

Scribbled on a scrap of paper

I decided on a design size, and drew a second version. Slightly squint.

Enlarged, and a bit neater

Then I tidied it up, with consistently-sized lettering.

Better, but the stright lines are a bit harsh

The straight line of text across the centre in particular didn't seem right, so I drew a fourth version. Even though the curves on which the lettering was now based were not noticeable, they did soften the design to the feel I wanted. Once I had the letters and spacing sorted, I could add the flower and bud. I then used a blue Frixion pen to transfer the design onto a piece of cotton, and backed it with a second layer so that any thread ends on the underside wouldn't show through.

The final version - the blue made it look like an embroidery transfer

The embroidery was done using some of my collection of threads from Mulberry Silks. Most of the lettering was done in medium thickness thread using split stitch, and the flowers and leaves were done in two strands of fine thickness thread.

I liked how the text made sense even without the 'yesses'

At some point while working on the project, I realised that the final 'yes' should have an upper case Y, not lower case. I had already left a gap in the stem underneath for the interlacing letter tail, so the new version had to incorporate this. I left the alteration until everything else was completed, as I didn't want to accidentally iron out lines which I still needed.

The redrawn detail

For emphasis, I used a thicker thread in a different colour for the three occurrences of 'yes'. By the time I had finished, the embroidery wasn't exactly dirty, but it looked as though it would benefit from a freshen-up. As it was such an important project to me, I wanted it to look its absolute best. I was concerned that the bright 'yes' red might run, so I stitched a spare length onto a scrap of cotton and tried giving it a cold wash, and it was fine. I had used all the other threads previously, and somehow just assumed that they were colourfast. . .

I was wrong

Most of them were, but not the dark red of the lettering. No matter how much I rinsed the piece, more dye kept coming out as it dried. I even tried unpicking all the lettering and washing it again, but having leached out of the thread, the dye is now firmly attached to the cotton fabric. (It has also changed from pink to a fairly unappealing brown, so dying the fabric to match isn't really an option.)

The brown marks where the letters were are more obvious in real life

Obviously, the irony of having inadvertently ruined a project undertaken specifically to improve my mental health is not lost on me. I'm furious with myself for not having checked all the threads, and I'm also devastated. I certainly can't face starting it all over again, so I'm putting it away for a while, to see if any rescue ideas come to mind. If not, I will have to bin it. So let this be a warning to all potential embroiderers out there - always, always, always check your threads for colourfastness before letting them anywhere near water.

Sunday, 3 April 2022

Plans and packaging

I'd completely forgotten how long embroidery takes! Especially if you find that you need natural light to make a half-decent job of it. And even more especially when you realise partway through that you need to change the design (thank goodness for Frixion pens!).

While there still isn't a finished piece, at least I have some sewing plans to show. I have finally found a suitable pattern for the last of my MakeNine2022 (or MakeNone2022, as it is so far!) fabrics - the black, cream, and red cotton.

The last piece of the (as yet, not begun) jigsaw

This simple design should work well with the woven plaid, and I think I have just enough for the longer-sleeved version. The plan is to do the decorative stitching in red, and make a buckled belt rather than a tie one. I will probably also omit the pocket.

The pattern is unused, which prompted a new discovery. I have a few Style patterns from that era, and they have a single coloured sheet with the illustration, and the pattern pieces wrapped in the instructions. What I hadn't realised is that the whole package was sealed in a plastic (not cellophane) bag - you can just see the perforations along the top in the pictures below.

The paper sheet is the same size as a pattern envelope

The back of the package

Up until this point, Style had always sold their patterns in paper envelopes, even when they moved to colour printing. Back views, yardages, and pattern pieces were on the envelope back, cutting layouts and brief instructions on a single sheet inside.

Envelope for an earlier pattern, 1288

The sheet folds into four and fits inside the envelope

When I looked at opened, non-envelope, pattern 1541 (yes, I did finally manage to get a copy), I discovered that the instruction sheet was even smaller than the one for 1288.

Layouts and yardages - the sheet wraps around the pattern pieces

The still-concise instructions on the other side

The instructions which are the same for all patterns were on the back of the illustration sheet, so overall there was the same information - just arranged differently.

Front and back of the illustration sheet

When sealed up, the effect was exactly the same as a pattern in a paper envelope.

I'm not aware of any other pattern company making such a change, and I wonder why Style did it? Was it an attempt to reduce production costs? Appear more modern? Reduce production costs disguised as appearing more modern? Whatever the reason, it was shortlived. In 1966 Style went back to paper envelopes.

The envelope returns

Initially, though, the instruction sheet layout didn't change, that took a couple more years.

Information so good they gave it twice

At least at this point Style, finally, started dating their patterns - thereby making a pattern nerd's life much easier!