Once I had an actual dress-shaped garment to try on, I decided to take out the front skirt pleat - it wasn't needed, and it seemed to make the skirt hang oddly. The next thing to consider was the waist ties. On the original pattern they are cut as a single layer of fabric and hemmed, but because I was using satin, I had to make them double thickness. My initial cutting layout had allowed for very long ties, and I chose to make them the full length of the fabric available, on the basis that I could shorten them later if I wanted, but I couldn't lengthen them.
This did make the ties quite heavy, and when tied they pulled down from the waist. To get round this I added a belt loop at the point where the bow is tied. Both waist ties are pulled through the loop, but despite this it only needed to be small, as the fabric compacts a lot.
 |
| The teeny tiny belt loop |
The loop sewn is stitched through the dress and onto the waist stay inside. I have put waist stays into several dresses, but Gisella's comment on last week's post (and a huge thank you to her and to everyone else who takes time to comment - I do read them all) reminded me that not everyone may be familiar with this handy feature.
A waist stay or stay tape is basically a close-fitting internal fabric belt on a dress. It is usually made from petersham or grosgrain ribbon, with either a snap or hook-and-eye fasten (I prefer the latter). In effect, it acts as a waistband and provides structure to the dress; supporting full, heavy skirts such as those on Vogue 8789, and/or allowing the bodice to create a blouse effect, such as Vogue 5215. Without a waist stay, both of these dresses would just hang from shoulders and distort.
 |
| Dresses with waist stays - Vogue 8789 and Vogue 5215 |
The waist stay is usually only attached to the dress at the seams; sides, centre front and centre back. However, because this dress is made from such a drapey fabric, I chose to attach the stay to the waist seam allowance all the way round. Sewing the belt loop onto the stay rather than just the dress gives it more support to hold the weight of the ties. I also attached long hanging loops to the stay, to take the weight when the dress is on a hanger.
 |
| The waist stay and a hanging loop |
After the amount of effort which went into this dress, I would have liked to get some decent pictures of it. Unfortunately, other commitments meant that this was not possible just now, so it was quick back yard shots instead.*
(Update, 10/05/21: The photos have been updated. Still back yard shots, but better light and better hair!)
I started off with the waist ties in a big bow, as per my inspiration image.
 |
| In a bow at the side |
But then I realised that I could wrap them round my waist, and have a small tie like the one on the pattern illustration.
 |
| Centre front tie |
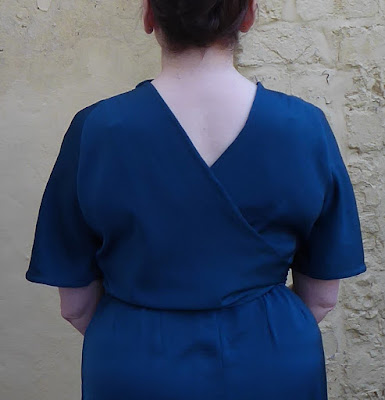
I can't remember if I mentioned it in a previous post, but I redrafted the back pieces to make the crossover point slightly higher up.
 |
| Back view showing the wrapover |
Clearly I need a longer slip, as the skirt generates static and sticks to my legs with the slightest movement, but I'm really pleased with the dress. Plus, it's more fabric out of the stash, and my first UseNine2021 project completed as well - woot!
 |
| Getting closer to stash-neutral (for this year at least) |
 |
| One down, a mere eight to go! |
* - In other news, I am experimenting with growing out my fringe. I've had it for over 25 years, and decided that if I wanted to grow it out, the time when it already had five months of lockdown growth was the time to try. Prepare for all manner of unfortunate hairstyles until either I give up or it gets long enough to fasten back properly!

No comments:
Post a Comment