The weather here has been atrocious for several days, and while today was at least dry, it was also windy, so I did my photography indoors. This solved the potential problem of the dress blending into the yard wall and leaving only the collar, buttons, cuffs and belt visible! You also get a period appropriate sideboard in the background into the bargain.
 |
| Finished! |
My constuction of the bodice diverged from the instructions a few times, but I also followed the instructions at one point to use a period technique which I'd never tried before. The main change was in making the button loops for the front. The instructions state to "Stitch and turn a bias strip of material so it is ⅛" wide finished". I've made rouleau before, but never as narrow as ⅛" / 3mm, and certainly not out of fabric as bulky as seersucker. I couldn't imagine this working at all, so instead I made the loops individually.
I eased out the puckers in the fabric to make it smooth, and then cut a series of pieces a scant ½" wide by 2" long (1.2cm by 5cm), on the bias. Then I folded these in half lengthways, and folded the sides in - 1. I secured the end with a couple of stitches - 2. (Apologies if these images look a little odd; I'm left-handed, so sew from left to right. Also, please ignore the terrible state of my nails!). Then I eased the strip into a loop shape, and overcast the folded edges together - 3 and 4. I found it was easier to shape the loop with the sewing on the outside curve rather than the inside, and shaping the loop as I sewed produced a flatter result than if I sewed it straight and then tried to shape it.
 |
| Making the button loops |
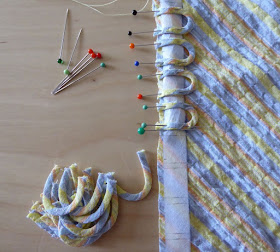
I worked out the spacing for the loops down the bodice, and marked the positions onto a strip of Stitch-n-Tear, which I then pinned onto the bodice front. Then I pinned the loops in place, and basted them just inside the seam allowance.
 |
| Pinning the loops in place |
The instructions don't call for anything to stabilise the seam when attaching the facing to the bodice front, but I was concerned that because both pieces are on the bias, the seam could stretch. I used a selvedge strip of a firm but fine woven cotton (something else which I keep in my 'will come in handy' stash, along with silk organze selvedge) as stay tape, basted onto the facing over what would become the sewing line.
Unlike a modern pattern, there is no back facing for this dress. In the past I have drafted my own pattern piece from the bodice back, but this time I decided to follow the instructions, which were to "Baste a strip of bias to back neck as facing". As there was no indication of how large this strip should be, I erred on the side of caution and made it 7.5cm / 3" wide, and a good 7.5cm / 3" longer than the back neck seam. I trimmed off the excess (there was a lot of excess!) once the bias strip was sewn in place, and turned the edges under. Because I had interfaced the collar, there was no need to stiffen the back facing in any way.
 |
| Showing the collar, front facings, and back bias strip (with the dress back underneath) |
The skirt is attached to the bodice before the facings and underpanel are added. The two are joined by the period method of turning under the seam allowance of the bodice, laying it over the skirt, and sewing through all three layers. Although I found this technique odd when I first encountered it, now I prefer is as it gives a stronger seam. I omitted the buttons and loops on the skirt section, and fastened this with press studs (snaps) instead.
 |
| Showing the different fasteners, and the waist seam |
None of the buckles I had were right for the belt, but I did have a metal fabric-covered buckle which I was able to prise apart, so I decided to remove the original fabric and recover it. This proved easier said than done. It was impossible to get the fabric to stay in place while I pushed the back of the buckle on, so I attempted to glue the fabric to the inside of the buckle. Then it proved impossible to get the fabric to stay in place while the glue dried. Eventually I managed to clamp it with several kirby grips (bobby pins) with the ends chopped off. I could only do one section at a time, however, so it was a long process.
 |
| My kirby grip clamps |
The belt needs a retaining loop, but apart from that, it's done.
 |
| Did I mention it has pockets? |
The pattern includes a piece for making shoulder pads, but as I had a pair of raglan pads anyway, I used those instead.
 |
| The cuffs have a curved detail at the top |
It's hard to be too smug about using stash fabrics at present, as there aren't many alternatives, but nonetheless here is the Stashometer.
 |
| Almost 29 metres of stashed fabric used this year! |

Nicely done! So many great details on that dress--hope you get a lot of enjoyment wearing it!!
ReplyDeleteWell done. I don't know if I would have the patience any more for all the handwork you put into this. :)
ReplyDeleteThank you Helen
Delete