Pages

Sunday, 28 June 2020

Patterns of Fashion

Well, here we are again. It's the last Sunday of another month, and once more I do not have a completed vintage dress to blog about (although at least this time I have two days in which to finish it). So instead, it's back to The Great British Sewing Bee for post inspiration.

The penultimate episode was Movie Week, and for the made-to-measure challenge the contestants had to make a 1920s flapper dress. In this challenge I always enjoy trying to spot what patterns the contestants are using, and this time Clare's inspiration picture really caught my eye.

I recognise that image! Dress, 1928-9

It was an illustration from Patterns of Fashion 2, by Janet Arnold, one of my favourite costume books. Judging from the edition dates, I have had my copies of volumes one and two of Patterns of Fashion since the mid-1980s, and many happy hours have been spent drooling over the illustrations they contain.

Janet Arnold was a costume historian and teacher. Three volumes of Patterns of Fashion were published in her lifetime, and she had completed research for more. Volume 4, based on some of that research, was published in 2008, and volume 5 in 2018 (you can read my review here).

Volumes 1-4

The first two volumes, which cover women's clothing from 1660 to 1940, remain my favourites. They contain beautiful line drawings of garments housed in costume collections (mostly English, but a few French), alongside meticulous scale drawings of the pieces, drawn to ⅛ scale.

The pattern pices for the 1928-9 dress shown above.

It is astonishing to me that Janet Arnold could create these patterns from extant, complete garments - obviously without unpicking anything!

The books were intended to be used for creating costumes for theatre etc, and for some pieces there are detailed drawings of fabric or construction points, to help with this. There is often also information about the sort of support garments which would have been worn underneath.

1795-1810 riding habit, and details

Volume 1 also includes a timeline of women's fashion for the 200 years it covers.

Women's dress, 1660-1860

Both volumes begin with some text, and examples of Arnold's extensive collection of items relating to dress. Shamefully, I had never actually read any of this - being too distracted by the pretty pictures - but last year I finally did so; and found some useful information for my dissertation!

Example of the extra information in volume 2

The later volumes include some photographs, but the first two only have drawings. However, thanks to the wonders of the internet, it is now much easier to find images of the garments featured. The website of the Museum of London (listed as 'London Museum' in the books) even has a 'Janet Arnold' section, which contains photographs of all of its garments which appear in Patterns of Fashion; you can access it here. In this example, the close-up image of the lace on this dress shows just how detailed and accurate Arnold's drawing is.

Dinner dress with embroidered lace, c 1882-3

The lace in detail, image © The Museum of London

In other cases, images highlight details which drawings can't always make clear. For example, this drawing and pattern show how this dress is constructed and what it looks like, but the effect of the intricate beading can only really be appreciated in a photograph (click here for close-up images).

Evening dress, Vionnet, c1925

The pattern

Image © Kerry Taylor Auctions

This dress was sold in 2012, long before I first went to Kerry Taylor Auctions, but when I saw it on Kerry Taylor's new website recently, I immediately recognised it. Clearly, although I frequently can't remember what I went upstairs for, I do have most of the illustrations from Patterns of Fashion committed to memory!

Sunday, 21 June 2020

Stashbusting musings

Some entirely unplanned sewing this week. I finally had to accept that, despite my best efforts at patching and mending, my summer dressing gown had disintegrated beyond repair and a replacement was urgently needed. I didn't have a suitable pattern for a woman's robe, but I did have the pattern I had used for D's thank you present last year. I reasoned that a dressing gown is hardly a fitted garment, so I used that and omitted the lining. A delve into Deep Stash unearthed a remnant of pink flowered cotton with a slight stretch, which was the perfect weight for an unlined robe.

The pattern called for 3m of 150cm wide fabric. I only had 2.6m of 140cm wide fabric, but I knew that I wanted to shorten both the body and the sleeves, so thought that this would be enough. Unfortunately, when I came to lay the fabric out, I discovered this.

The printing fault explains why this was in the remnant bin

Clearly the fabric had creased on the roller while it was being printed. The fault carries on down the full length of the remant, so now I was down to 2.6m of 130ish cm wide fabric. Tricky. However, after a few experiments with cutting layouts on a single layer of fabric (it takes longer, but there's far less wastage), I managed to squeeze everything in.

My leftovers - mostly the strip with the printing error

Pretty though the fabric is, I did worry that the end result would be a bit of a flowery blur. Taking my inspiration from the pattern, I decided that adding binding would sharpen things up a bit.

Vogue 8964 - binding on collar, pockets and sleeves

I knew that I had quite a lot of pink cotton bias binding left over from making a petticoat years ago, and intended to use that. But then I found that I also had 4m of emerald green satin binding. I have absolutely no idea when or why I bought this, but I used it instead of the pink, and I really like the contrast.

Binding on cuff and pocket

The green was definitely the right choice

I'm really pleased with the end result, but it has got me thinking. This project was started before non-essential shops in England were allowed to open last Monday (15 June), which is why everything had to be sourced from stash. My local fabric shop, Abakhan, is now open, but to the astonishment of everyone who knows me, I haven't been in it yet.

In this day and age, it is rare to have a fabric shop close to where you live*, and I'm well aware of just how lucky I am in this respect. However, the downside is that it is so easy to 'just pop in' there whenever I need something, rather than look through what I've already got. Making this dressing gown, and planning out an entirely new idea inspired by the Vintage Sew a Dress a Month (details coming soon) during lockdown, have highlighted that although I have a substantial stash of both fabric and 'sundries' such as trimmings, it is rarely my first port of call for supplies - and this needs to change.

This isn't to say that I will not buy anything more until my workroom is bare; indeed another order from Ditto Fabrics is currently somewhere in transit. What it does mean is that in future I want to make a conscious effort to begin new projects by 'shopping my stash', and not just automatically going for the new and shiny.

Stashometer update


* - When Abakhan first opened a branch in Chester, it was in the first shop that I came to as I walked into town from home. Then the whole area was earmarked for redevelopment, and all the shops were closed. Abakhan did not immediately move to new premises, so I was back to having no local fabric shop. In the meantime, we moved house. When Abakhan re-opened, it was in the first shop that I came to on my new route into town! Mr Tulip was utterly convinced that they had delayed acquiring new premises until they knew where I'd moved to, and nothing I could say would persuade him otherwise.

Sunday, 14 June 2020

Clothes that Count

The current series of The Great British Sewing Bee reaches the semi-final this week, but while the Sewing Bee may have first arrived on our screens in 2013, it turns out that dressmaking on the BBC has a far longer history than that.

I recently managed to add to my growing collection of Vogue Pattern Books, and folded up in one copy I found this.

The first of two supplements

It is a four-page pull-out supplement to the 21 September 1967 issue of the Radio Times (a radio and television listings magazine), and contains information about the first five programmes of a ten-part series on home dressmaking called Clothes that Count. Unlike the 1976 series Dressmaker, which was aimed at the complete beginner, this series was "intended for women who already have a little experience of dressmaking". The programmes were 30 minutes long, and broadcast at 23:35 on Tuesdays on BBC1 (clearly the BBC thought that dressmakers were insomniacs), with a repeat at the far more manageable time of 19:30 on BBC2 on Wednesdays.

The inside pages

Each programme featured a different garment, and concentrated on some of the problems which might occur while making it up. The patterns featured were all ones which the viewers could buy in the shops, and which had been chosen "because they are pace-setters, and can be made up in different versions". I have managed to find images of all five of the main patterns featured online.

Week one was a raglan sleeve dress. This was Simplicity 7284, which cost 5s 0d (five shillings, click here for an explanation of pre-decimal British money), which is the equivalent of £4.70 today. It came in bust sizes from 31" to 36", and could be made as an "overall or house dress" or for evening wear, depending on the fabric chosen.

Programme one

Simplicity 72845

Week two was a dress and jacket, made from Vogue 7158. At 7s 6d (£7.05, clearly the price of dress patterns has exceeded inflation since 1967!) this cost half as much again as the Simplicity pattern, and was available in bust sizes 32" to 42". Again, it could be made for day or evening.

Programme two

Vogue 7158

According to the supplement, from programme two onwards there would also be a special outfit designed by a couturier for the programme, and the pattern would be available to buy shortly afterwards.

Week three was a shirtwaister dress; Vogue 1772, price 6s 6d (£6.11), sizes 31" to 38".

Programme three

Vogue 1772

This programme featured a number of other shirtwaister styles, and it's interesting to see how the prices of different pattern brands compare:

Practical Fashion 5892 - 2s 6d (£2.35)
Blackmore 4275 - 3s 1d (£2.90)
Maudella 5332 - 3s 6d (£3.29)
Butterick 4456 - 4s 6d (£4.23)
Simplicity 7258 - 5s (£4.70).

I have no idea why Maudella 5332 was issued twice

Butterick 4456 is very similar to the Vogue pattern

Week four was a cape, made using Style pattern 1992. This cost 4s 6d (£4.23), and came in bust sizes 32" to 38". According to the supplement, a cape could be made "short to be worn with trousers by a youngster, longer in tweed for the fuller figure". The Style pattern apppears to be geared towards the younger model.

Programme four

Style 1992

Possibly this programme was mostly about 'youngsters', as it also featured Le Roy pattern 3157, price 3s 0d (£2.82).

Le Roy 3157

The garment for the final week covered by this supplement is a short evening dress, made from McCall's 8805, price 5s 0d (£4.70). This came in bust sizes 31" to 38" and also, rather unusually for a 'misses and junior' dress, half sizes. The supplement suggests that makers who want a "contemporary line", but would prefer a longer dress could make the overdress slightly shorter than the slip, and illustrates the idea.

Programme five

McCall's 8805

The actual sewing on Clothes that Count was done by Ann Ladbury, who later presented Dressmaker. The programmes also featured London-based designers Jo Mattli and Michael, both of whom created a number of patterns for the Vogue Couturier range.

Jo Mattli and Michael (of Carlos Place)

Jo Mattli discusses fabric with presenter Brian Hoey, image © BBC

Clothes that Count was evidently popular enough with viewers to prompt a second series, New Clothes that Count, in 1969.

New Clothes that Count, image © BBC

Sadly, very little information about either series is available, but by combing through the Radio Times archive I have managed to find out a little more about the first series:

Programme six - the suit, including versions for the larger figure and a mini-skirt version
Programme seven - the trouser suit (rather fashion forward for the BBC in 1967), including both full length and Bermuda shorts versions
Programme eight - empire line evening dress
Programme nine - double-breasted coat, including day and theatre versions
Program ten - culotte dress, including day and evening versions, and one with long trousers (the mind boggles).

I haven't watched them yet, but two episodes are available here (programme three) and here (programme nine). Something tells me that Michael Hoey may not have the same presenting approach as Joe Lycett! Sadly, my mum does not remember this series at all, but I'd love to know if anyone does.

Sunday, 7 June 2020

Vogue 7422 - part 2, completed

Well, that didn't pan out as intended. Not only did the 'last little jobs' to finish the dress take far longer than expected (when am I going to stop being surprised when this happens?!), but I also lost several days to a particularly persistent migraine. But Vogue 7422 is finally finished and photographed.

The weather here has been atrocious for several days, and while today was at least dry, it was also windy, so I did my photography indoors. This solved the potential problem of the dress blending into the yard wall and leaving only the collar, buttons, cuffs and belt visible! You also get a period appropriate sideboard in the background into the bargain.

Finished!

My constuction of the bodice diverged from the instructions a few times, but I also followed the instructions at one point to use a period technique which I'd never tried before. The main change was in making the button loops for the front. The instructions state to "Stitch and turn a bias strip of material so it is ⅛" wide finished". I've made rouleau before, but never as narrow as ⅛" / 3mm, and certainly not out of fabric as bulky as seersucker. I couldn't imagine this working at all, so instead I made the loops individually.

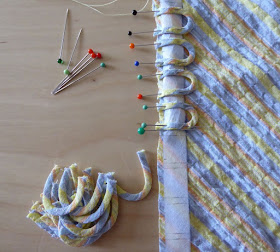
I eased out the puckers in the fabric to make it smooth, and then cut a series of pieces a scant ½" wide by 2" long (1.2cm by 5cm), on the bias. Then I folded these in half lengthways, and folded the sides in - 1. I secured the end with a couple of stitches - 2. (Apologies if these images look a little odd; I'm left-handed, so sew from left to right. Also, please ignore the terrible state of my nails!). Then I eased the strip into a loop shape, and overcast the folded edges together - 3 and 4. I found it was easier to shape the loop with the sewing on the outside curve rather than the inside, and shaping the loop as I sewed produced a flatter result than if I sewed it straight and then tried to shape it.

Making the button loops

I worked out the spacing for the loops down the bodice, and marked the positions onto a strip of Stitch-n-Tear, which I then pinned onto the bodice front. Then I pinned the loops in place, and basted them just inside the seam allowance.

Pinning the loops in place

The instructions don't call for anything to stabilise the seam when attaching the facing to the bodice front, but I was concerned that because both pieces are on the bias, the seam could stretch. I used a selvedge strip of a firm but fine woven cotton (something else which I keep in my 'will come in handy' stash, along with silk organze selvedge) as stay tape, basted onto the facing over what would become the sewing line.

Unlike a modern pattern, there is no back facing for this dress. In the past I have drafted my own pattern piece from the bodice back, but this time I decided to follow the instructions, which were to "Baste a strip of bias to back neck as facing". As there was no indication of how large this strip should be, I erred on the side of caution and made it 7.5cm / 3" wide, and a good 7.5cm / 3" longer than the back neck seam. I trimmed off the excess (there was a lot of excess!) once the bias strip was sewn in place, and turned the edges under. Because I had interfaced the collar, there was no need to stiffen the back facing in any way.

Showing the collar, front facings, and back bias strip (with the dress back underneath)

The skirt is attached to the bodice before the facings and underpanel are added. The two are joined by the period method of turning under the seam allowance of the bodice, laying it over the skirt, and sewing through all three layers. Although I found this technique odd when I first encountered it, now I prefer is as it gives a stronger seam. I omitted the buttons and loops on the skirt section, and fastened this with press studs (snaps) instead.

Showing the different fasteners, and the waist seam

None of the buckles I had were right for the belt, but I did have a metal fabric-covered buckle which I was able to prise apart, so I decided to remove the original fabric and recover it. This proved easier said than done. It was impossible to get the fabric to stay in place while I pushed the back of the buckle on, so I attempted to glue the fabric to the inside of the buckle. Then it proved impossible to get the fabric to stay in place while the glue dried. Eventually I managed to clamp it with several kirby grips (bobby pins) with the ends chopped off. I could only do one section at a time, however, so it was a long process.

My kirby grip clamps

The belt needs a retaining loop, but apart from that, it's done.

Did I mention it has pockets?

The pattern includes a piece for making shoulder pads, but as I had a pair of raglan pads anyway, I used those instead.

The cuffs have a curved detail at the top

It's hard to be too smug about using stash fabrics at present, as there aren't many alternatives, but nonetheless here is the Stashometer.

Almost 29 metres of stashed fabric used this year!