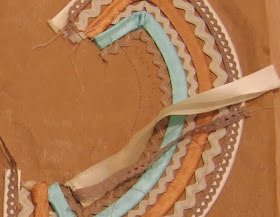
I was fascinated by this, and kept it for a while. I never stitched any more of it however, and it must have been thrown away in a clear-out. I always remembered the idea though, and recently decided to give it another try.
For the dress I stuck with tried and trusted New Look 6000. The look was to be all about the collar, not the dress, so I wanted something simple. For the fabric I turned to my hefty stash of dress weight cotton remnants.
 |
| The fabric - duck-egg blue with cream, gold, brown and grey motifs |
The collarless neckline of the pattern was slightly wider than I wanted, so I redrafted it.
 |
| New Look 6000, view E |
Then I laid the front over the back at the shoulder seam to get the full neckline curve from centre front to centre back, and drafted a collar shape.
 |
| The collar pattern |
Next I cut the collar out in thin card.
 |
| Made into a template |
And drew round it onto a piece of brown paper, taking care to mark the front and back.
 |
| The collar base |
I bought ric-rac and satin bias binding in colours as close as I could find to the colours in the fabric, plus some beige lace to put over the cream binding. Then I tacked alternating strips of the binding folded in half and the ric-rac onto the brown paper. The ends overlapped what would become the top edge of the collar. I worked on both sides of the collar at the same time, rather than make one complete side and then the other. If you don't work this way, then the second side always looks much better than the first. (Trust me, I learned this the hard way on a much earlier project!)
 |
| The first rows of binding and ric-rac |
Once everything was tacked on, starting from the outer edge, I sewed the ric-rac to the binding where the edges met, and also overcast the folded edges of the binding together.
 |
| The full set, first attempt |
It was only when I came to the innermost row of cream binding that I realised I had a problem. The collar was deeper than the rows of ric-rac and binding, so the inner edge of the binding did not meet the inner edge of the collar.
 |
| The gap between the collar inner edge and the binding |
I took out that row of binding, and marked the inner edge of the collar with pin holes.
 |
| The inner edge marked with pin holes |
Then I pressed a new piece of satin binding first flat, and then in half. I pinned the binding in place against the ric-rac, and then tacked along the pin holes marking the inner edge.
 |
| The replacement binding tacked down (sorry it's so hard to see) |
Then I attached the beige lace along the tacking line.
 |
| The completed collar, still on the paper |
Once all the strips were sewn together, I took a deep breath, unpicked the tacking, and removed the collar from the paper. It all stayed together! Then I pinned the collar onto the dress, and attached the facing along the inner edge of the lace.
 |
| Dress, front view |
 |
| Collar close up |
 |
| Dress, back view |
I wasn't sure how well (or even, if) this was going to work when I started, but I'm really pleased with the end result. I've no idea where Granny T got the idea from, but I'm glad that she tried it, and kept the unfinished result.

Ok, now that collar is adorable!! I love all the ric-rac, satin binding and lace. What wonderful colors. I love how our grandmothers knew just how to do something! I have several quilt pieces that my grandmother sewed to brown paper in the hopes of them going into a quilt! I will have to remember this technique. What a wonderful idea! Thank you for sharing!
ReplyDeleteBlessings!
Gina
Thank you Gina! I'm really pleased with the dress, I think it's going to get a lot of wear.
ReplyDelete