Pages

Sunday, 24 April 2016

A day out with Mum - Colwyn Bay 1940s festival

Last weekend Mum and I headed out along the North Wales coast to go to the Colwyn Bay 1940s Festival, now in its fifth year.

Several government ministries moved out of London during World War II, and the Ministry of Food relocated to Colwyn Bay. It was safe from bombing raids, its popularity as a holiday resort before the war meant that there was plenty of accommodation, and its position on the Irish Mail railway route made it easy to get to and from London.

Ministry of Food poster, © IWM

There were displays of military vehicles. . .


. . . and reenactors.

German soldiers assisting a British bobby with inquiries

My late father-in-law was a dispatch rider in the Western Desert, and after the war worked at the Triumph motorcycle factory in Meriden, so this was of particular interest to me.

Triumph motorbikes

Apart from the fact that it was standing on the pavement (it should have been partially underground, with the dug-out earth over the top) Mum reckoned that this Anderson shelter was spot-on.

ARP warden and Anderson shelter

Mum had relatives who lived in the area in the 1940s, and she remembers going to see The Squadronaires (the RAF band) at Colwyn Bay cinema during the war.

Now a pub, but still a wonderful building

Entertainment at the festival was provided by several musical acts, including the Colwyn Bay Ukulele Group, and the Goodnight Sweethearts.

The Colwyn Bay Ukulele Group performing on the stage

The Goodnight Sweethearts performing in the town

There was also an indoor display about various aspects of life during the war, including information about the Bevin Boys; the men conscripted to work in the mines, who so often seem to get overlooked in WWII history.

Image courtesy of the Daily Post

Of more interest to Mum and me however (yes, just call us shallow!) was the display of wartime wedding dresses, some displayed with wedding photographs. Apologies for the poor quality of the images which follow; it was impossible to get photographs without reflections.

Satin and lace wedding dress

Photographs from the wedding

Close-up of the bodice

Lace wedding dress

On the subject of clothes; I had hoped to wear my 1944 coat, but it was nowhere close to being completed. (On the plus side, not only have I managed to cut it out with all the pieces lying in the same direction, I even had 30cm / 12" fabric to spare. I could have followed Mum's rule of buying ¼ yard less fabric than stated on the pattern!) Being coatless, I decided not to dress up properly, but I did wear my CC41 dress and earrings. A number of people did make the effort though, including a lovely lady called Carmel, whose stunning 40s outfit and hair quite made my mum's day.

Carmel with 'Winston Churchill'


Out shopping (apologies for the traffic cones)

Fair Isle knitting was the perfect way to use up wool scraps

The world definitely needs more gents in hats!

It was a fun day, and (apart from the air raid siren, which even now she still hates) Mum really enjoyed being taken back in time. Thank you to all the people who put so much work into making the festival happen.

Sunday, 17 April 2016

The University Chapel Project - April 2016 update

The latest meeting of the Chapel Stitchers took place on Friday. There was a lot to report; the project is really coming together. Peter Jenner, the University Chaplain, joined us - and got more practically involved than he may have bargained for. Sadly Christine wasn’t able to join us (if you’re reading Christine, hope you get better soon), but she had sent Kath the small crosses for the communion sets, cut from the same fabric as the large cross for the altar frontal.

Fabric cutouts and the template for the completed cross

Ros showed us progress on her kneeler. The background shading is taking shape, and Ros is going to draw out a template so that the other kneeler can be shaded in the same way.

Shading around the dove

Barbara is working on her first pair of hands for the green communion set, using long and short stitch to shade between the colours.

Embroidering the hands

Fiona had pieced together the coloured bands for one end of all the stoles.

The stole pieces

The next step was to decide on the positioning of the hands and cross on the other end. We tried out a couple of ideas, but came to the conclusion that the only way we could really tell what worked was by seeing the stole being worn. Kath pinned the pieces together and Peter tried on the end result , but being worn over a fleece jacket didn’t really work! More formal attire was definitely needed. Peter then gamely submitted to being sent out into the corridor so that we could see the stole from a distance, as well as close to.

Trying out motif positions

The current plan is to leave the crosses plain on the red, purple and green sets, but to add gold embroidered rays to the white set, both for the celebratory aspect and to make the ivory cross stand out from the background.

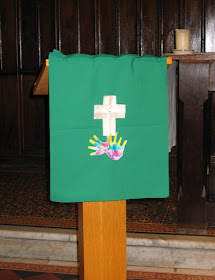
Positioning motifs on the veil and burse was simple, and we then all went down to the chapel to try out the lectern falls.

We need a further four lecterns falls, as a lectern has recently been found for the pulpit. The new falls will be slightly wider, so that both sets exactly fit the lectern they hang from. Fortunately we have enough extra crosses, and Louise, Sandra, Sharon and Barbara will each embroider a further set of hands.

The lectern fall on the lectern . . .

. . . and on the pulpit

We also tried laying the kneeler on the altar steps. Although the shading is in completely different colours from the decorated tiles, the tonal values are similar, and the end result looks great.

The kneeler in situ

Chapel is currently full of scaffolding, as the new window commemorating the university’s 175th anniversary is due to be installed this week – exciting! The dedication service for the new window will take place on 1 June, so the plan is to have the altar frontal and the green communion set completed by then.

The next meeting is Friday 6 May at noon, in the usual room in Senate House.

Sunday, 10 April 2016

Simplicity 4896

I'm making view 3, the short version

This pattern is a bit of a mystery. According to Blueprints of Fashion: Home Sewing Patterns of the 1940s, it was printed in 1944. Unlike Style, Vogue or DuBarry patterns of the same era, there is nothing on it to indicate where it was printed. It is priced in British money, but with a stick-on label rather than directly on the envelope. Also unlike my Style and Vogue patterns from the war years, there are no references on it to clothing coupons or the CC41 regulations. Everything seems to point to it being printed in the US and imported, but would precious shipping space have been used to import dress patterns?

Envelope back

Of course, given its publication date, it may be that it was imported after the war had ended. If anyone who knows more about this period can shed any light – I’d love to hear from you!

Mystery aside, Simplicity 4896 is a fairly straightforward pattern. It’s a loose, edge-to-edge coat with no fastenings and a grown-on collar. In fact, apart from being narrower, and having a two-piece sleeve, it’s remarkably similar to Butterick 5716. This fact may come in handy when I start to sew it, as I can crib from the Butterick instructions. The ones with this pattern are, shall we say, brief.

Side one - cutting layouts and general instructions

Side two - specific instructions, that's your lot!

Not that I’m anywhere near starting sewing yet. First the pattern had to be redrafted to my size. After the near-miss that was Vogue 9546, I decided to do the job properly, and redraft the sleeves as well. This involved extending the armscye and widening the sleeves; time will tell if I’ve done this properly! I also shortened the coat a little.

My fabric is a wool-poly mix, so not period accurate, but I really liked its design. What I’d somehow managed to miss until I came to cut out (and fortunately I spotted this before I put scissors to fabric) is that it’s a design with a nap. The pattern layout however is not. Oops.

I've decided to use the fabric in the direction on the left

I think that I can eke out the fabric, but with a different cutting layout and by cutting every piece from a single layer. I did this with my CC41 dress, and was amazed at how little fabric I wasted. Here goes!

Sunday, 3 April 2016

A very ‘vintage’ pattern

(I’m aware that for a sewing blog, there’s been very little actual sewing posted on here recently. Unusually for me, I’ve fallen off the dressmaking wagon a bit - March isn’t a good time in my world. But it’s April now, and normal service will be resumed soon. In the meantime . . . )

I recently bought a bundle of vintage patterns online. They were described as mostly 1940s and 1950s, and so it proved, but nestling in among them was this.

The pattern as it first appeared

I’d heard of Victorian patterns being printed on a single sheet, with all the pieces overlaid, and I’d see reproductions in books, but I’d never before held one in my hot (and slightly shaking) little hand.

At first glance, it didn't look too complicated. But then I unfolded it a bit further.

Starting to look more complex

Initially I thought that it was some sort of reproduction pattern. Then I turned it over.

April 1874!

To say that I was amazed is a serious understatement! I've not been able to find out much about the Journal des Dames et des Demoiselles, as all the articles online seem to be in French (well, duh). I did find this bound copy of the 1871 editions, being sold by bookseller Antikvariát Valentinská.

Found on vialibri.net

The Journal does seem to have included some colour prints, although this may have been a cover illustration.

Found on Wikimedia Commons

I'm guessing that the pattern was given away with the magazine. It is printed on both sides, on very thin paper.

Side one

Side two

Each side contains pattern pieces for three different items, and also gives a brief description.

Side one illustrations - the printing on the other side shows through the thin paper

Side two illustrations

Side one description

So far I've only looked at side one in detail. The patterns are only for the jackets, not the full outfit. The third item is described as a 'parure'; totally confusing as I've always thought that a parure is a set of jewellery.

At first glance, the pattern looks like an impossibly complicated jumble of lines. When you look more closely however, each piece uses a different, distinctive, line style.

Different line styles

It is actually quite straightforward to trace each piece off onto tissue paper. I've done this for the first item, the 'Casaque de printemps' (literally, 'spring blouse').

Bodice pieces

Sleeve pieces

The sleeve looks quite straightforward, but I'm mystified as to how the bodice pieces fit together. I'm hoping that the brief 'explications' will provide some clues if I translate them. I studied French until I was 17, but nineteenth century dressmaking terms didn't feature much in the lessons. Fortunately a friend has a French degree, and is going to lend me her student dictionary. She was worried that I might find it a bit old-fashioned; I've assured her that for what I need, this won't be a problem!