Pages

Sunday, 27 September 2015

All I want for Christmas is . . .

Apologies for mentioning you-know-what almost three months in advance, but this beauty appeared in my inbox this week, and I just had to share. Plus, I've been on a hat blocking course at Hat Works this weekend, and while it was wonderful (details to follow soon), it was also hard work, and my brain is just too tired to compose a long post.

Since I attended the auction last year, I've been on the mailing list for Kerry Taylor Auctions. The next auction is on 13 October, but then in December there is another Passion For Fashion auction, which will include this beautiful 1950s Pierre Balmain embroidered cocktail dress.

Image copyright Kerry Taylor Auctions

Those cute berries! The frosty hints on the holly! The way the leaves drift down the skirt! I wonder if a letter to Santa would do the trick!

Close up - image copyright Kerry Taylor Auctions

Back view - image copyright Kerry Taylor Auctions


Sunday, 20 September 2015

Eye candy

I'm in the midst of a big project which I don't want to post about just yet, so have no sewing to share this week*. What's a girl to do in such circumstances? Well, I never tire of drooling over other people's vintage pattern stashes, so here's some of mine.

I've posted about my vintage patterns before; you can read the posts here, here and here. That was three years ago however, and the collection has grown a bit since then. Some I've bought at vintage fairs, some I've found in unlikely places, and very occasionally a friend having a clearout says, "I've found some old dress patterns, would you like them?" (I try not to squeal in such circumstances, because it's a tad undignified, but . . .)

So, in roughly chronological order, (based on the appendices in the two Blueprints of Fashion books, dates on patterns themselves, and guesswork), here we go.

This is the oldest pattern I own, from the 1930s. I will make it up sometime, but I must admit that I find the (lack of) instructions slightly scary!


Judging from the pattern numbers, the next two are pre-1939. I love the fact that 7598 includes a drawing of a zipper on the pattern envelope, and also reassures the purchaser that, "Instructions for Sewing in Slide Fastener Included"!


Advance 2229 is from 1939. Lovely style, and cute pocket detail, but that's a lot of buttonholes to hand sew.


Not being into frills, I think that I'd give view 1 of this 1944 Hollywood pattern a miss. I do like the scallop detail though, so it would be view 3 for me.


From 1947, this Simplicity pattern is only a year before my recent housecoat dress. As well as showing the contrast with the New Look, the envelope is of poorer quality paper than Simplicity 2683, which reflects things improving after the war.


I have no idea of the date of this next pattern as its number, 507, seems very odd. I'm guessing late 1940s though.


This Simplicity blouse pattern is from 1951. I love the dark blue and lace version.


Not only is this 1954 dress high on my 'to make' list, but I quite fancy having a go at the hat (with veil) as well!


The rest of my 1950s patterns are all date-free, in part because they are from smaller patter companies. I had heard of Bestway patterns, but Blackmore (based in Bletchley, Bucks) was a new name to me.


Then there is my old favourite, Weldons.


This pattern is on loan from my friend Kebi, and is unusual that it isn't in an envelope. Instead it's in a wrapper, with the instructions printed on the inside.


Onto the 1960s, starting with this undated (but including metric measurement) blouse.


And a 1968 dress clearly aimed at the younger market.


Finally for now, two 'half size' patterns, from 1966 and 1968. I'm guessing that the unusual size meant that the first one was a special order, hence the note, "Mrs Millington, Riddings, To Pay" scribbled on the envelope.


Some manufacturers produced patterns in sizes 13, 15, 17 etc, but clearly Simplicity stuck to dress sizes instead, and added the ½. I'm intrigued by the dart placements on the 1968 pattern.

So many patterns, so little time!

* - Hint: it's for a later historical Sew Monthly challenge. I'm still hoping to do something for each challenge, just not, in the words of Eric Morecambe, necessarily in the right order. A number of them might appear in the "Re-Do" challenge in December!

Sunday, 13 September 2015

Veiling, and fabric flowers

It’s been a few weeks since I attended these two courses at Hat Works, but I’ve just not had the opportunity to write them up, until now.

Both courses were run by Sue Carter and Marie Thornton, who also taught the excellent sinamay class. Veiling was actually the second course, but I’ll cover it briefly, as I didn’t manage to take many photos. Sue and Marie brought along lots of examples of beautiful vintage veiling for us to drool over, and admitted that the problem was that they were almost too beautiful to use – they are just taken out of their wrappings and patted from time to time!

Veiled hats and veiling samples

Beautiful antique embroidered and flocked veiling

We learned about different veil lengths and veil styles. Some people had brought along hats to veil, and we also experimented with making veils on millinery wire frames. Try as I might, I’ve not been able to get a reasonable photograph of my attempt, so that will just have to wait until it’s fully trimmed.

I’ve got some ideas for trimming however, courtesy of the first course, which was on making fabric flowers. Again, Sue and Marie brought both individual flower samples and various headpieces, so that we could see the flowers in use.

Fabric flowers and headpieces

Kanzashi flowers

Many of the flowers we made were made using techniques from Kanzashi, the hair ornaments used in traditional Japanese hairstyles. These are made by folding squares of fabric and sewing them together. There are numerous folding techniques, resulting in different flowers.

Geisha with Kanzashi flower ornaments

Although the Japanese versions are often tiny, and made from silk, we started rather larger, and worked with thicker fabrics which were (mostly) easier to handle. I forgot to photograph this one with a scale, but it is approximately 10cm / 4” in diameter.

My rather less delicate effort!

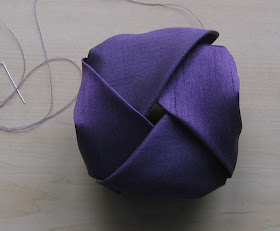
We also made cubist roses, which is what I used on my Wiener Werkstätte hat.

Cubist rose

Here’s how they are made:

Cut four squares of fabric, and fold them in half diagonally. My squares had sides of 20cm / 8".


Lay the folded triangles one over the other.


Lap the final triangle under the first one. I found it easier to pin the whole thing together.

Sew around the edges with a small running stitch.


Then pull up the thread to form a ball shape. Tip: Although I sewed the whole square and then gathered it for the photographs, it is actually much easier to gather each side as you sew it.

Because of the amount of fabric to be involved, however tightly the gathers are pulled up, there will almost certainly be a hole left in the centre. This can be covered with a circle of felt.

Wrong side of rose

Right side

Fold back the edges of the 'petals', and make a smaller rose to fit inside. I used a different fabric for mine, and 15cm / 6" squares.


The rose on my hat has a fabric-covered compressed paper ball at the centre. For the sample I made on the course I added stamens of twisted copper wire with beads at the ends.


I'm going on a hat blocking course soon; can't wait!

Sunday, 6 September 2015

The University Chapel Project - September 2015 update

The latest meeting of the Chapel Stitchers took place on Friday. Our design for the altar frontal has been approved, so we can start work.

There was some discussion about the designs for the stoles, communion sets and the central cross on the frontal, but we decided that the best plan was to concentrate on the embroidered hands for now, and use these as a basis for the other elements. The background fabric was decided upon and will be ordered, but we already have a selection of donated fabrics for the hand motifs, so we carefully removed the painted hands from the mock-up, sorted them into colours, and began matching them to fabrics.


Jo Morrison from Student Skills Development popped in to tell us about the University’s volunteering process. The hours spent on the group’s previous project, the 175th anniversary quilt, were all logged on the volunteering database, and the plan is to do the same for the Chapel Textiles Project. Staff, students and alumni can all register and log their hours, and the previous meetings which we’ve held can all be included as well. Contact Kath Roberts (kath.roberts@chester.ac.uk) for more information.

There are 13 of us in the group, so the plan is for each person to embroider four hands, which will get us well on our way to the 60 or so we need. The remaining hands will be plain, made in whatever colours and sizes are needed to fill out the design.

Christine has written some instructions for making up the hands; Kath Roberts has copies for anyone who couldn’t get to Friday’s meeting. However not everyone in the group has experience of preparing fabric for embroidery, so here are some quick notes on how I did two of mine.

First of all, draw around your hand template onto the fabric. You can do this with an ordinary pencil, or a silver quilter’s pencil, but please don’t use an ink pen. On dark fabrics you can use chalk, which is what I’ve done here.


If you are worried about the chalk line rubbing off, you can go over it with a small running stitch in a contrasting thread – just remember to remove it from the finished hand!


For this hand I tried pinning the template onto the fabric and stitching round the outline.


I prefer to do embroidery in a hoop, as it stops the fabric from puckering as I work, but this is personal choice. If you do want to use a hoop, but your fabric is too small to fit properly, never fear.


Simply get a piece of scrap fabric (I’ve used calico, but any sturdy fabric will do) and pin your hand fabric onto it, making sure that the shape isn’t distorted. Then hand or machine sew round the edges.


Then, put this into the hoop as normal.


You might also want to do this if your chosen fabric is thin and/or slippery, to give it a bit more body. Conversely, if you don’t want the extra thickness of the backing fabric, you can (very carefully) trim it away.

Wrong side, showing the backing fabric cut away

If your hand template is larger than your hoop, you can always do part of your embroidery and then move the hoop to the other section. If you do this, always take the fabric out of the hoop when you're not working on it. This reduces the chances of the fabric getting marked by the hoop, or the embroidery you have already done getting squashed by the hoop.

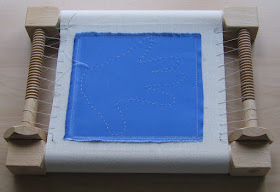
An alternative is to put your embroidery in a tapestry frame, if you have one. Again, you might want to apply your fabric to a larger backing piece. Attach the fabric to the top and bottom of the frame as normal. Then using either double thickness thread, or a thicker thread such as buttonhole, stretch the fabric sideways to keep it taut.

Stitching through the fabric and round the sides of the frame

I’ve been sewing for (loud coughing sound) years now, so there are probably lots of things which I should have included in these notes, but simply didn’t think about. If there’s anything at all that’s not clear, either add a comment below or drop me a line at black.tulip@btinternet.com, and I’ll do my best to help.

Don’t forget to save all your fabric scraps (or carbage, for those who like obscure sewing terminology), as they can be used in the stoles and communion sets, to tie all the pieces together.

The next meeting is on Friday 6 November, usual time and usual room. Until then, happy stitching!