Pages

Sunday, 29 December 2013

2013 - a review

I'd really hoped to be posting about my completed 1930s green dress tonight, but it's proving to be contrary to the end, and still isn't finished. Looking back on the year, it didn't feel as though I'd really got a lot done, but when I actually looked in my wardrobe, I was pleasantly surprised.

Dance-wise, there were two new dresses, and an alteration for a friend.

I made my 1920s dance dress


and my blue and gold devoré dress


and gave one of L's dresses a new lease of life by replacing the skirt.


Of my other sewing, the sewing bag I made to take to classes was a definite success


the feed sack dress rather less so!


The biggest spur to my 2013 sewing however was of course the wonderful Historical Sew Fortnightly.

It encouraged me to get a few things of my UFO pile, such as the embroidered-but-not-made-up Bedouin bag for the Accessorize challenge


the purple satin corset from hell (and if I ever mention using satin in a corset again, someone please remind me about this particular project!) for the Lace and Lacing challenge


and of course Mr Tulip's djellaba for the Generosity and Gratitude challenge.


I've always been interested in historical clothing (over Christmas we watched a programme about Ladybird Books, and it struck me that The Story of Clothes and Costume has a lot to answer for), but until this year I had never tried making anything other than modern clothing. The Historical Sew Fortnightly finally prompted me to have a go.

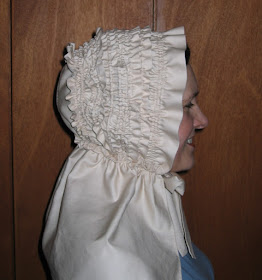
I started simply with my Glastonbury sunbonnet for the Peasants and Pioneers challenge


made a traditional Tunisian costume for Squares, Rectangles and Triangles


made my first attempt at drafting a historical (well, 1930s) item from scratch and used up some stash fabric (double win!) to make this dress for Eastern Influence


made a late teens blouse (possibly technically a UFO, as I had made the lace for the trimming years ago) for Separates


and last but not least, my favourite project of the year, made a 1930s bag for the Wood, Metal, Bone challenge.


However more than any of the things I made, I think that the real achievements of the year are:
1) getting a whole lot better at hand sewing, and
2) after (cough) years of sewing, finally learning to sew with a thimble!


So what might 2014 bring? Well, I may have finished three UFOs this year, but I'm taking two into 2014, so that's not really progress. Despite my best efforts, Vogue 8686 is not going to be finished before Hogmanay. Meanwhile, I think the target for my beaded 1920s dress should be 'before Hogmanay 2014'.

I've got a whole raft of contemporary fabric and patterns which I want to make up; some of the patterns and the fabric even go together. And while I hate to say it, 2014 may be the year when I finally give in to the strange lure of the Style'n'Fit kit!

The Historical Sew Fortnightly is carrying on for 2014, and is already generating a totally unrealistic want-to-make list. I've loved seeing what other Challengers have made this year, and it has given me so many ideas. The Dreamstress, Jen of Festive Attire and Lauren of Wearing History have all made lovely 1930s outfits, and as I don't have any reason to wear 'proper' historical clothing, following their example and making clothes I can wear for everyday is very tempting. Plus, the cut-off date for the Historical Sew Fortnightly has been extended from 1939 to 1945, and I've got a couple of 1940s patterns in mind....

Then again, despite having absolutely no use for it, having a go at a complete, purely historical outfit is very appealing. I am a dress-lover at heart, and I've been inspired by so many stunning examples in the Historical Sew Fortnightly; the beautiful Sailor Suit made by Gina of Beauty From Ashes, the 1897 Tea Gown by Lauren of American Duchess and the Tissot-inspired Early 1870s Day Dress by Natalie of Frolicking Frocks, to name but a few.

One thing's for certain; I won't be short of things to do in 2014!

Sunday, 22 December 2013

Vintage sewing techniques

The Dreamstress has recently posted a piece on her blog about her entry for the last challenge of the Historical Sew Fortnightly 2013; Celebrate. She has made 1930s dress, which is just adorable. You can read all about it here.

She mentioned in her post that although the pattern is a reproduction of a vintage pattern, the instructions use modern construction techniques; namely a zip, and ordinary (non-lapped) seams.

This got me thinking. Until recently, I’d never even come across lapped seams, and the idea of using press studs/snaps rather than a zip to fasten a dress would never have occurred to me.

Lapped seams were common in the 1930s. The complex shaping of some of the clothes, like the jacket in this Vintage Vogue pattern, meant that normal, right-sides-together seams would be incredibly tricky to do.

1935 fashions

This illustration in “The Art of Needlework” shows how a lapped seam is created.

Constructing a lapped seam

All of the Vintage Vogue patterns in my collection include vintage techniques in the instructions. Some, like Vogue 2787 from 1948, give a choice of vintage or modern methods for fastening. However no alternative is offered for the lapped seams which are used in this and in Vogue 8686 from 1933.

The use of lapped seams continued into the 1950s. Vogue 8851 from 1952 uses them on the bodice.


This 1950s Maudella pattern, although short on instructions (like most Maudella patterns I own), does say to turn under the shaped edge of the bodice panel front and stitch it over the side front bodice. With all of those right angles, it would be a nightmare to do otherwise.

Lovely use of on-grain and bias cutting

As well as the seams and fastens, Vogue 8686 includes instructions for top-stitching the belt which exactly match an illustration in my 1930s “Weldons Encyclopaedia of Needlework”.

Belt illustration centre left

Given that the instructions on early C20th patterns tended to be ‘concise’, it’s easy to see that books such as my 1930s sewing manuals filled a need for more detailed information. The pages on side fastens, snap fastens and hooks and eyes in Weldons would all have been useful for the home dressmaker making Vogue 8686 in its original form.

Skirt plackets

Press studs and hooks and eyes

More plackets, and how to support a pleated section of a skirt

“The Art of Needlework” includes six pages of instructions on how to put together a skirt from a pattern, again presumably because a number of dressmakers would have found the pattern instructions themselves insufficient.

Skirt instructions

The skirt in question (Fig 185) and illustrations for pleats

Both books go into some detail on how to make and sew pleats.

Zips were available to the home dressmaker in the 1930s but may well have been a novelty; Weldons does include a short section on how to use them.


However zips, even in 1950s, were far chunkier and less smooth than modern ones. I bought this dress at a vintage fair, and some day I intend to make a pattern from it. Although there is no label in it, parts of it are beautifully finished inside; I wonder if it was made by a professional dressmaker?

I'll make the skirt longer

But the zip! Not only is it a pale beige (although the side placket is so well constructed that it hardly shows), but the metal teeth are so rough that it was a struggle to get the dress onto the dressform to photograph it: it kept snagging on the fuzzy fabric of the form.

The dress also has one of my favourite period features, pleats at elbows. But that is a whole different technique.

Sleeve shaping

Re-Do and One Metre

Whoops! Not one but two Historical Sew Fortnightly challenges have come and gone, and I've not posted about either of them.

First up was Re-Do. This was a chance to pick any previous challenge and re-do it (or do it for the first time). It could be one that you didn’t finish, one that you wish you’d had more time for, or any time for, or one where you loved the theme so much you want to do it again. You can see the results here and here.

The next challenge was One Metre. This one was self-explanatory; make an item that takes one metre or less fabric. The results for this one are here and here.

30 December is the final challenge for the Historical Sew Fortnightly 2013*; Celebrate. Assuming that I can drag myself away from overeating (and reading the new books which Santa may bring for me, fingers crossed), I'm hoping to tick off two challenges for this one. Firstly, finally finish the Green challenge. Secondly, celebrate getting the dratted thing done!

* - 2013 may be nearly over, but there is a Historical Sew Fortnightly 2014 coming hot on its heels. Yay! Having said that I wouldn't take part, I find I'm already wondering if maybe I could squeeze a couple of little, challenge-appropriate, projects into my schedule. Could be a busy year.

Sunday, 15 December 2013

Sewing memories

My 100th post! This seems to call for something more than an update on my current projects.

To me, one of the nicest things about having been sewing for a long time is that along the way I’ve acquired skills and tools which bring back happy memories whenever I use them. In an earlier post I mentioned my friend R teaching me how to do French knots left-handed; whenever I use them now, they always remind me of her. So, this post seemed like a good time to write about some of my sewing tools, and the memories they hold.

First up is this needlebook, which I made in primary school. It’s the earliest piece of my work which I still have. I had made things before this, but over time they were thrown away: this got kept because it was useful.

Old and slightly less old - my needlebook and needlecase

I don’t know if you can still get the fabric which the book is made from, but at the time it was a very popular tool for teaching children how to sew; the long white threads were an aid to cutting in a straight line, and could be used for a variety of embroidery stitches. The book consists of a rectangle of this blue fabric, embroidered with soft cotton thread, and lined with an unknown fabric (now sporting a couple of unknown and irremovable stains). The raw edges of both pieces were turned in, and the rectangles oversewn together, then a rectangle of felt was sewn in down the centre through all three fabrics. After all these natural fabrics, the book was finished off with corded ties made from then very fashionable nylon wool. Nice!

Needlecase outside and inside

Nowadays I usually keep my needles in the turned wooden case beside the needlebook in the picture above. This works fine if it is kept in my workbox, but sometimes the lid can come off. So when I’m away, for example on a sewing course, the needlebook still gets used.

Mystery case

This mock crocodile skin case, complete with two lockable claps on the top, holds a hefty 25 pounds of sewing goodness; my mum’s first sewing machine, Singer model 99. I love the way the wooden case is designed to hold the machine in place. The clip on the right was for the can of oil, and the extension table slots into the lid.

The machine neatly slotted in

The machine dates from the 1950s, and was originally hand cranked. However page two of the instruction booklet is an advertisement for converting your machine to use electricity, and this Mum duly did, with my dad fitting the motor and light.

The instruction booklet, which has indeed been 'carefully preserved'

The advertisement, and the instruction booklet for the motor

The instructions for installing and using the motor even include an illustration of how to store the foot control with the machine; just in case you couldn’t work this out for yourself!

How to store a small foot controller in a large space

I can’t remember how old I was when Mum first taught me to use the machine, but I do remember sitting at the kitchen table with it, and feeling very nervous! In time Mum bought a new Husqvana machine, and the Singer was relegated to a cupboard. Eventually I acquired it, and even though I now have two more modern machines, I still find the Singer best for jobs involving heavy upholstery fabrics or machine quilting. I don’t know if this is true, but someone recently told me that only older machines like this produce a true straight line of stitches; modern machines which sew both straight and zig-zag will always have a slight wave in the stitching.

If only there was some way of attaching a smell to a blog post! I haven’t used the Singer for a while, and as soon as I opened the case to take these photographs, a familiar aroma flooded out. Although I’d been thinking about what I’d made with the machine in the past, I had completely forgotten about its distinctive smell; presumably a mixture of oil, wood and nameless fluff. Just sniffing it took me straight back to the house where I grew up, and watching Mum make dresses for me!

Singer model 99

In the early 1980s I left home and went to study at the University of Liverpool. Unsurprisingly, not that many of my fellow students had any interest in sewing (although I did teach a couple of friends who developed an interest as they saw the various things I made). So, I joined the Merseyside branch of the Embroiderers’ Guild. There I met a lot of lovely, like-minded people and made some good friends. One of these was Mrs W, whose husband had worked as an engineer for what was then Liverpool Corporation. Among other things he had been involved in building a machine to clean the road Mersey Tunnels. Mrs W had a fabulous little beeswax holder which her husband had made for her, and he very kindly made one for me as well.

Beeswax holder

Its shape is similar to that of the machine bobbin next to it, and it consists of two old, one shilling coins joined together with a central spindle. You simply take a small piece of beeswax, soften it between your fingers, and press it against the spindle. Keep doing this until the holder is filled, and to replenish it as the wax is used. To wax your thread, grip the holder by its flat sides, and draw the thread through the wax. I find it is far less wasteful that the cakes and blocks of beeswax which you can buy, as nothing breaks off it.

The beeswax holder came in very handy when I, along with other members of the branch, got involved in a project to restore some of the ecclesiastic embroideries in Liverpool’s Anglican Cathedral. Getting to see and work on these beautiful pieces from the early twentieth century was a joy and a privilege. Almost 30 years later, something as simple as waxing a thread brings back a lot of happy memories from that time.

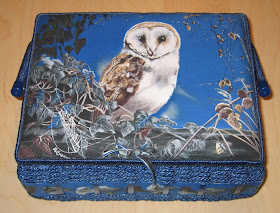
My workbox belonged to my late mother-in-law, who loved owls. When she died, my sister-in-law offered it to me, and using it pretty much every day is a lovely reminder of a lovely lady.


My final sewing tool is actually 50 tools; my sewing weights. These have cropped up in pictures in various posts before now, but never with any explanation. Used instead of pins when cutting out pattern pieces, they really speed up one of the more boring parts of dressmaking. I also find them very handy for holding sheets of tissue paper in place when drafting new pattern pieces from existing patterns.

Drafting a kimono sleeve block from a sleeve and a bodice

You can buy pattern weights, but they can be quite expensive, especially if you need a lot. Mine are simply a pair of large washers from a hardware store (B&Q in my case), inside a small fabric pocket lined with wadding. Something I read online recommended using silk, as this was less likely to damage any delicate fabric they were laid on. Fortunately I had a small remnant of brightly checked silk (I can’t imagine where it came from!) , so that’s what I used.

Pattern weights close up

So, the memories. Whenever I go away, I always take some sewing to do. In 2010 I went on a trip to Morocco with a number of the Ya Raqs girls. We stayed in a riad in Marrakech, and although our days were busy with sightseeing, shopping and of course dancing, we also spent time just relaxing on the roof terrace, enjoying the sun.

The roof terrace

I get twitchy if I sit and do nothing for too long, so this was perfect sewing time. Obviously I didn’t take the weights, but many of the silk pockets were sewn either on the flights there and back, or sitting on the roof terrace. So now, it can be cold, dark and generally dismal outside (like today), but simply cutting out a dress can take me back to enjoying afternoon tea at the Hotel Mamounia, or just sitting in the sun with the girls.

Relaxing by the riad's pool after a hard day's sightseeing

Outside the Mamounia

Sunday, 8 December 2013

Adding a lining

The Historical Sew Fortnightly has introduced me to the blogs of so many talented people and given me a wealth of ideas and inspiration; not just for yet more garments I want to make, but also how to make them. For example, the beautiful finish which The Modern Mantua-Maker always gives to her clothes has prompted me to make more of an effort with finishing off my own dressmaking.

The first thing to benefit from this approach is Vogue 8686, to which I have added a lining. The only green lining fabric I could find was an emerald green which clashed dreadfully with the apple green of the dress. Eventually I found a browny-green crepe fabric which was suitable, if a little heavy.

To make the lining, I cut out all the pattern pieces apart from the facings. The only thing which I changed was the bottom of the sleeve; I cut it slightly shorter, and with a straight edge. Then I made up the bodice in the lining fabric.

There were only two differences from the construction of the dress bodice. Firstly, I used a scant 12mm/½” seam allowance rather than the usual 15mm/⅝”. A lining should be made very slightly larger than the garment, because lining fabric generally has less 'give' in it that the outer fabric. Secondly, I omitted part of the stitching which attaches the lower back piece of the lining to the sleeve/back yoke. This was because the lining would be handled differently at the centre back.

The part of the bodice construction omitted from the lining

Once I’d made up the lining bodice, I turned the dress inside out and then pulled the lining over it, wrong sides together. I pinned the two bodices together the seams and dart ends, then pinned through the lining, neckline facing and dress at the very edge of the facing.

On the dress front, I cut the lining fabric away to about 25mm/1” in from the row of pins, except at the centre front. There I made the edge of the lining into a much shallower V, so that it was easier to work with. I turned the raw edge under by about 12mm/½”, pinned it down, and slip-stitched along the turned edge.

Front neckline completed

The facings at the back of the dress are quite wide, as they have to accommodate the buttons and buttonholes. As with the front, I cut the lining back to about 25mm/1” in from the edge of the facing. Once the sides were in position, I turned under the top edge of the lower back piece, and slip-stitched that in place as well.

Back neckline

I used much the same technique for attaching the lining to the sleeves, except that I made the sleeve linings about 25mm/1” longer than they needed to be, so that the lining comes down over the sewn edge. This is the same technique as is used for jacket sleeve linings, and ensures that you can move your arms easily.

Sleeve, showing the slight overhang of the lining

When slip-stitching the lining down, I had to be very careful that I only sewed it to the facing, and didn’t so much as catch the bodice fabric underneath. I found this out the hard way. Even though the stitches didn’t show on the right side, they pulled the fabric, and were very obvious once the dress was on.

Next I made up the skirt lining, and attached it to the bodice. I now need to decide if I want to sew the lining down to the waistline seam allowance, or if I leave it hanging free, with a stay at the side seams to stop it from twisting round under the dress.

(Please excuse the festive backdrop to these photographs; my sister-in-law and brother-in-law called in at the weekend and dropped off our Christmas presents, I haven't found anywhere to store them yet!)

Back view of the lined dress

I also used two strips of the lining fabric to neaten the edges of the skirt’s side vent with a Hong Kong finish.

The skirt vent

I will use the same technique on the hem, when I get to that stage. Putting the dress on a dressform, I was surprised by how long it is; even though I made my pattern pieces quite a bit shorter than the originals.

Front view. The dressform is the same height as I am, without shoes.

As well as making the inside of the dress look so much neater, the lining makes it much easier to get the dress on and off. So all in all, well worth the extra effort.

Sunday, 1 December 2013

Mr Tulip strikes a pose

I finally persuaded Mr Tulip to let me take a photograph of him in his Moroccan djellaba, and here he is, echoing the photograph of him posing in Abdullah's original, all those years ago.

Mr Tulip, in djellaba and shesh

It's my dance class Christmas party this week, and I'm performing a piece I choreographed some years ago as homework, but have never actually danced for the class. It's also an excuse to wear my Golden Era costume again, so I needed to make sure that it still fits. Then, when I was looking at a YouTube clip of Samia Gamal dancing with Farid el Atrache, I noticed that he was wearing a striped galabeya, and had An Idea. A very silly idea indeed, involving clothing from a completely different country, but one I just had to try out.

So here is. Exhibit A: a still from the film clip. Unfortunately I don't know what the film is called (anyone out there who can read Arabic?). And apologies for the poor picture quality.

Farid el Atrache and Samia Gamal

The film details, taken from YouTube

Exhibit B: Mr Tulip and me, in a very vague approximation of the pose!